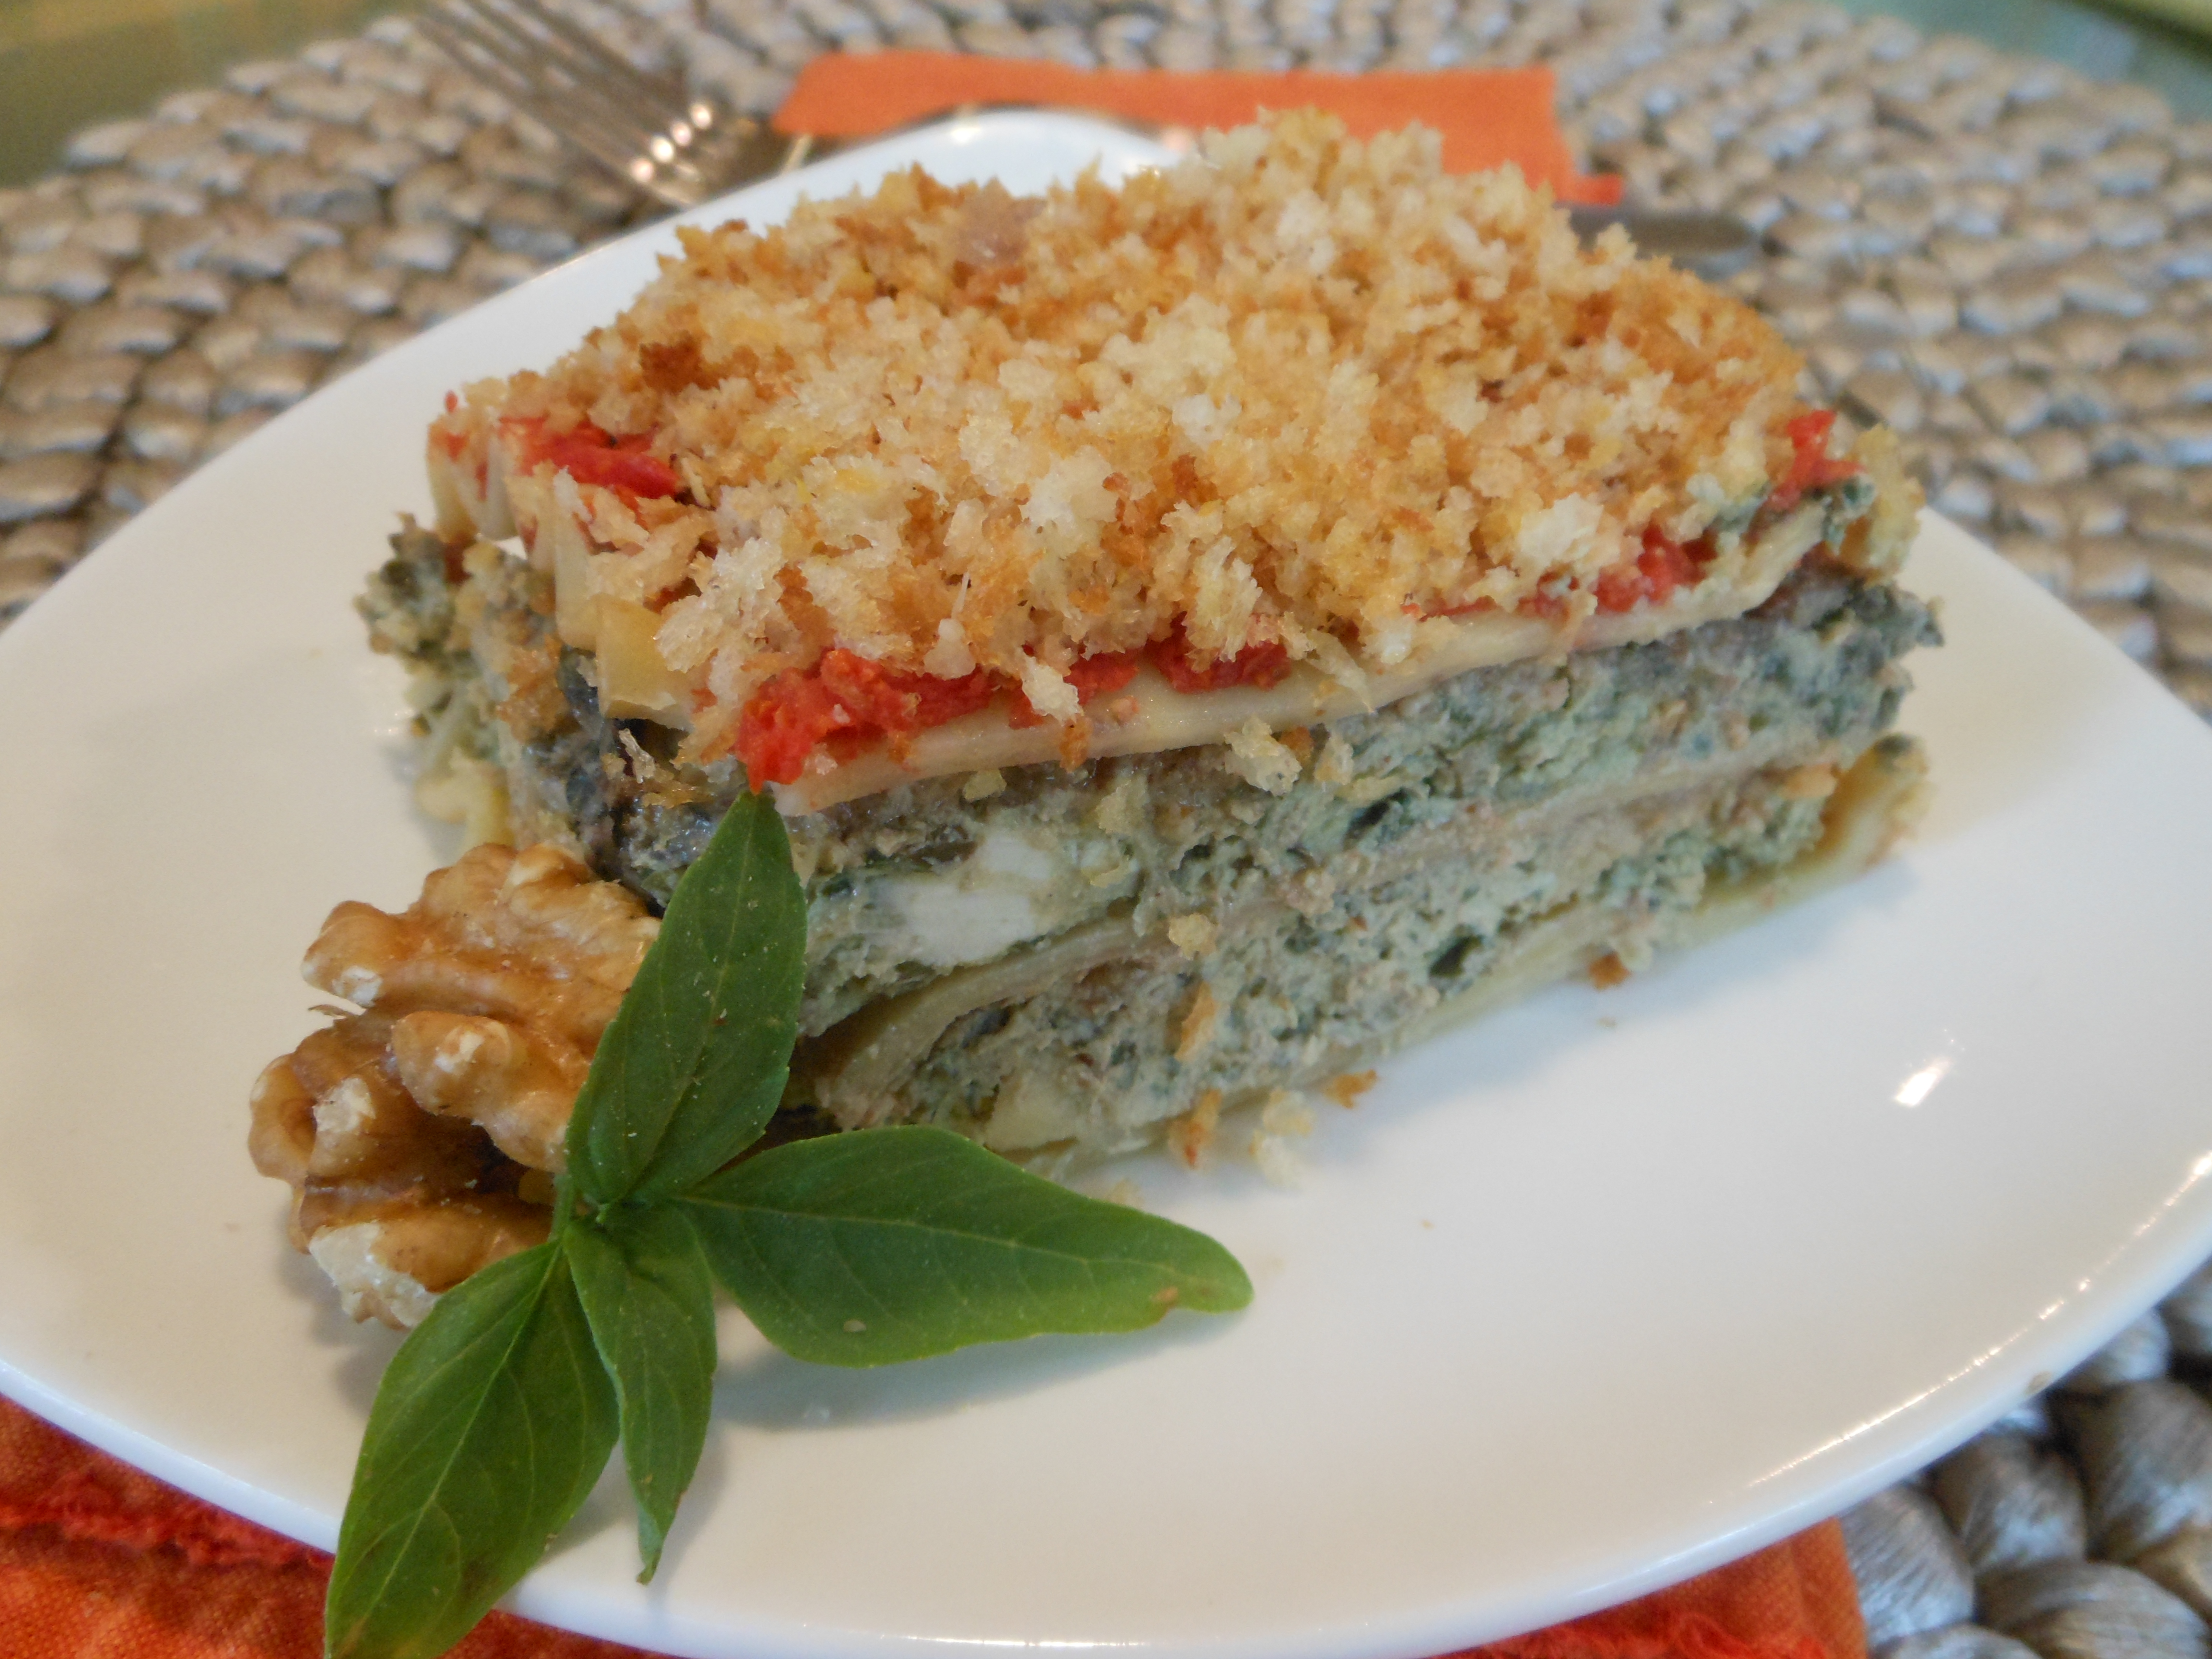
In this lovely summer lasagna–a guest recipe I was asked to create for Tofutti Brands, Inc.–a fluffy and creamy Swiss Chard Filling finds its perfect counterpoints in rich Walnut Pesto; zippy, pleasantly acidic, lightly cooked Fresh Roma Tomato Sauce; and a crunchy topping.
Creamy Swiss Chard Filling (recipe follows)
sea salt
1/4 cup + 2 tablespoons olive oil
6 dried lasagna noodles
1/2 pound (about 3 large) fresh Roma tomatoes, unpeeled, stem end removed, and halved
3 tablespoons loosely packed fresh basil leaves
1 cup walnut pieces
1 large garlic clove, halved
1/2 cup panko bread crumbs
1 tablespoon nutritional yeast
Make Creamy Swiss Chard Filling in food processor, transfer mixture to a medium bowl, set aside, and rinse out bowl of food processor.
Noodles: Fill a large pot (4-quart) 3/4 full with water, add a tablespoon each of sea salt and olive oil, and bring to a gentle boil. Add lasagna noodles, partially cover, and simmer 8 to 10 minutes or untilal dente, lowering heat if necessary. Drain and arrange noodles in a single layer on a baking sheet, covered with a kitchen towel to prevent drying out.
Fresh Roma Tomato Sauce: Place Roma tomatoes in food processor with basil and a pinch of sea salt and process until smooth. Transfer to a medium (2-quart) saucepan and cook over medium-high heat, stirring frequently, until sauce thickens and most of watery moisture has evaporated; lower heat if necessary to prevent scorching and sticking on the bottom. Remove from heat.
Walnut Pesto: Rinse and dry bowl of food processor and add the nuts, garlic clove, and about a 1/2 teaspoon sea salt. Pulse until finely chopped and, then, with motor running, drizzle in 1/4 cup of olive oil to make a thick paste. Set aside.
Topping: Heat 1 tablespoon of olive oil in a large cast iron skillet, add bread crumbs and toast, stirring occasionally, until crumbs begin to turn golden brown, lowering heat if necessary. Add nutritional yeast and continue toasting and stirring for another minute or until crumbs are golden and yeast is fragrant. Remove from heat.
Assembly: Preheat oven to 350 degrees. Oil the bottom and sides of two 5 x 9″ metal or ceramic loaf pans. Trim all of the lasagna noodles to fit the length of the pans and then cut the trimmings in half. Line each of the pans with 2 overlapped lasagna noodles, spread each with 1/4 of the Creamy Swiss Chard Filling, and cover the surface of each with small dollops of 1/4 of the walnut pesto. Top each with a single lasagna noodle and 1/2 of the noodle trimmings tucked along the sides if desired (or you may discard these). Repeat layers, ending with a final single lasagna noodle. Spoon half of the Fresh Roma Tomato Sauce over each, sprinkle with half of the bread crumbs, and bake, uncovered, for 30 minutes. Allow to cool for 10-15 minutes, slice with a sharp serrated knife, and serve.
Note: if you are watching your calories, this lasagna is equally as successful and delicious without the last lasagna noodle layer Simply spoon the tomato sauce over the second and final Walnut Pesto layer, top with crumbs, and bake as directed. In this case, you will need only 6 lasagna noodles.
Creamy Swiss Chard Filling:
1/2 pound stemmed Swiss chard leaves
14 ounces extra firm tofu, drained
8 ounces Tofutti Better than Cream Cheese
Juice and zest of 1/2 large lemon
2 large cloves garlic
2 tablespoons nutritional yeast
1 tablespoon fresh rosemary leaves
1/2 teaspoon Bragg Liquid Aminos
1/2 teaspoon sea salt
1/8 teaspoon turbinado sugar (or any granulated sugar)
1/8 teaspoon freshly ground black pepper to taste
Finely chop Swiss chard in the bowl of a food processor. Transfer chard to a medium bowl, set aside, and rinse out bowl of food processor. Place all remaining ingredients in the food processor bowl and process until smooth, scraping down sides as necessary. Transfer to bowl with Swiss Chard and fold together until completely combined.
This recipe is based on one of Ina Garten’s, the Barefoot Contessa, as seen on the Food Network. My main changes are the addition of fresh minced mild chili pepper, which is optional, and garlic.
I had seen the introduction to one of her shows recently, where she mentioned these potatoes, but I didn’t watch it. So, when our farmer’s market had beautiful new potatoes that they call “creamers” this week, I bagged some planning to make the recipe, as I knew I could find it online. And I did.
But I didn’t write it down; I just created it from memory, adding a couple of ingredients. They are just delicious and quite beautiful…something about those mustard seeds.
3/4 pound golf ball size new potatoes (quartered; halved if potatoes are smaller)
1 medium onion, halved, and sliced into 1/4-inch thick slices
1/4 cup olive oil
2-3 tablespoons stone ground mustard
1/2 teaspoon sea salt
1/4 teaspoon freshly ground black pepper
Optional: 2 teaspoons finely diced mild red chili pepper, seeds and membranes removed
1 large clove garlic, minced
Preheat oven to 425 degrees. Oil a large roasting pan and place potatoes and onions in a single layer in the pan. In a small cup, whisk together olive oil, stone ground mustard, sea salt, and pepper. Drizzle over potatoes and onions, and toss well to completely coat; I like to use my hands for this task. Roast for 30 minutes, stirring every 10 minutes. Sprinkle chili and garlic over potatoes, stir to distribute, and roast 20 more minutes, stirring after 10, or until potatoes are very crispy and brown and some of the onions are charred. Serve immediately.
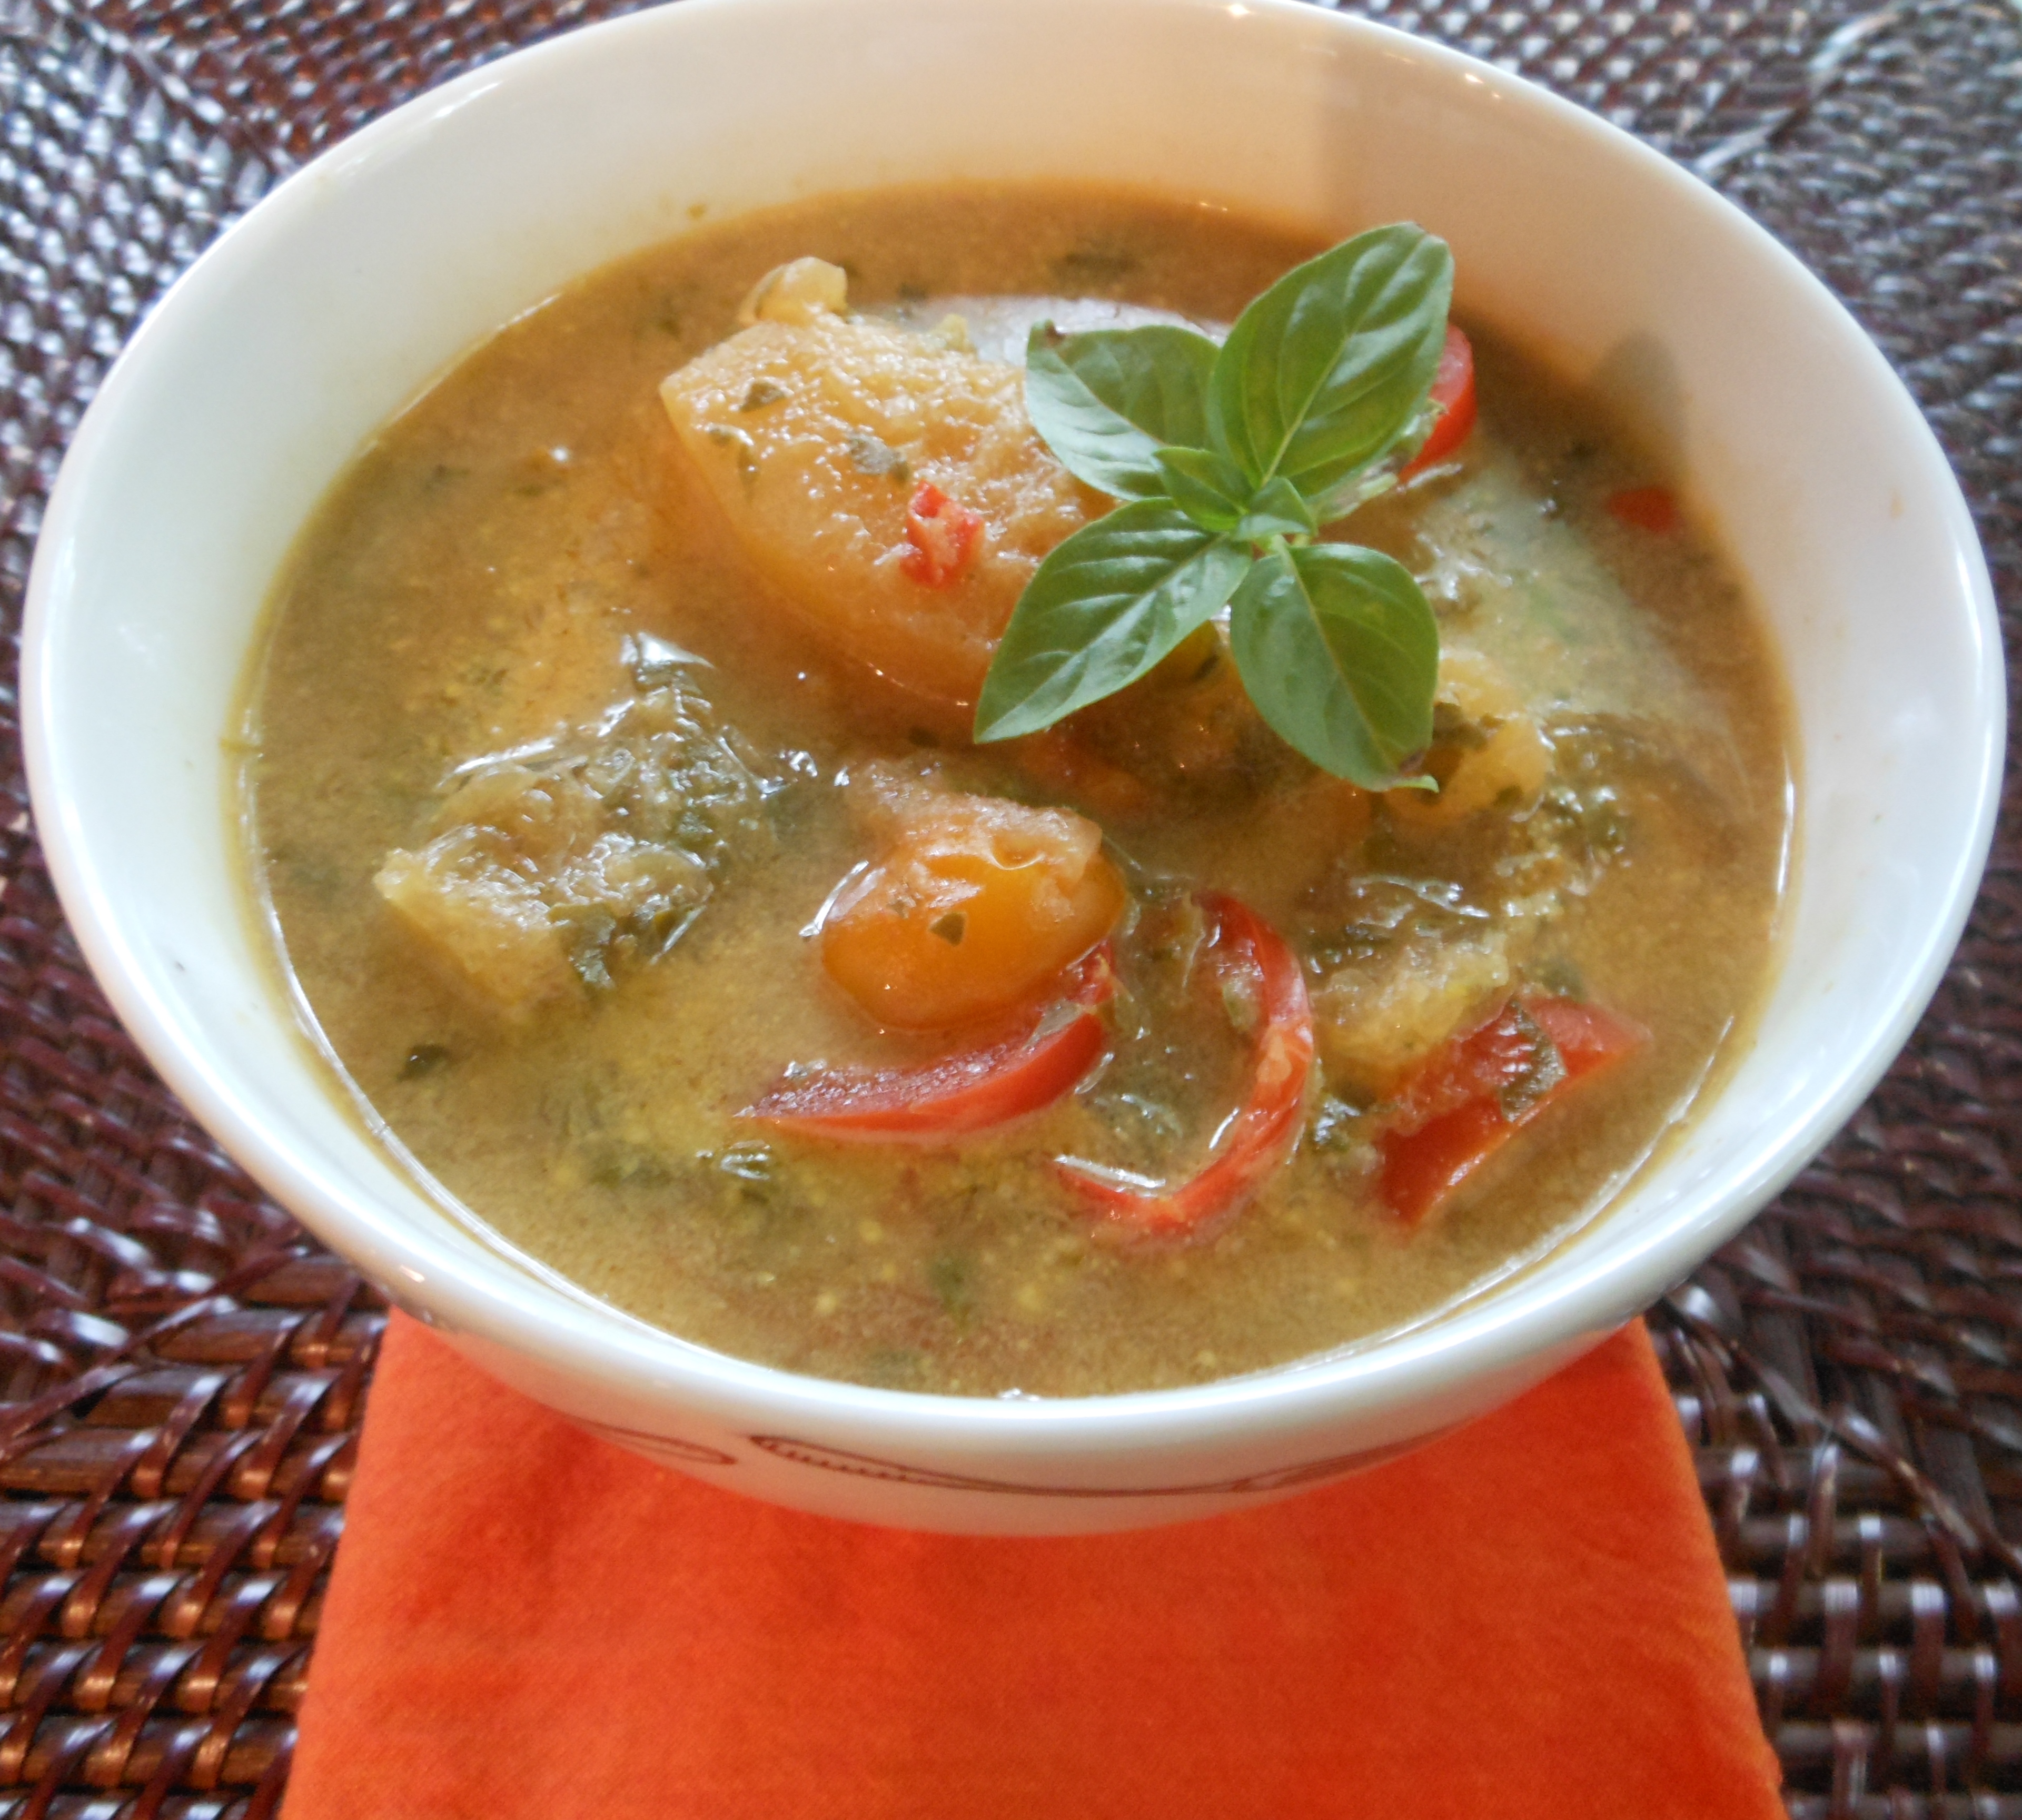
This soup is as delicious as it is nutritious and lovely. Thicker than most Thai restaurant soups (due to the starch in the squash), it is very filling, yet still light.
It was inspired by my love of all things Thai, but also by an over-zealous trip to the farmer’s market this week considering I am leaving town on Sunday. In a little bit of a panic about not wasting food, I created this soup brimming over with vegetables like red bell pepper, fresh chili pepper, pattypan squash, grape tomatoes and Swiss Chard.
I had purchased 2 bunches of the chard–what was I thinking–so I created a really tasty Swissh Chard and Pumpkin Seed Pesto out of the remainder, which will freeze nicely.
I used the vegetables I had on hand, but feel free to substitute other veggies, keeping flavor, texture and color contrast in mind. In addition to the onion and bell pepper, you will want about 4 cups of vegetables. Precokl firmer vegetables like squash and carrots, and simply heat softer ones like tomatoes and mushrooms.
2 tablespoons olive oil
1 medium onion, thinly sliced
1 large red bell pepper, stemmed and seeded, thinly sliced
1 1-inch piece of fresh ginger, peeled and very thinly sliced
1 large cloves garlic, minced
2 teaspoons minced red or green mild chili pepper
Sea salt to taste
Freshly ground black pepper to taste
1-15 ounce can coconut milk or lite coconut milk
2 cups water
2 regular or 1 large vegetable bouillon cube (enough for 2 cups of water)
1 tablespoon soy sauce
2 pounds pattypan squash (unpeeled and unseeded weight), baked, roasted or grilled until tender, peeled, and cut into wedges [you may substitute eggplant, zucchini and/or yellow squash]; approximately 2 cups cooked chunks
1 cup (approximately) red or gold grape tomatoes, halved
1 cup finely chopped Swiss chard (I use a food processor for this task)
1/3 cup fresh cilantro leaves and tender stems, rough chopped
Zest of 1 large lime
1/4 cup basil leaves, preferably Thai basil
4 teaspoons vegan fish sauce (sold a “vegetarian” in Asian markets) or rice wine vinegar
Garnish: 1/4 cup chopped roasted and lightly salted cashews and peanuts and sprigs of basil or cilantro
In a large (4-quart) saucepan, heat olive oil over medium-high. Add onion, bell pepper, ginger, garlic, chili pepper, and a pinch of sea salt, and freshly ground black pepper, and sauté, stirring frequently, until softened, about 5 minutes. Add coconut milk, water, bouillon cube, and soy sauce, and heat until barely simmering. Add squash, tomatoes, and Swiss chard, and return to a gently simmer. Avoid boiling. Stir in cilantro, lime zest, and basil leaves and heat through. Serve in large bowls with 1 teaspoon of vegan fish sauce or rice wine vinegar stirred into each. Garnish with chopped nuts and a sprig of basil or cilantro.
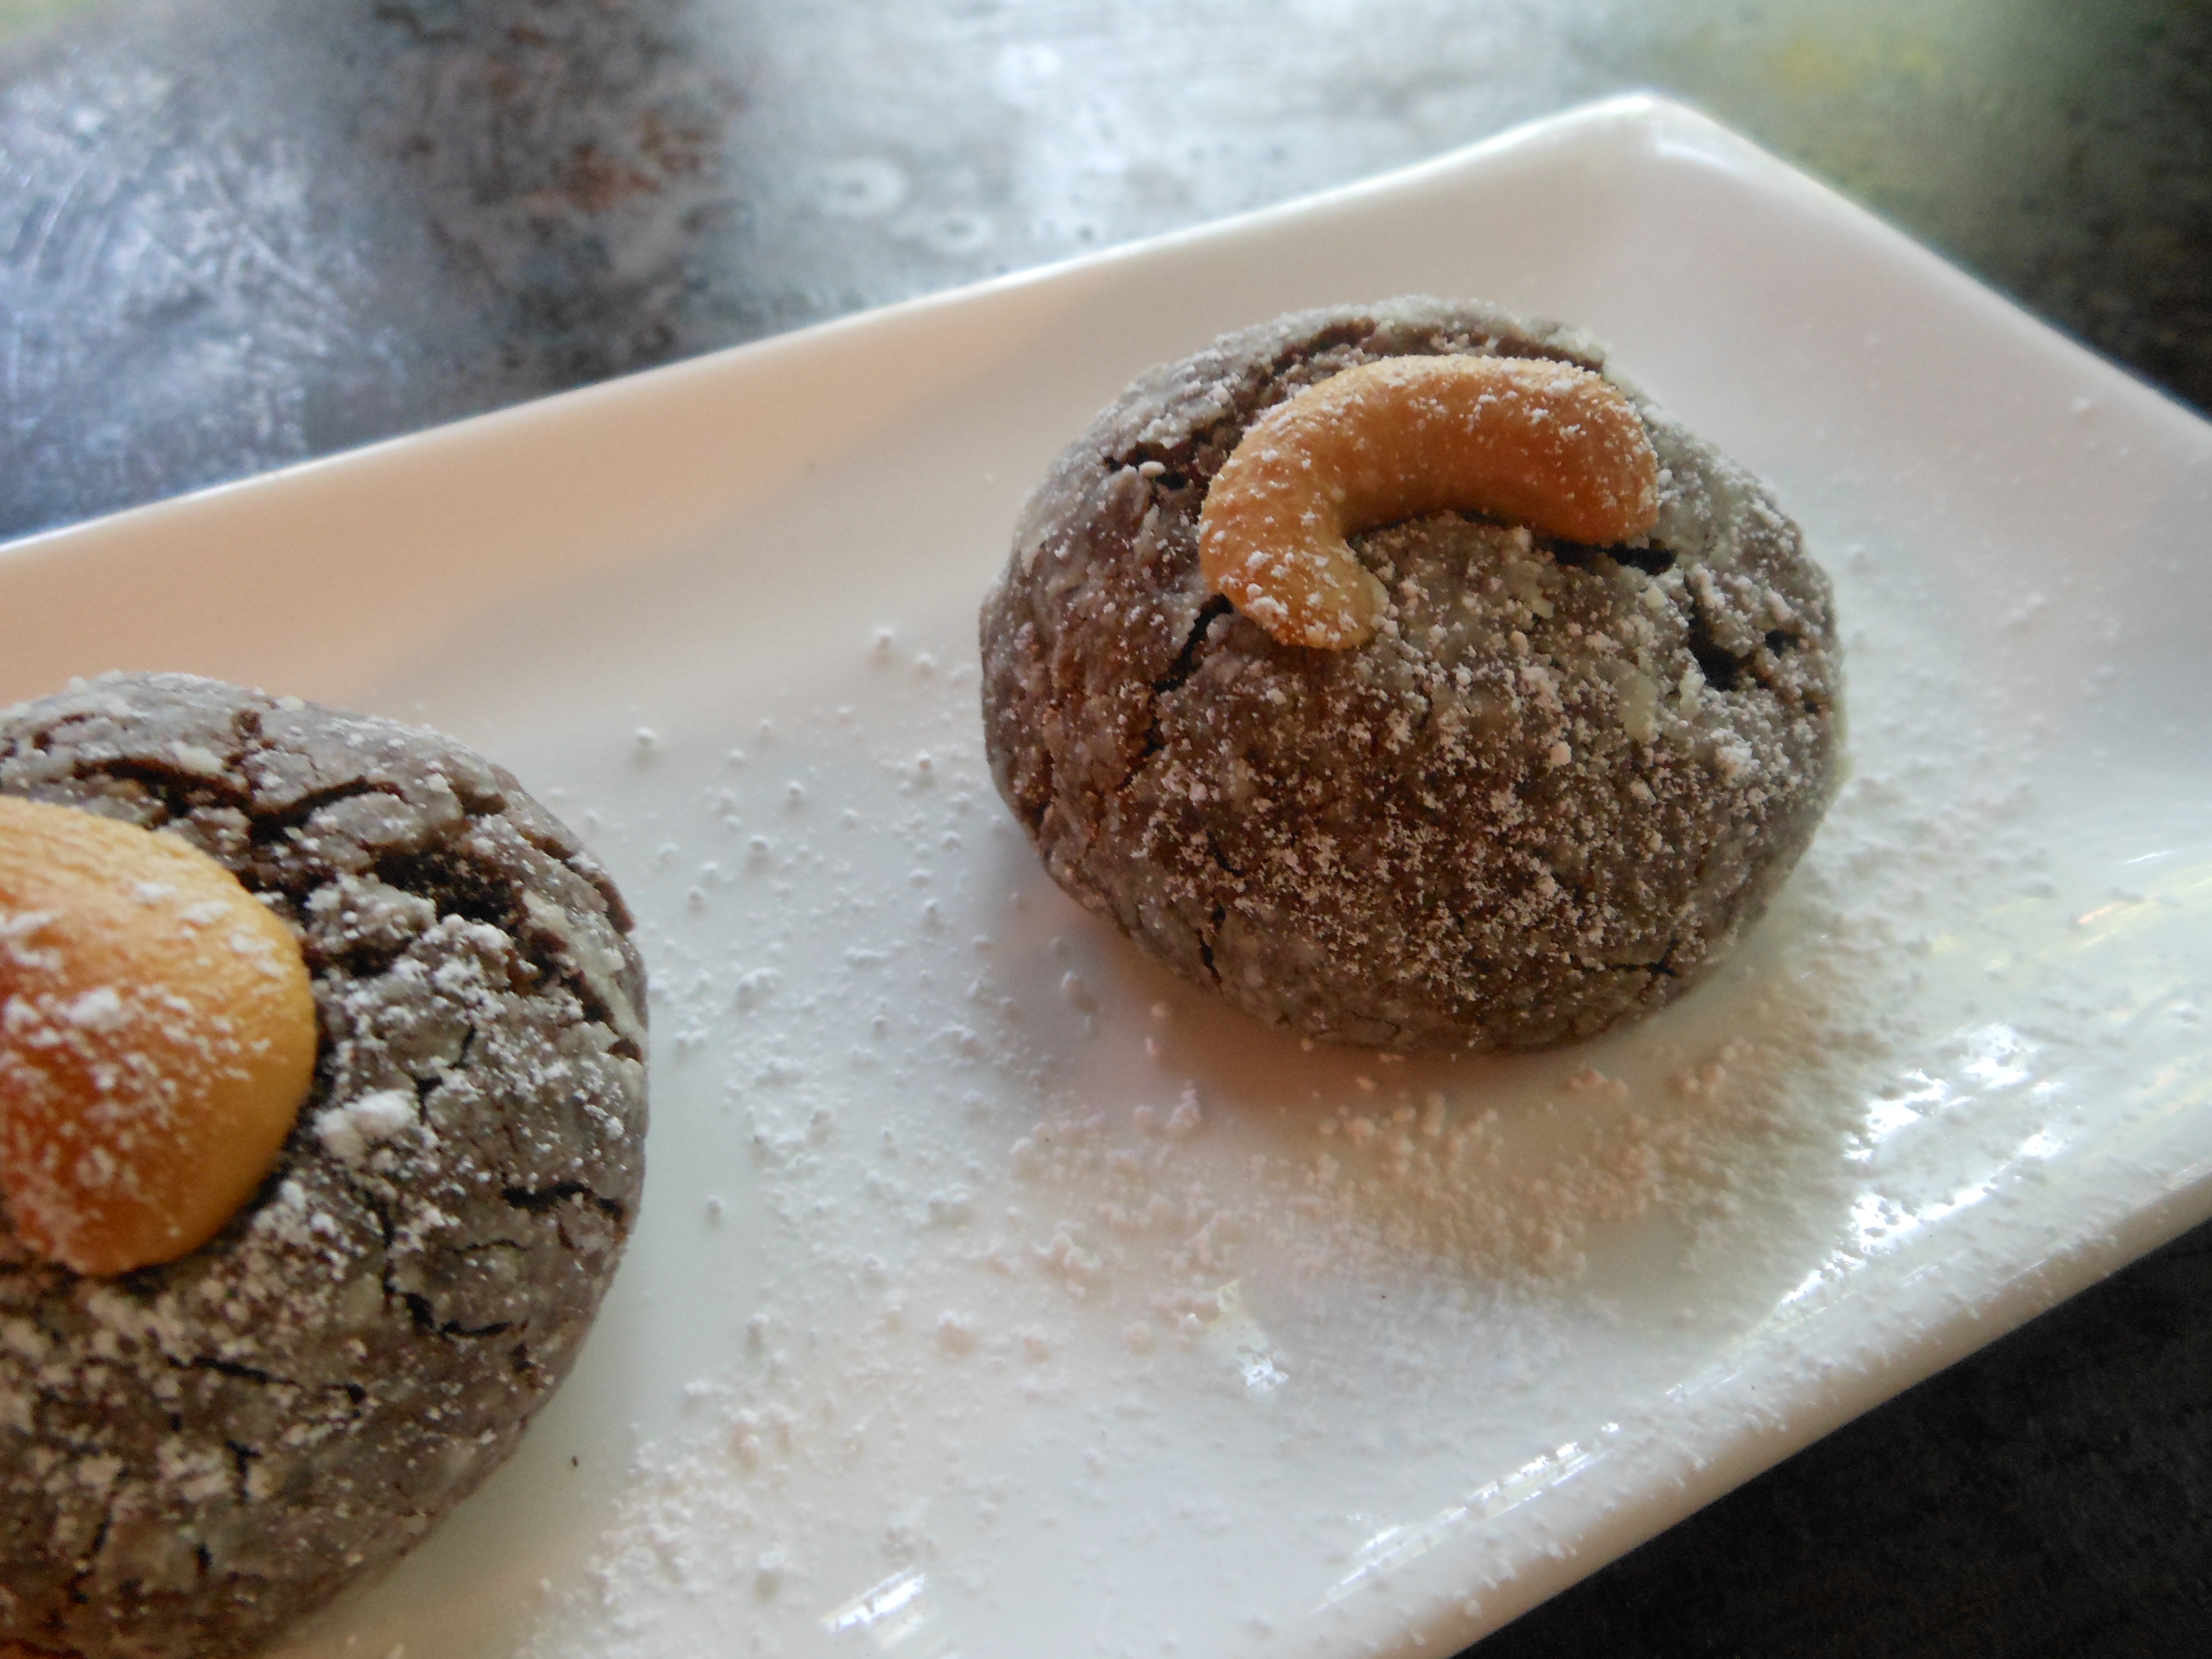
The only thing better than a moist chocolate cookie is one with a hint of cherry flavor, a juicy maraschino cherry tucked inside, and a buttery cashew on top.
Quite deceiving in appearance, the exterior of these cookies keeps a secret of the bright red maraschino cherry surprise hidden within.
Simple to prepare but quite fancy in appearance, these cookies are equally at home in school lunch boxes or on cocktail party trays.
Sunday night, I served them to our dear friends and houseguests, Juliane and Marc Curvin. Health conscious, like me, we eacg enjoyed one cookie perched in a stainless steel Chinese spoon, all lined up on a long and narrow contemporary white rectangular plate. Neither they nor my husband are vegans or even vegetarians, but all thought these treats were the perfect 1- or 2-bite sweet ending.
8 ounces vegan chocolate chips, melted
1/2 cup vegan butter
1 cup turbinado sugar (or any granulated sugar)
1 teaspoon vanilla
2 tablespoons maraschino cherry juice
1/4 cup cherry liqueur (or substitute 1/4 cup maraschino cherry juice)
2 tablespoons non-dairy creamer or non-dairy milk
2 cups white whole wheat flour (or unbleached all-purpose)
Pinch sea salt
24 maraschino cherries, drained
approximately 1/2 cup confectioner’s sugar
24 lightly salted and roasted cashew halves
Preheat oven to 375 degrees. Line a baking sheet with Silpat. In a medium bowl, melt chocolate in microwave or over simmering water. Remove from heat and stir in butter until it melts. Add sugar, vanilla, cherry juice, cherry liqueur, and non-dairy creamer and whisk to combine. Whisk in half of flour and then incorporate remaining flour using a fork. Dough will be somewhat stiff. Using a small scoop, form a ball of dough. Using your thumb, create a depression in the center and place a maraschino cherry inside. Press dough around it to completely encase and gently reashape into a ball. Roll in powdered sugar and place on prepared baking sheet. Place a cashew half on the top pressing down ever so slightly to adhere. Repeat with remaining dough, cherries, confectioner’s sugar, and cashew halves, placing balls about 2 inches apart. Bake 12 minutes. Let cool slightly on baking sheet and then remove to a wire rack to cool completely. Dust with additional confectioner’s sugar before serving.
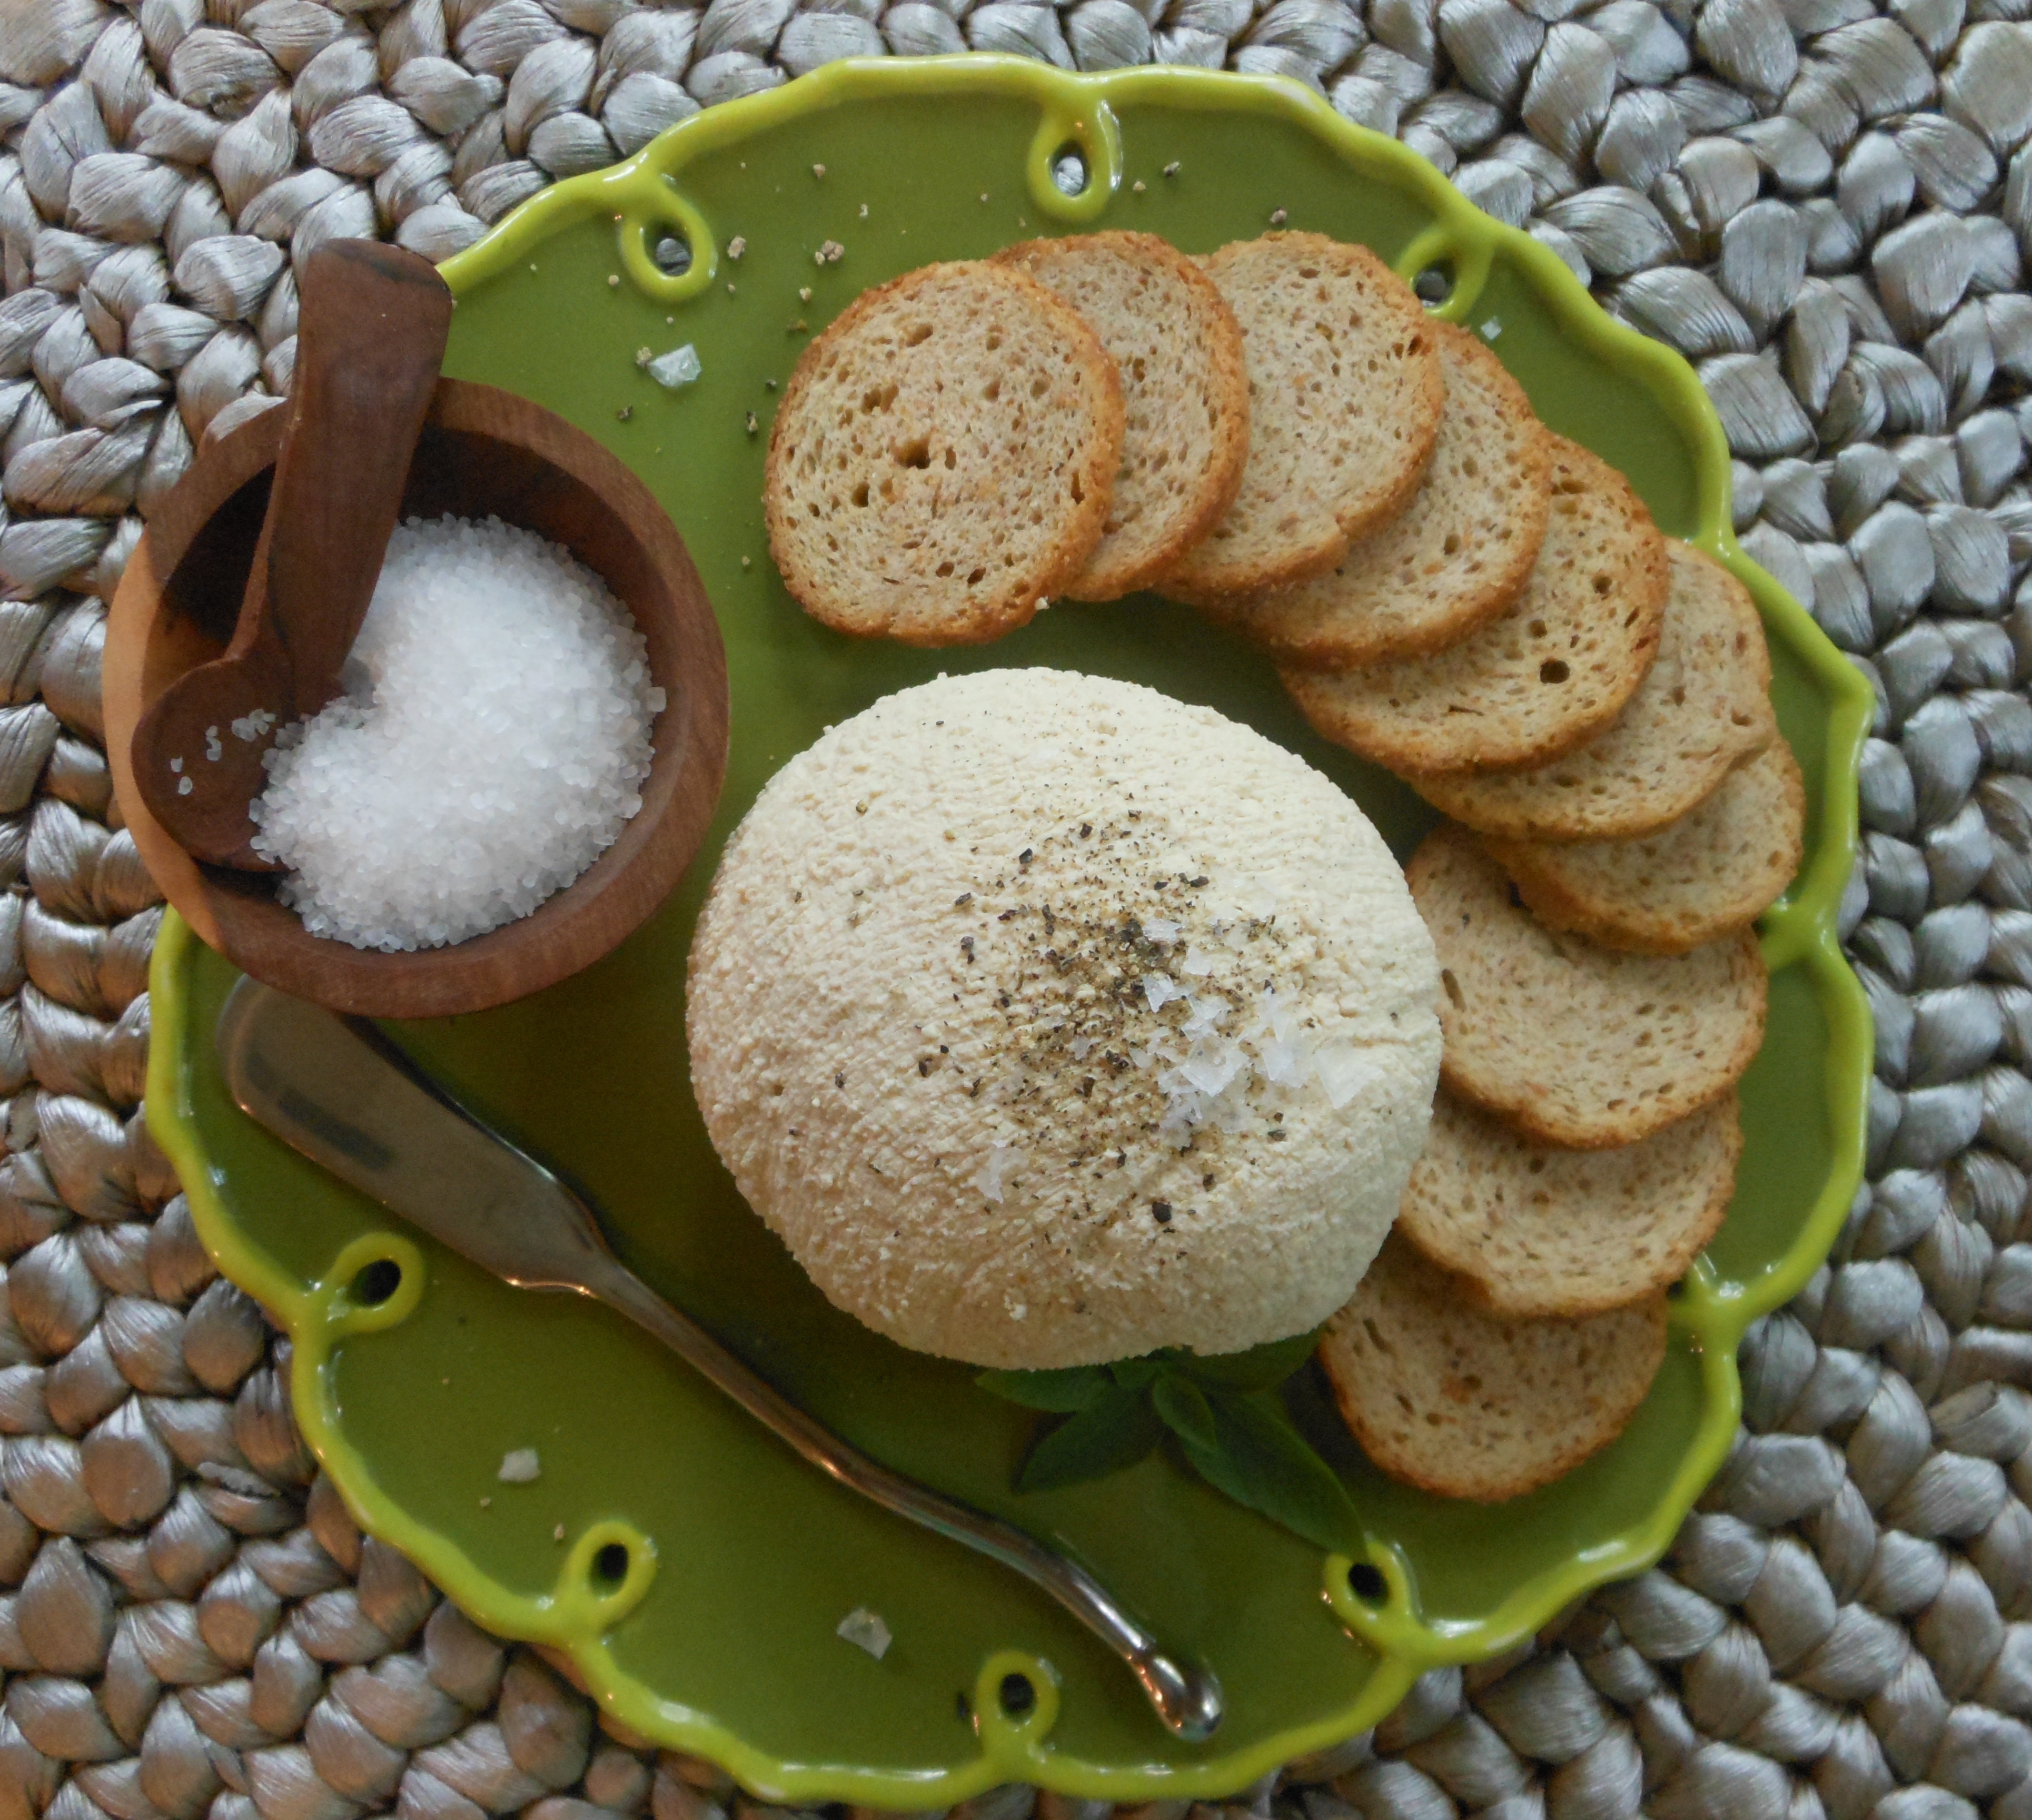
About a year ago, I purchased Artisan Vegan Cheese by Miyoko Schinner. Last week, I invited one of my vegetarian foodie friends, Trish Pfeifer, over to try out a couple of recipes…with disappointing results…except for our own Homemade Vegan Ricotta (pictured at right)!
I love the cheeses that I have created both for my blog (search “cheese”) and The Blooming Platter Cookbook, but I was intrigued by the promise of Schinner’s meltable and sliceable cheeses, as I am not a big fan of market varieities, even Daiya. Her photos make the cheese look like the real deal.
My Search for Rejuvelac
Many of the cheeses I was interested in called for “rejuvelac,” a liquid made from sprouted grains. I am busy, like everyone I know, so I knew that the number of times the grains must be rinsed, the water changed, etc., not to mention the days necessary for the grain to sprout, were deal-killers for me. So I thought I would purchase it but, alas, not so much. No one in our area carries it, but I found it online from Herbspro.com. It arrived sometime the week of July 7 while I was away–after ordering it on June 26–and it arrived wrapped in bubble wrap in a brown paper box though it was clearly marked “Perishable–Keep Refrigerated.” Oh, and the shipping for 2 bottles, which together cost $9 and change, was $20! I had decided to splurge for the sake of research.
I emailed the company to ask if the product only needed to be refrigerated after opening. They responded promptly that they “weren’t trained on the products” and provided the manufacturer’s contact information, also in CA. I called and was told that absolutely the product must be refrigerated every moment of its life and that I should throw it out and contact Herbspro for a refund. Easier said than done. I called and had to give my phone number to the person who answered who sent an email to shipping who would be in touch, though they weren’t there at that time (and it was mid-morning even in CA). I told him, after our brief conversation, that I had absolutely no confidence that anyone would call me back, though he assured me. And, guess what? No one did.
So I called back about 4 p.m. PST and got the same man to whom I explained why I was calling. He transferred me to “shipping,” where the phone rang interminably until I hung up. I called back for a third time and this time the phone was answered by a woman who knew exactly what was going on with the product–she knew it should have been shipped in a cold pack–and issued a refund. However, as I explained, they need to ship it with a signature required because I was out of town for a week and, even if it had been shipped cold, it wouldn’t have been when I returned home to open it.
Plan B
Without any Rejuvelac, I was forced to choose cheeses that didn’t call for it, which limited our options significantly. One also can’t purchase unsweetened plain vegan yogurt here and choosing recipes that didn’t call for it would have, again, limited our options down to almost nothing. The amounts of yogurt called for were small, though, so I bought some plain sweetened yogurt and hoped for the best with Schinner’s Cashew Cream Cheese. I also selected Farmer’s Cheese (really, a ricotta), which only called for soymilk, vinegar and salt. THe latter also involved actual dairy cheese-making methods, which I wanted to try.
Schinners Farmer’s Cheese/Ricotta–A Dud! (my SUCCESSFUL recipe follows at the bottom)
Our first attempt at Schinner’s”Farmer’s Cheese” was a complete flop. We added the vinegar to 200 degree soymilk exactly as instructed and watched as beautiful curds formed and then watched as they just as quickly melted, leaving us with nothing but a pot of warm milk. The problem with this recipe is incomplete instructions. She never says to remove the pot from the heat after the vinegar is added. She just says to add the vinegar and that curds will continue to form over the next 10 minutes. Ten minutes, we assumed, of cooking, since NOWHERE did she say to remove the pot from the burner, nor to turn it off.
I decided to look up homemade dairy ricotta recipes online and both that I consulted said to remove the pot from the heat as soon as the vinegar is added. That worked beautifull and we were thrilled with our results. But, Schinner’s yield says 2 cups and ours was 1. Because both online dairy recipes called for dairy milk and cream, we thought we should perhaps compensate for the lack of cream in some way. So the third time we made it, we reduced the milk by 25% to 6 cups, but kept the amount of vinegar the same at 1/4 cup. We saved milk and got the same beautiful results–a yield of 1 cup–with no vinegary taste. The only other change was not to let the curds form over the course of 10 minutes before pouring the mixture through a cheesecloth-lined strainer, but 1, as one of the online dairy recipes instructed.
Schinner’s Cashew Cream Cheese–A Disgusting Dud!
“What could go wrong?,” we thought. Afterall, I have made plenty of nut cheeses. But what I haven’t done is make them with live yogurt cultures AND leave them to cure, ripen, or whatever at room temperature as instructed in the book. The cheese was tasty–albeit not very similar to cream cheese–as soon as we took it out of the food processor. But as it sat for the recommended amout of time, it started becoming a bit foamy–not the consistency of cream cheese at all–and tasting spoiled. Schinner notes that the longer the cheese is left out, the “tangier” or “sharper” it becomes. It was not tangy or even sharp to our palate–as a vegetarian, I loved stinky cheese and Trish still does–rather it began to taste fishy and spoiled.
Because we wanted a firmer product, we weighted ours in a cheesecloth-lined colander and, as instructed, left them out for even more hours, at our respective homes. The results were completely inedible, as in gag-reflex inedible. I even tried salvaging mine with sea salt, pepper and olive oil. But, no good. Plus, I’m not sure if they would have made us sick if we had been able to choke them down. Honestly, they were disgusting and we both, independently, threw them out in our outdoor waste bins.
My Recommendation
It appears that we are not the only ones who met with some disappointing results when usuing this book. Though the 4- and 5-star reviews far outweigh the 1-stars, I read some of the latter who share my concerns. My advice would be to 1) make MY version of Vegan Ricotta, and 2) if you are still tempted to purchase the book, read a few reviews, and then do so fully informed. *Evidently, a lot of people are achieving fine results with the recipes in the book. However, this ain’t my first culinary rodeo, I can follow a recipe with the best of ’em, and still didn’t achieve edible cheese. I gave the book to Trish to give to her niece who lives near DC, can hopefully obtain rejuvelac there and, perhaps, have better luck with the rejuvelac-based recipes. I am left believing that there must be something about working with live cultures and probiotics that is far more variable than the level for which this book takes into account.
*Another vegan cookbook author friend reports that the Meltable Mozza from the book is nice. One of the reviews on Amazon, however, reports that it didn’t work. Buyer beware.
The Blooming Platter’s Homemade Vegan Ricotta Cheese
6 cups unsweetened soymilk
1 teaspoon sea salt
1/4 cup apple cider vinegar
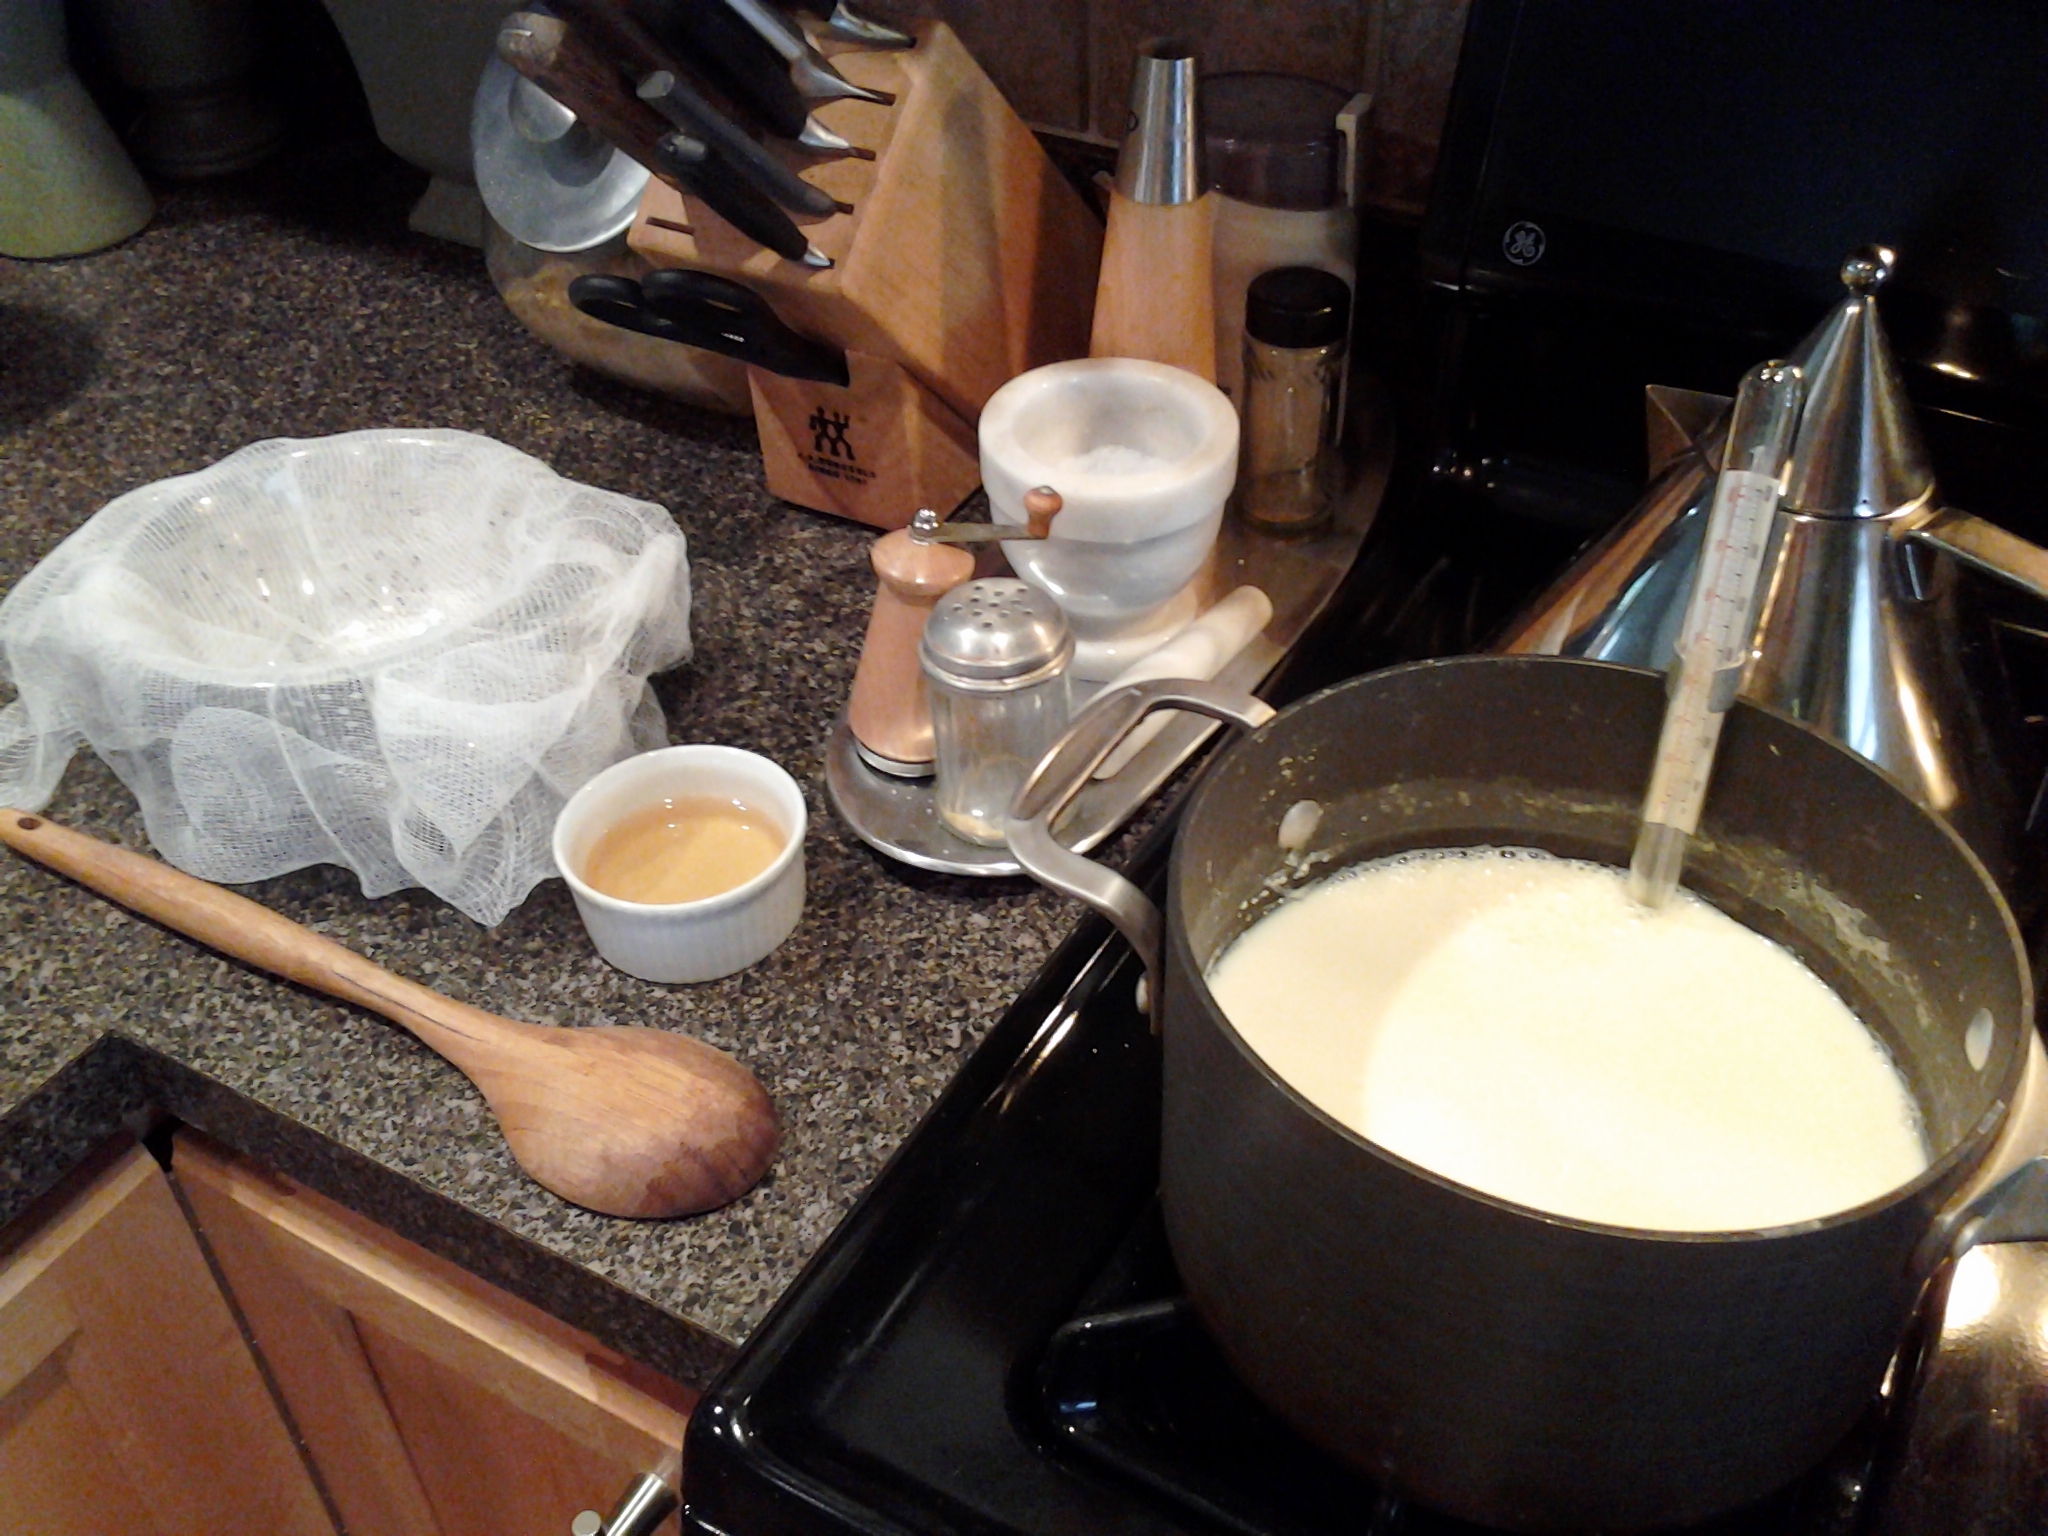
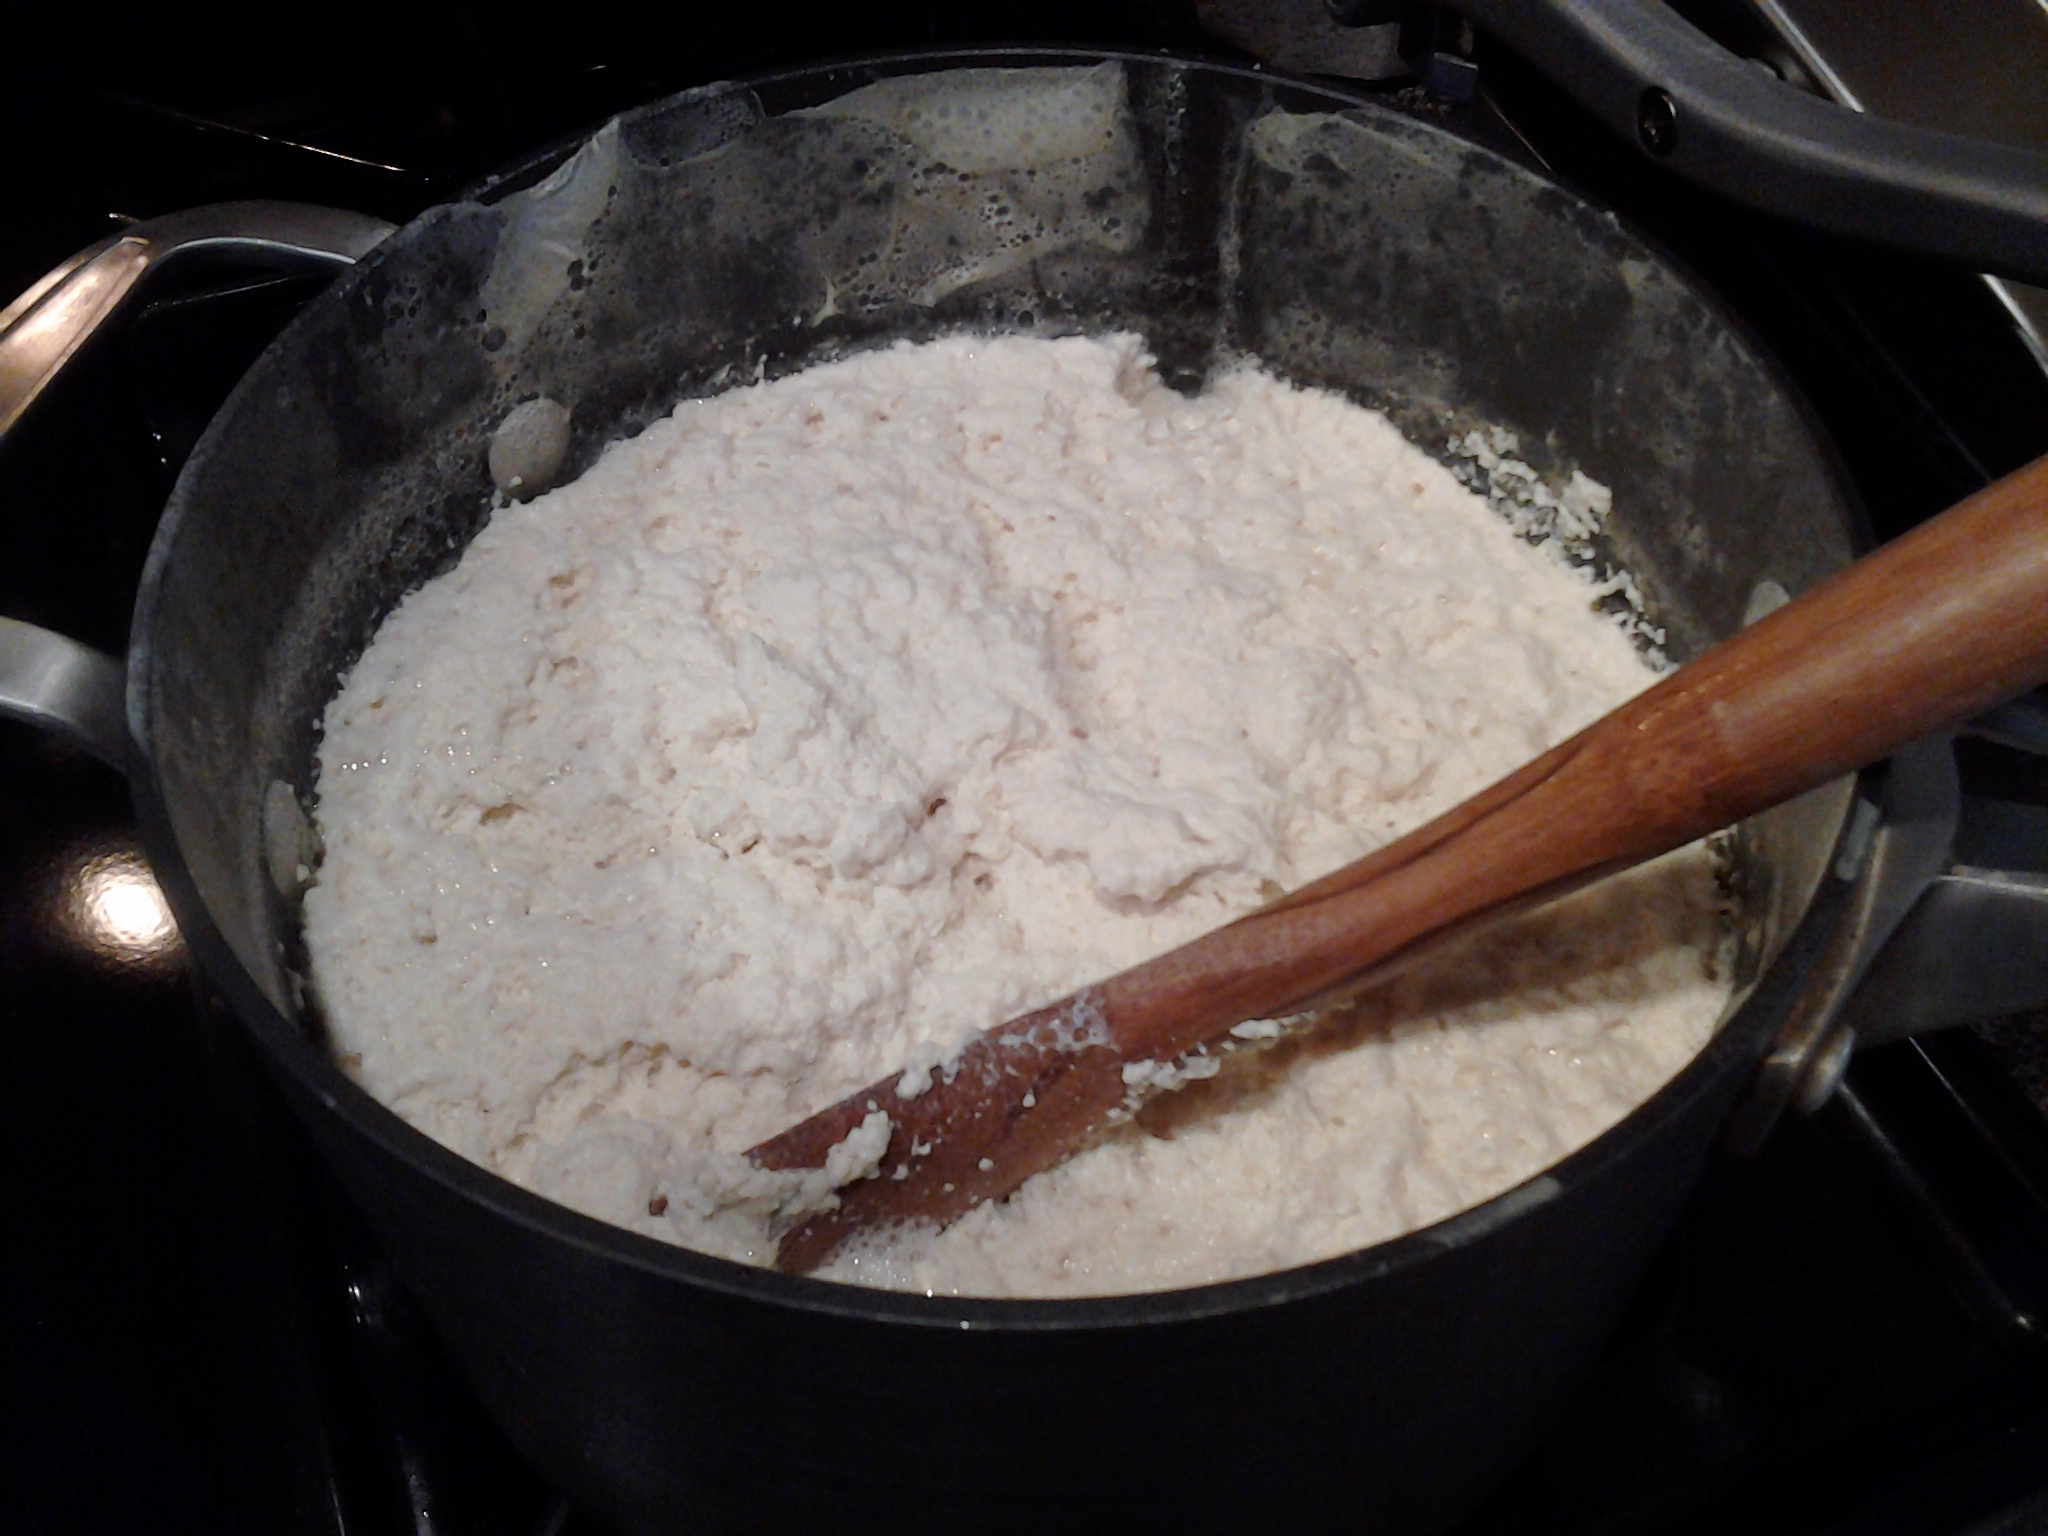
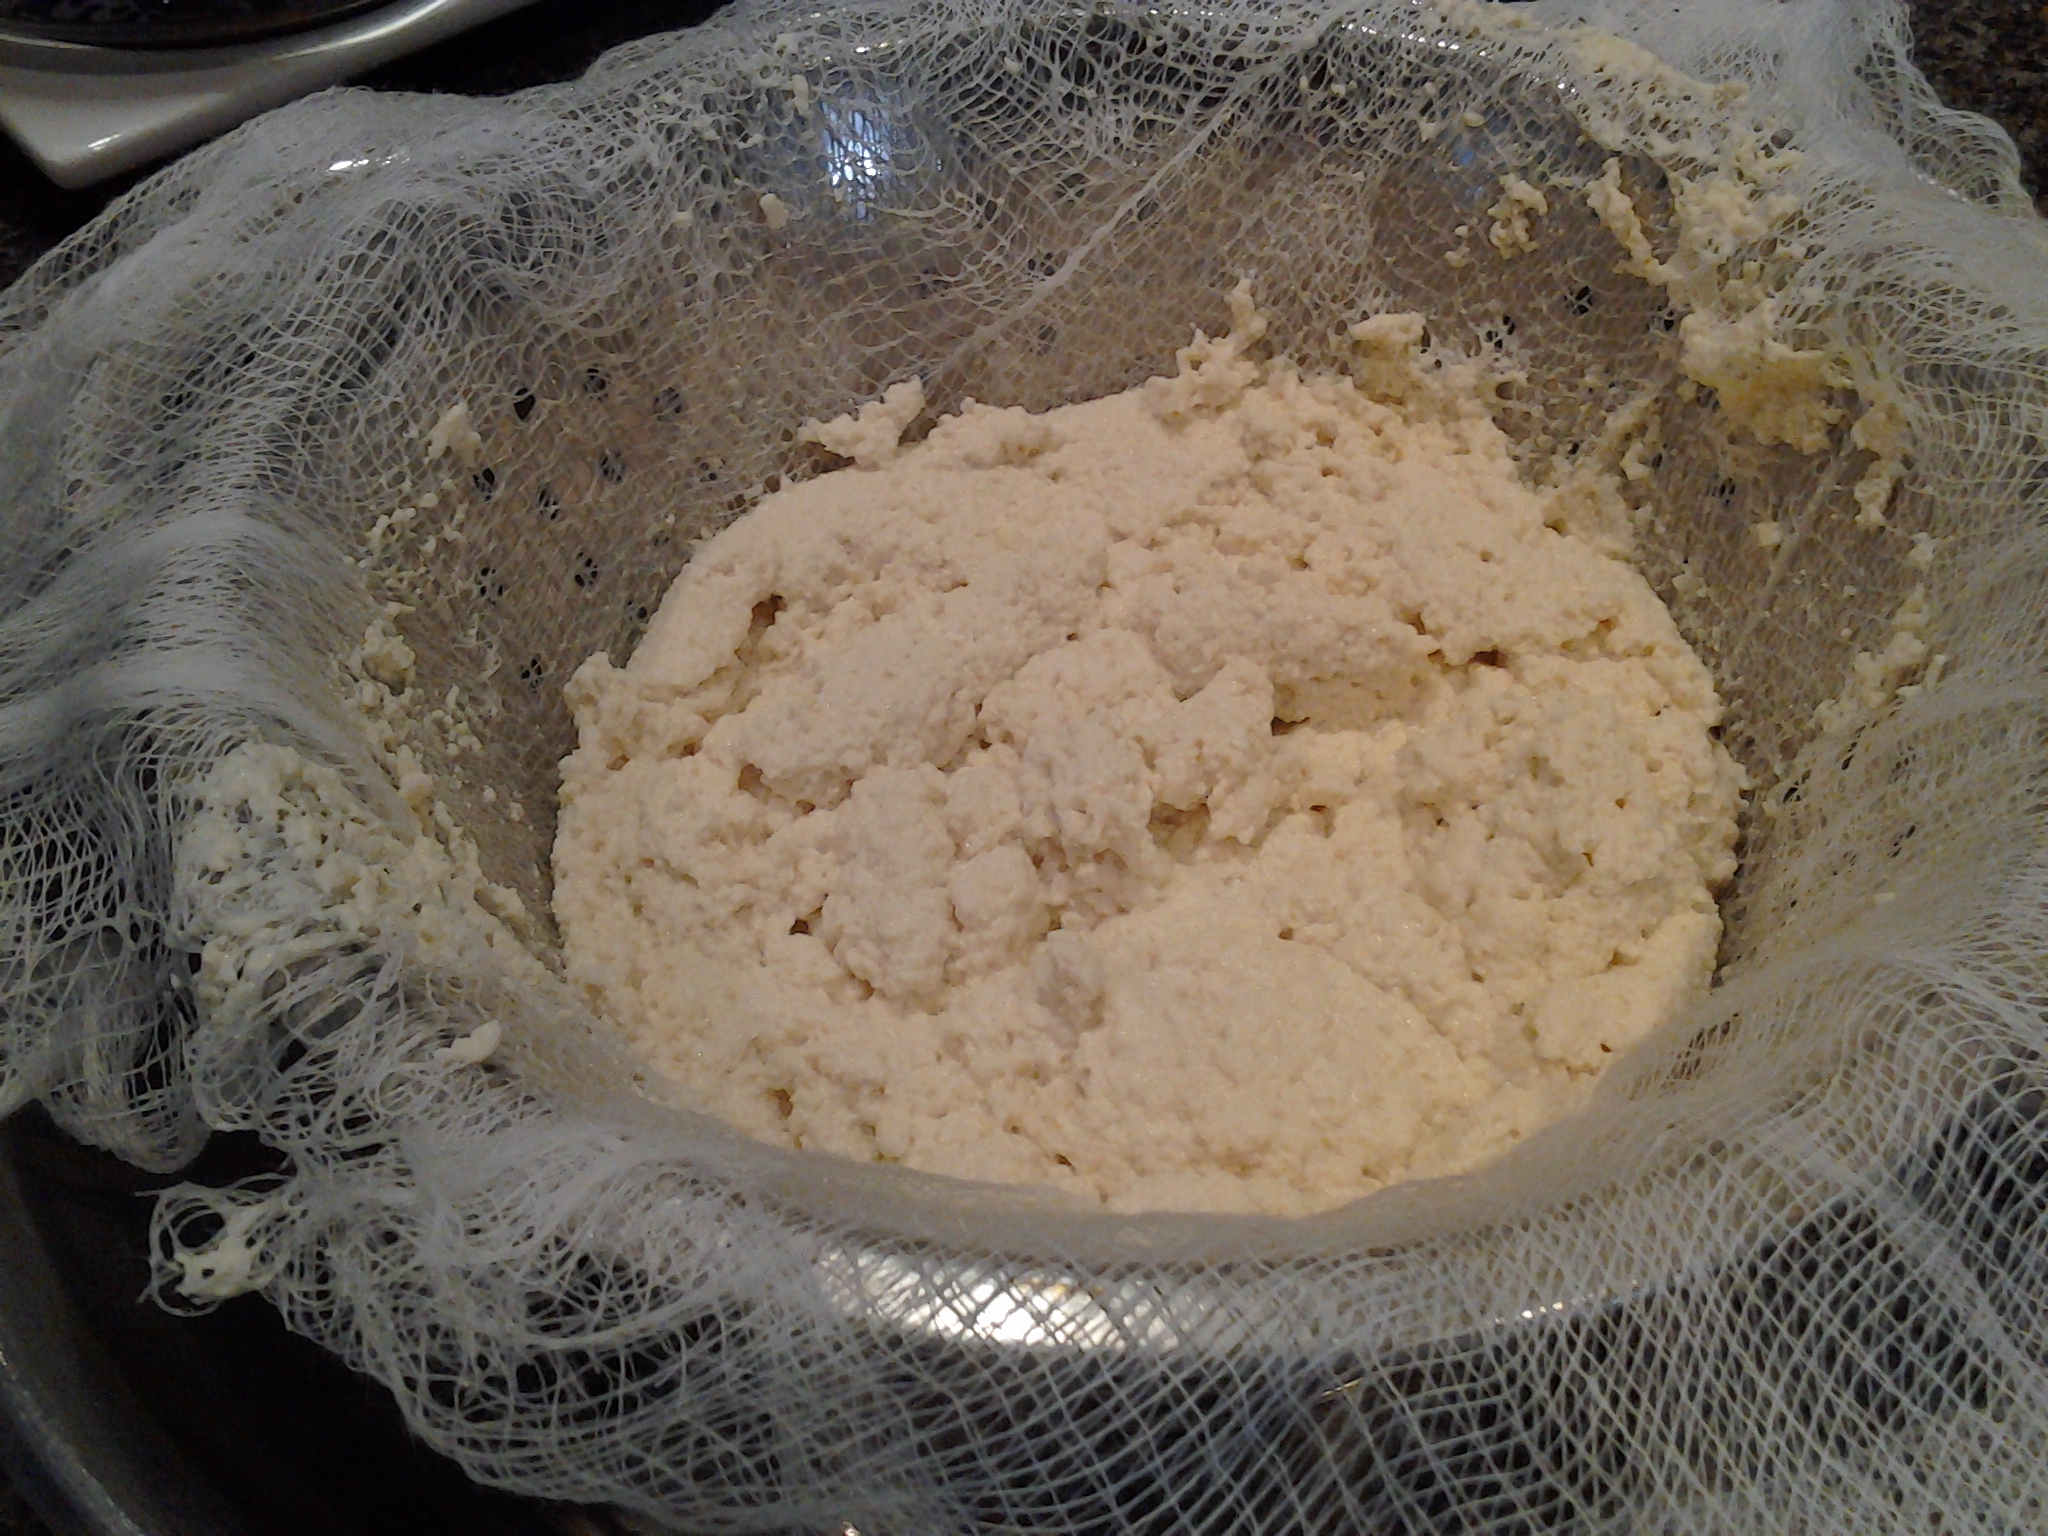
Line a strainer or sieve with 2 thicknesses of culinary cheesecloth (not the hardware store variety), available at some grocery stores, at kitchen shops, and online. Place strainer over a deep bowl (I used my Kitchenaide mixing bowl) so that the bottom of the strainer won’t be suspended in the milk as it drains, or you can just pour off the liquid as it collects. In a large (4-quart) saucepan, heat milk and salt over medium-high heat to 200 degrees, stirring occasionally. Stir in vinegar, remove from heat, and very gently stir as big fluffy curds form and separate from the liquid (which would be whey in dairy cheesemaking). After about 1 minute, pour mixture into prepared strainer and allow to drain for one hour. It will be soft at this stage and can be refrigerated and then enjoyed like this. Or you can create a firmer cheese, as we did, by gathering up sides of the cloth, twisting, tying with cord, and hanging from your kitchen faucet or from a wooden spoon set across the top of your deep bowl as I like to do (to keep the dogs out of it!). Let draindrain for about 8 to 12 hours, unrefrigerated. Carefully remove cheese from the cheesecloth, cover, and refrigerate. Note: use the drained off liquid to water your plants!
Simple Steps to Perfect Ricotta–A Visual
Warming milk for ricotta with equipment/ingredients at the readyCurds form as vinegar is addedCurds draining in cheesecloth-lined colander
This recipe (or, really, more of an ultra-easy formula) was inspired by an invitation from Tofutti to create a plain Greek yogurt using any of their products.
Wanting a nut-free version, I had initially thought I would combine their Better than Cream Cheese or Better than Sour Cream with tofu, until I remembered how pronounced is the soy flavor of processed tofu.
So, then I wondered what would happen if I combined only the two Tofutti products. Eureka! Perfect in thick creamy texture and almost pure white color.
The remaining issue was the particular “tang” of Greek Yogurt. (Sorry, but I had to take tiny tastes of my husband’s dairy variety to try to match it as closely as possible.) The flavor is is definitely NOT lemony, so neither juice nor zest would do the trick. I wondered about vinegar, but white vinegar is too astringent, apple cider vinegar to dark in color, and balsamic to pronounced in flavor, as well as deep in color. But rice wine vinegar proved to be the ticket! One teaspoon wasn’t quite enough; two was perfect!
The purity of the flavor of Greek yogurt is tricky to duplicate, and my version admittedly has a little more complexity of subtle flavor notes than its dairy-based cousin. But it comes exceptionally close. Enjoy using it however you use plain Greek yogurt!
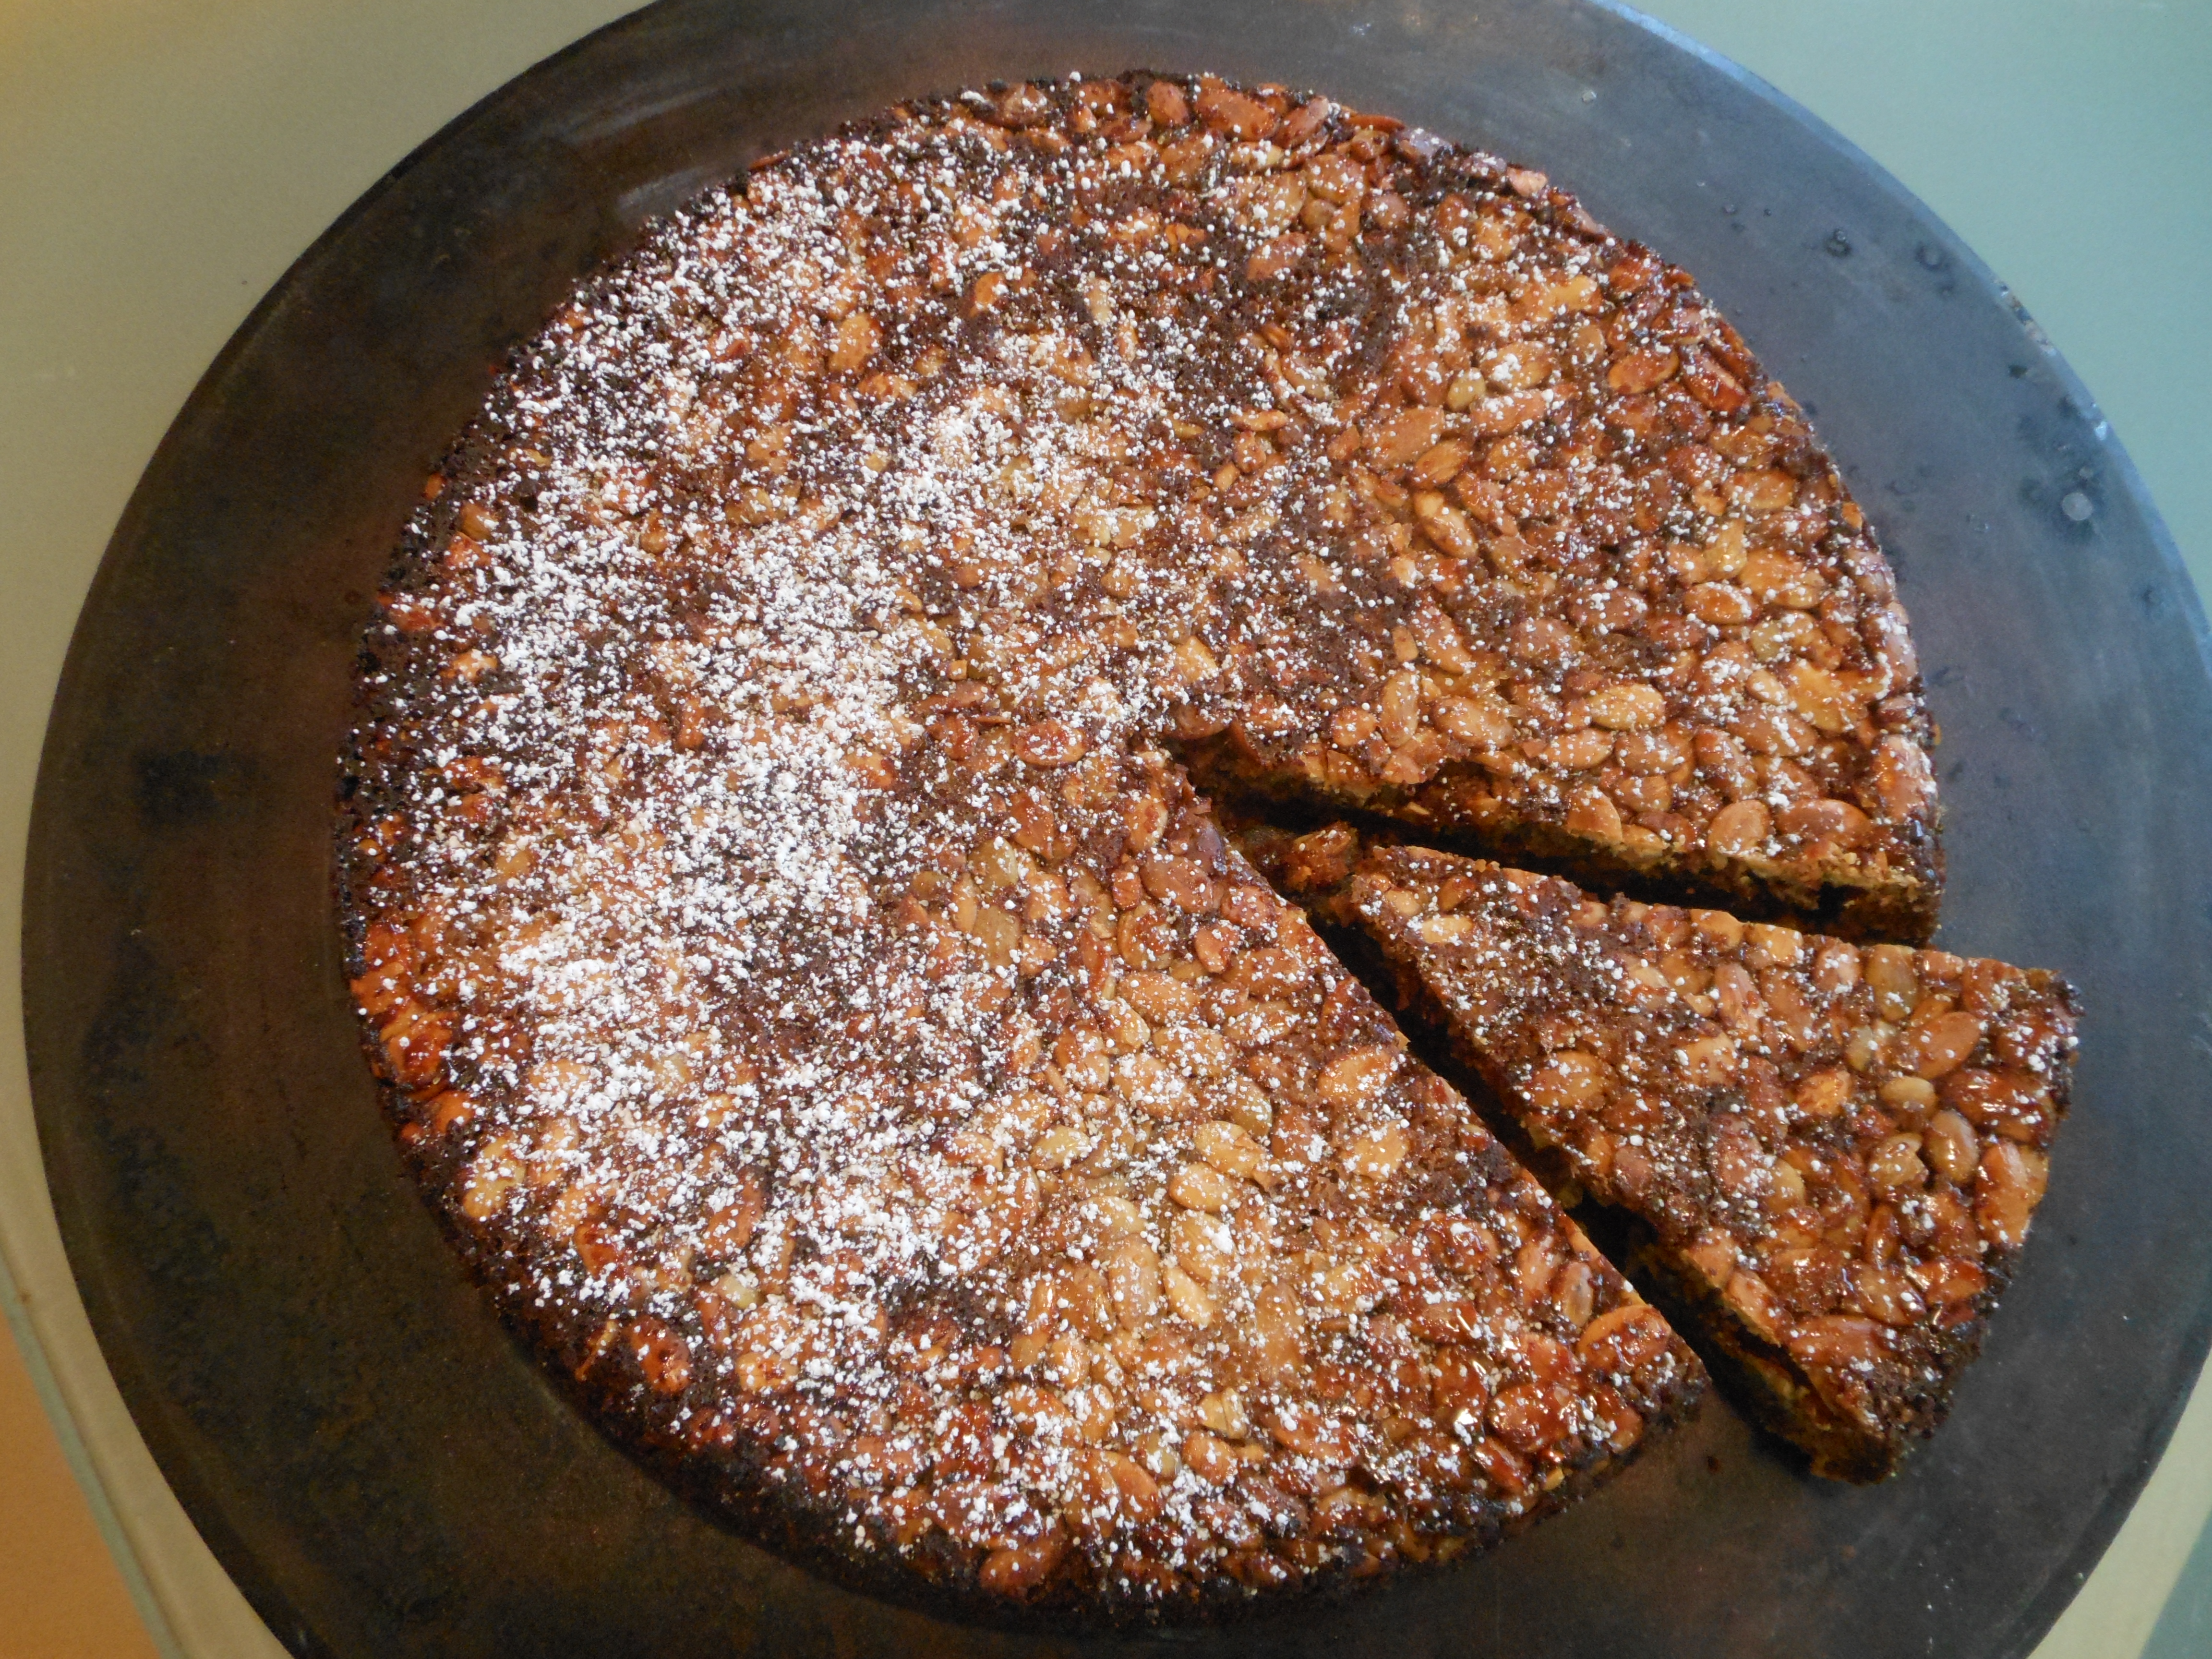
A recipe from Rick Bayless–the iconic American chef steeped in traditional Mexican cuisine which he serves up, with a modern twist, at his Frontera Grill restaurants in Chicago and cooks up on his PBS series–inspired my vegan version (which I submitted to the Virtual Vegan Linky Potluck!).
I spotted the recipe in “Chefs’ Weeknight Dinners” in the July 2014 issue of Food and Wine while on an airplane and knew it would be one of the first new recipes I created once I got back home.
I followed his recipe and method except for the eggs and the chocolate. For the 3 eggs, I substituted 1/2 cup mashed banana, 1/4 cup unsweetened soymilk, and an additional 3/4 teaspoon baking powder. I chose banana as I’m not a powdered egg replacement fan and the banana seemed both Mexican and compatible with chocoalte. (I think pureed pumpkin would also be a nice substitute.) And for the Mexcian chocolate, finely chopped, I simply subbed vegan mini chocolate chips. I also added a teaspoon of vanilla and a smidge more confectioners’ sugar for dusting.
The recipe is a cinch to make and very earthy due to the large amount of pumpkin seeds. It calls for just over a cup of sugar, but the pumpkin seeds are roasted and salted, so this unfrosted cak is not too sweet.
The result is deliciously different without being odd. The cake has a consistency somewhat similar to a blondie with chocoalte chips. But its flavor–with the banana virtually undetectable–is all its own, so I think you’ll love adding it to your repertoire.
1 3/4 cup roasted and salted pumpkin seeds
1 cup plus 2 tablespoons turbinado sugar (any granulated sugar will work)
1/2 cup mashed banana
1/4 cup unsweetened soymilk
Optional: 1 tablespoon tequila
1 teaspoon vanilla
1/3 cup softened butter, cut into 1-inch pieces
1/3 cup white whole wheat flour (unbleached all-purpose flour would also be fine)
Preheat oven to 350 degrees. Spray a 9-inch baking pan with non-stick spray. Trace around the bottom of the pan on a piece of parchment paper and cut out just inside the line. Place paper in greased pan and spray again. Sprinkle bottom with 1/2 cup pumpkin seeds and 2 tablespooons of turbinado sugar. In a food processor, pulse the remaining 1 1/4 cup pumpkin seeds with the remaining 1 cup of turbinado sugar until the mixture resembles wet sand. Add the banana, soymilk, optional tequila, vanilla, and butter, and process until smooth. Add the flour and baking powder and pulse just until incoproated. Add the chocolate and pulse until well distributed. Transfer the batter into the prepared pan, gently smoothing to make an even layer over the pumpkin seeds. Bake for about 40 to 45 minutes or until a pick inserted in the center comes out clean and edges are golden brown. Rotate the pan halfway though baking. Cool the cake in the pan on a rack for 10 minutes, then invert it onto a plate and carefully peel off the parchment paper. Dust the cake with the confectioners’ sugar and serve warm or at room temperature.
For the last five years–since the moveJulie and Julia came out–my husband, Joe, and I have hosted a birthday party for Julia Child on or near the weekend of her August 15 birthday. And I invite you to do the same!
Having just seen the movie with my parents and sister five years ago, and looking for an excuse to gather some friends together for a late summer party, I hit on a birthday party for this larger than life icon and role model for home cooks who wanted to elevate their culinary repertoire a la Francaise (beginning in 1961 with the publication of Mastering the Art of French Cooking.)
This summer soiree has turned out to be our friends’ favorite gathering of the warm weather season, so the tradition has continued for this, our sixth summer. And it is a no-brainer for me as the hostess because it is fortune du pot or potluck.
However, some rules do apply: while I do not insist that contributions be vegan or vegetarian (I am the only vegan in the crowd and Reese Lusk the only strict vegetarian), they usually are, e.g. Beet Bourguignon. But they must be prepared according to or inspired by one of Julia’s recipes or, at least, something French. And everyone is asked to bring a bottle of a favorite wine, prerferably French, of course.
Our generous comrades go way beyond with gifts and flowers, all of it unnecessary but much appreciated. And the presentation! All of these folks love good simple design as much as they love good simple (or sometimes not-so-simple) food and good company, so it is like a tantalizing parade as our guests start arriving.
We only confer minimally ahead of time about what eachof us plans to prepare, but the spread is alway spsrawling and spectacular in both taste and appearance, with every dish complementing every other beautifully. I sometimes prepare a birthday cake, though not always, as its not like we need to amp it up in the celebration department. Wine, conversation and good cheer flow freely for several hours around our dining table that comfortably seats 10.
Iget a kick out of designing a digital invitation like the one shown here in Microsoft Publisher after conferring about a date via email (sometimes we’ve had to hold the party the week before due to scheduling conflicts). After that, there’s nothing more to do except anticipate a beautiful summer evening that practically creates itself.
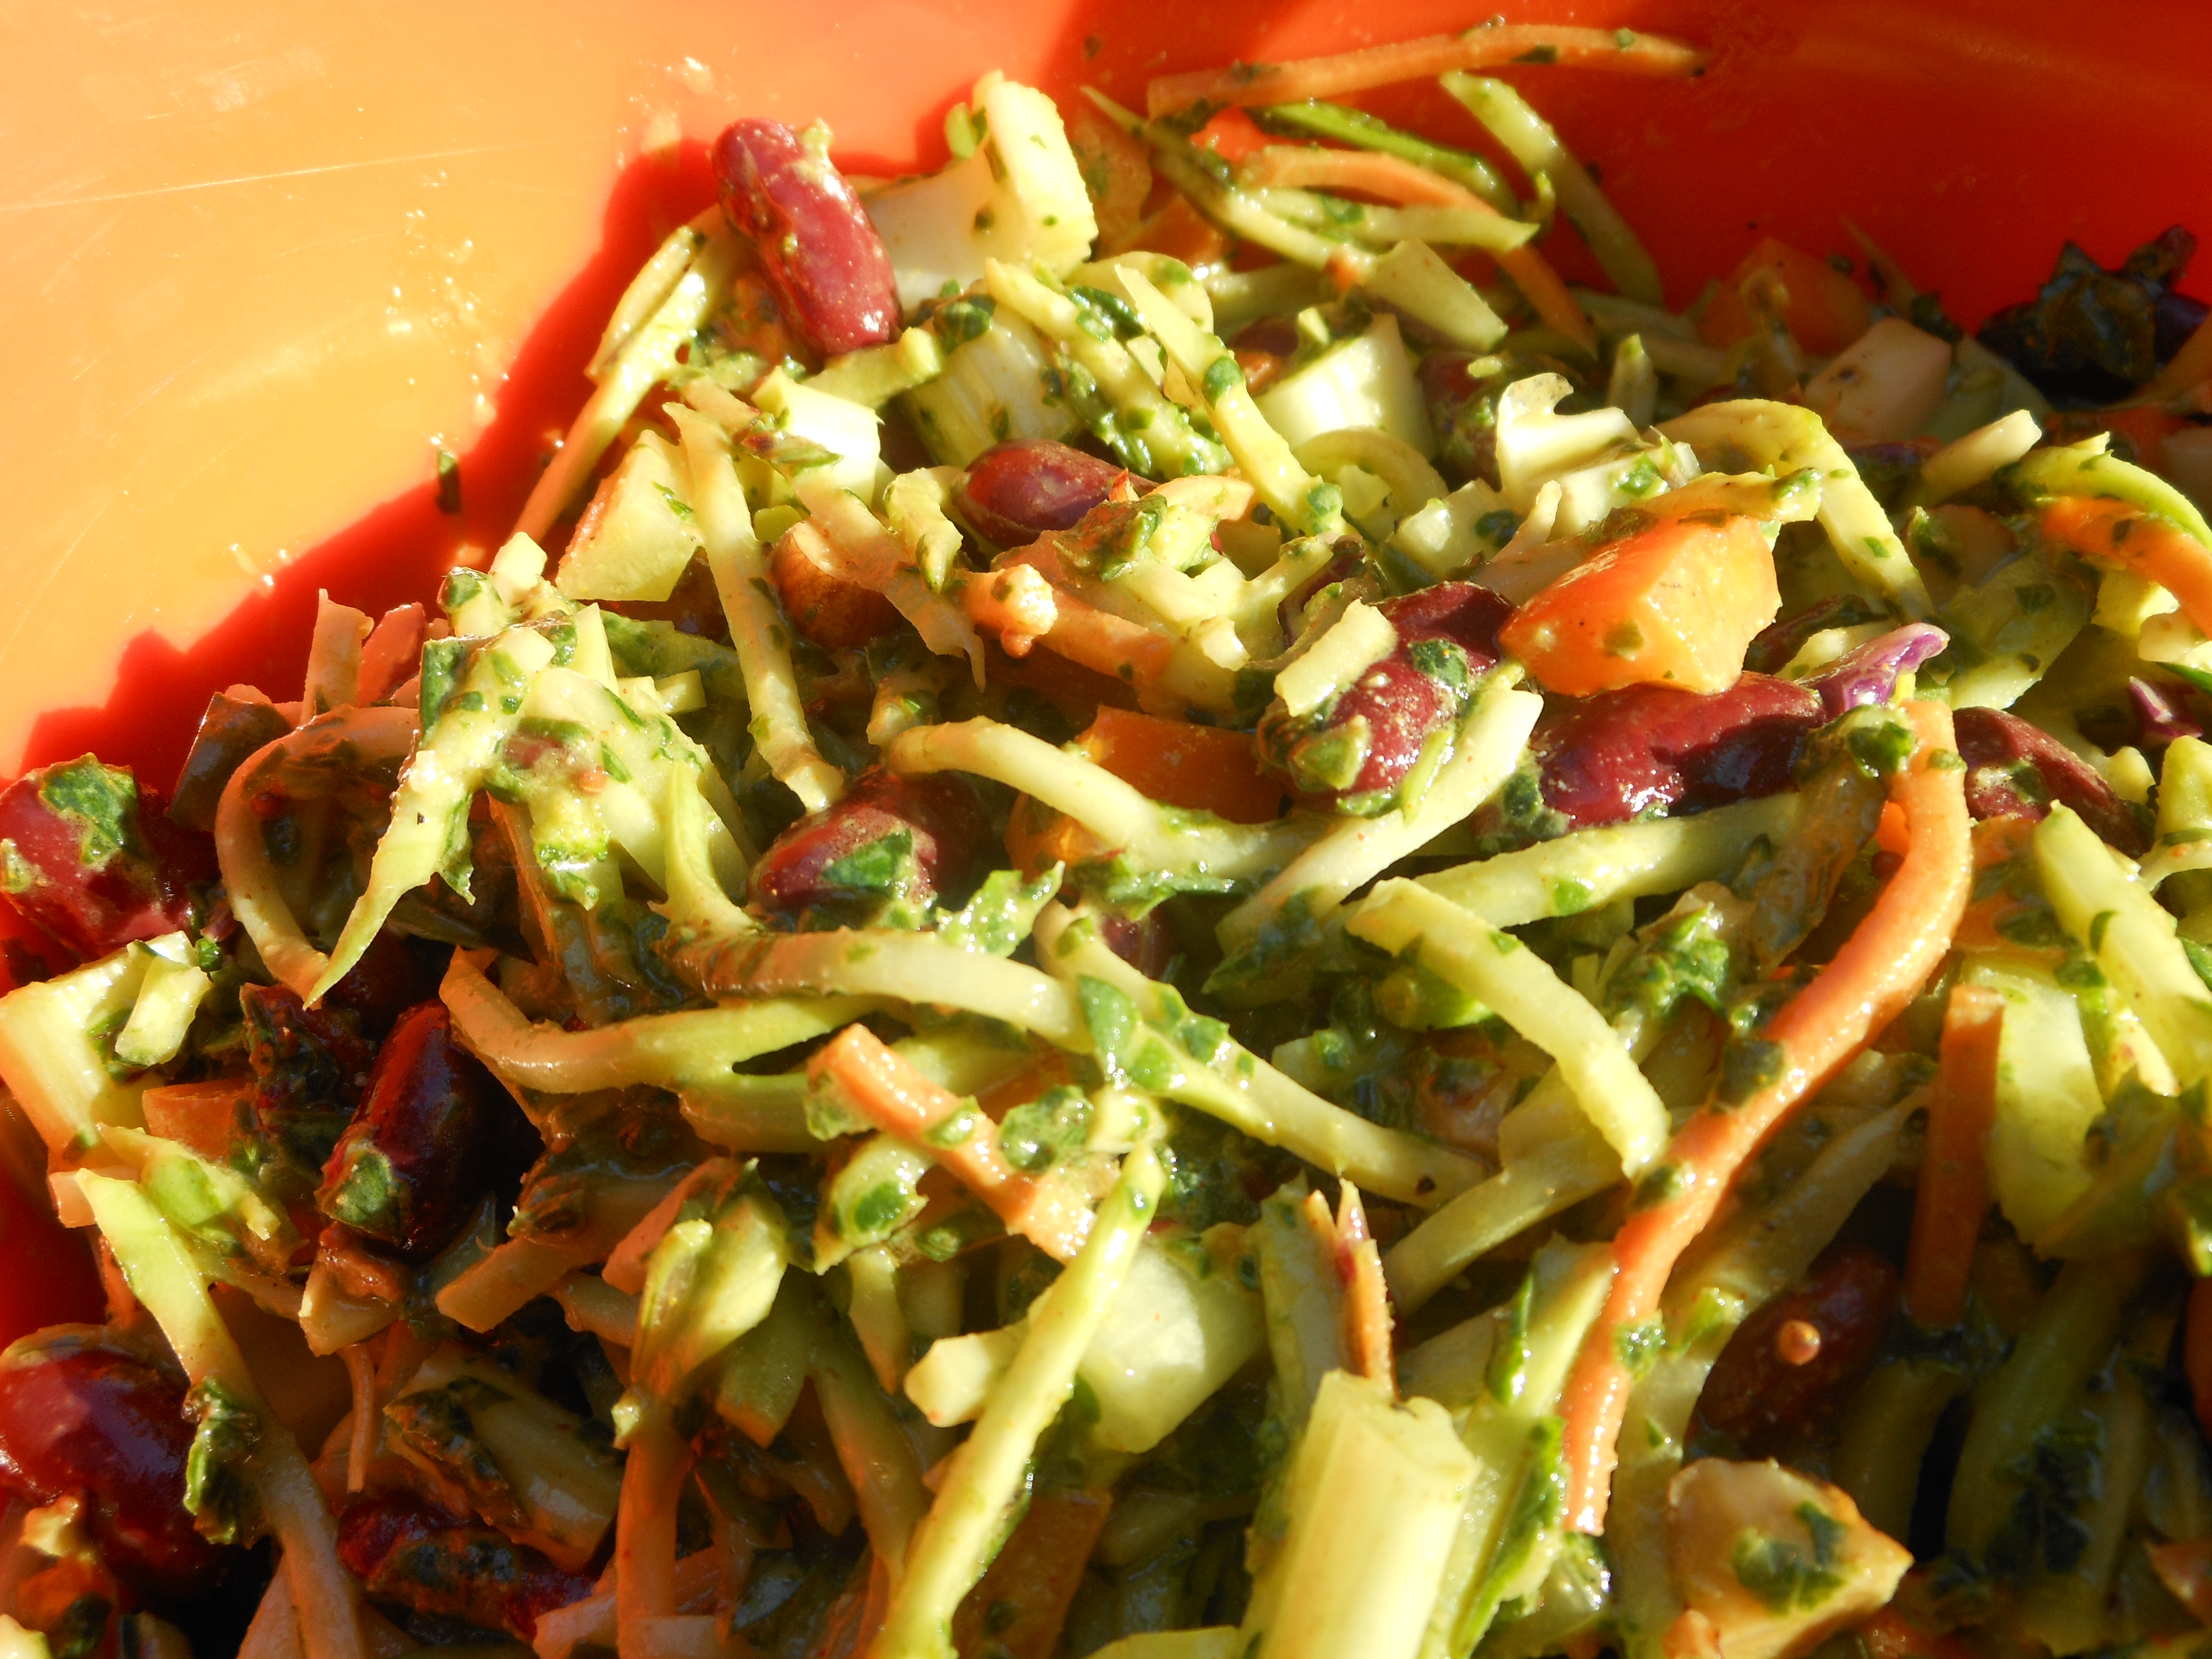
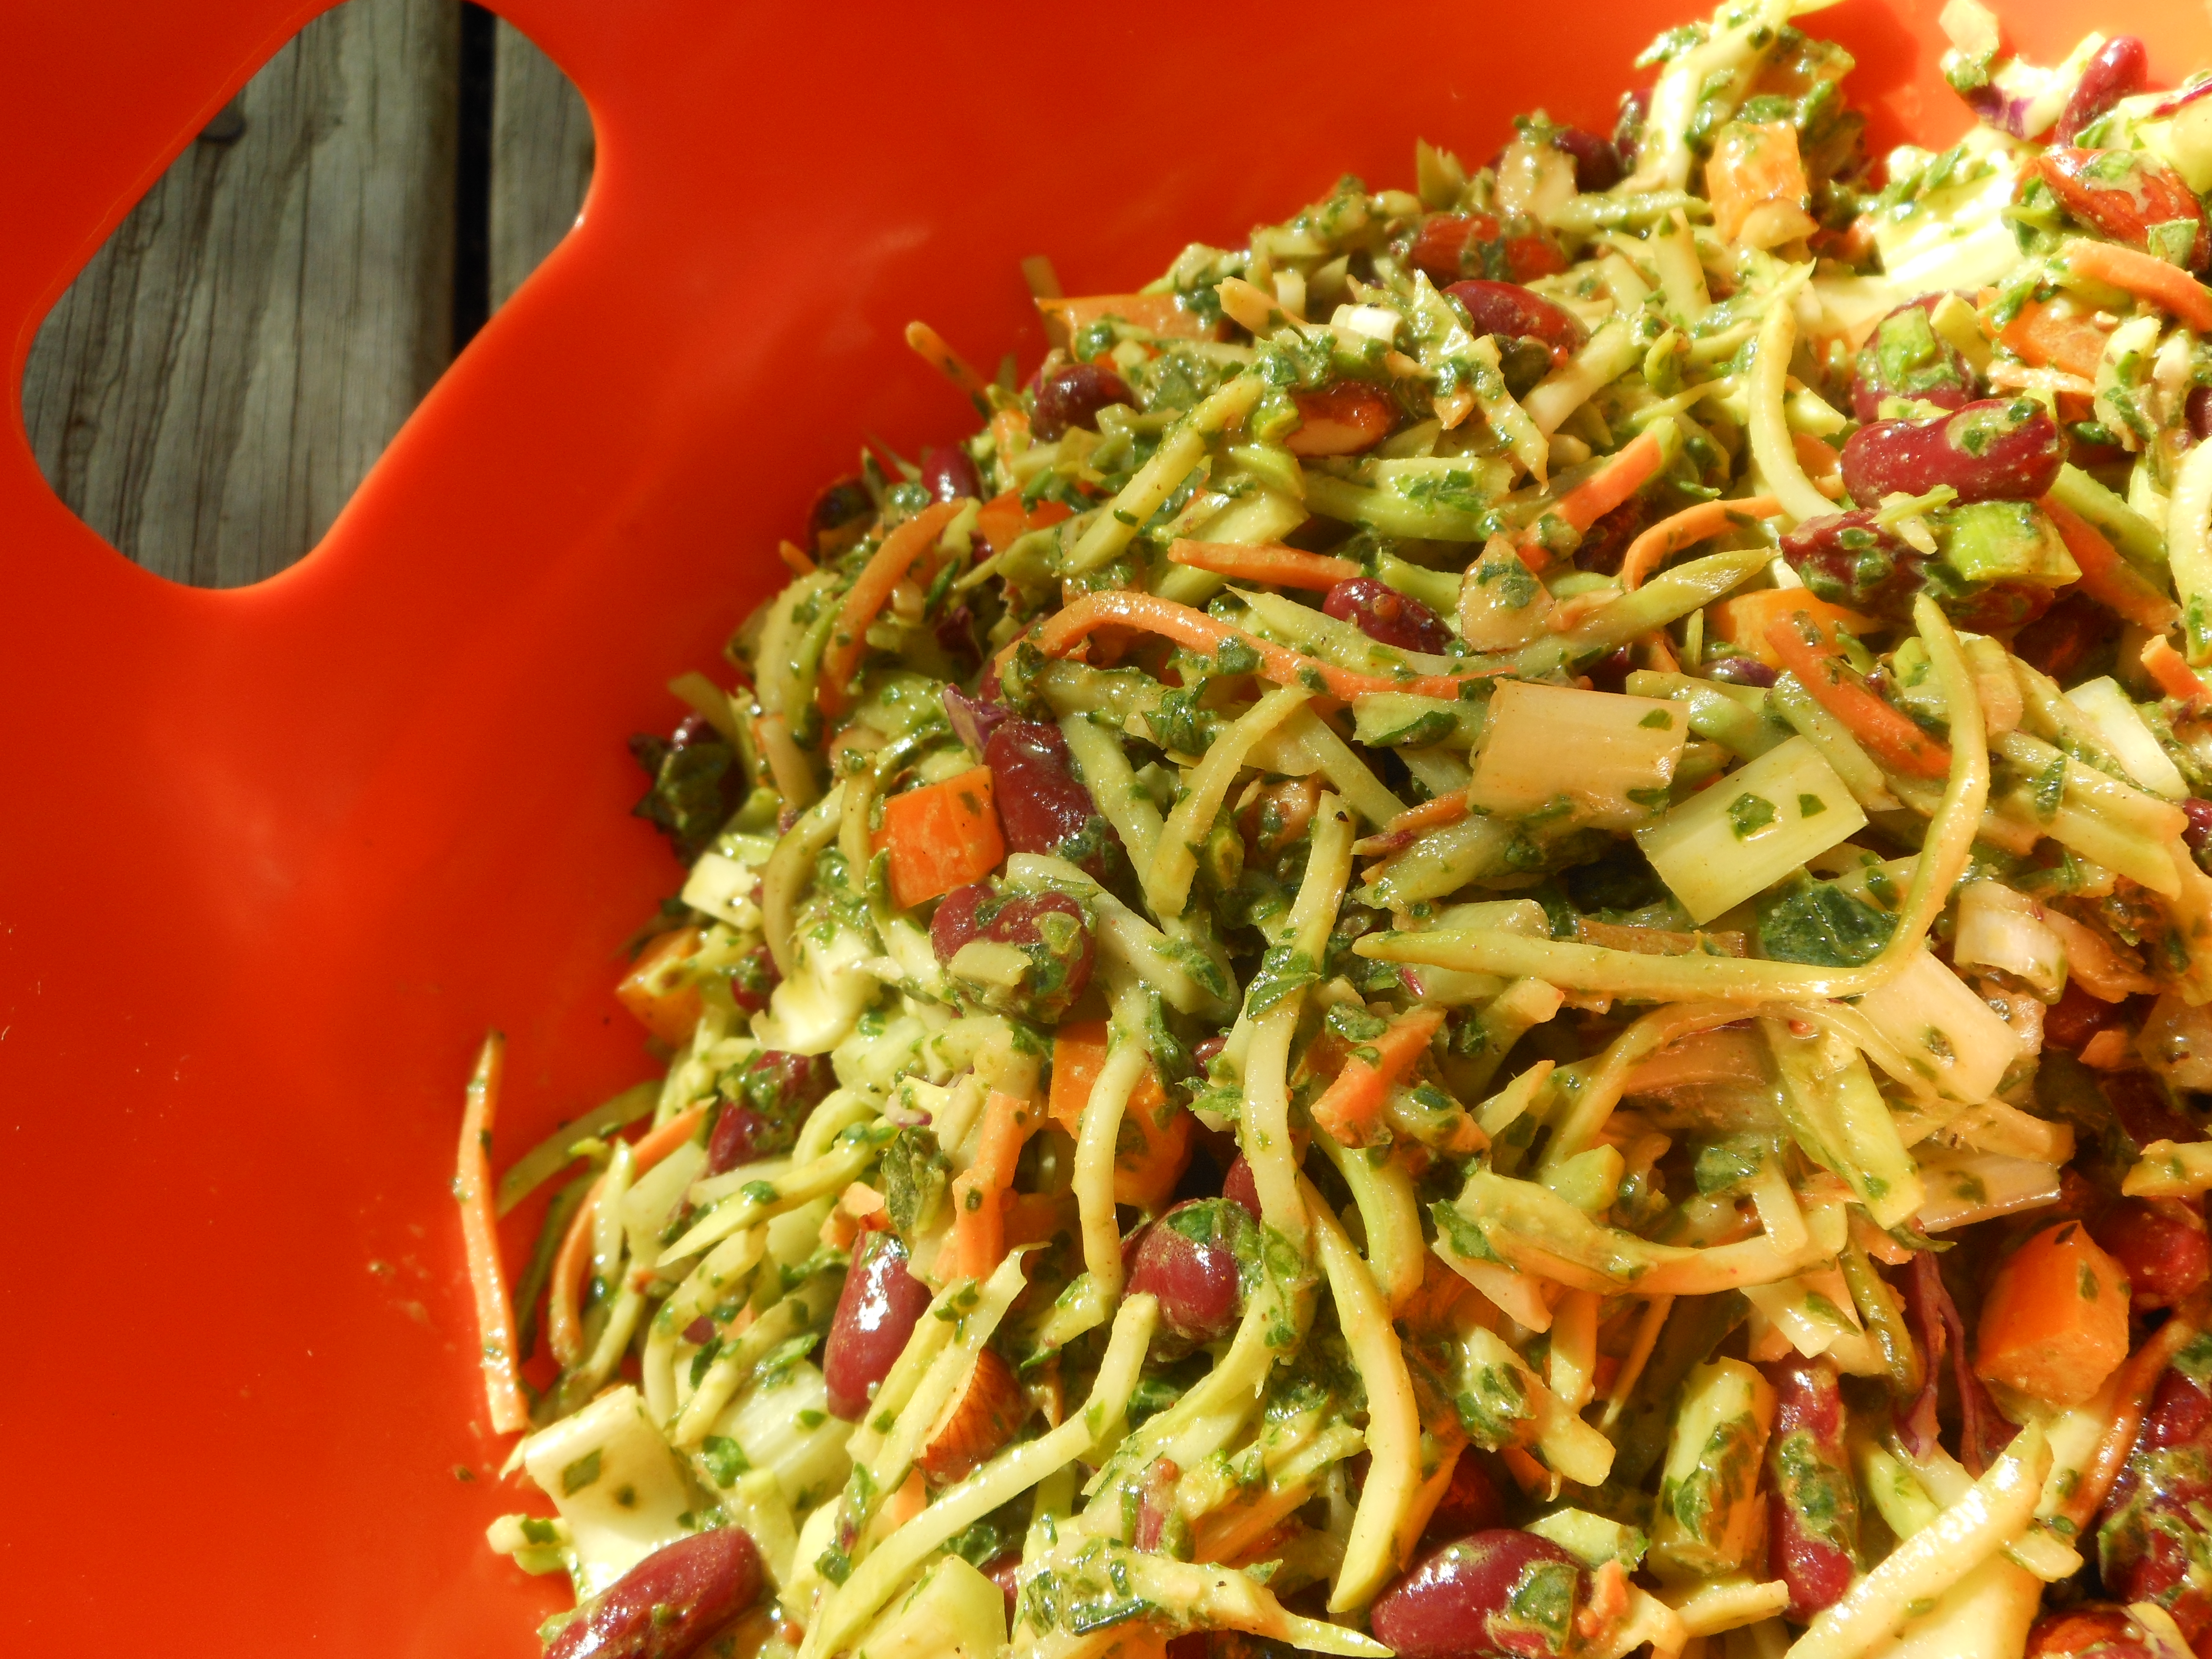
Yield: 6-8 servings (depending on other side dishes)
I took this salad to a 4th of July celebration at our good friends’ Mary Beth and Ken Mays’ home where it was a huge hit along with burgers (veggie and beef–I was the only vegan, though Mary Beth is a pescetarian and her cousin a vegetarian), red skinned new potato salad with artichoke hearts and both green and ripe olives in a light vinaigrette dressing, and a beautiful fruit salad for dessert.
Since we decided to go fairly traditional with our menu, I felt a slaw was in order. But I also felt a little more protein would be nice, not to mention more color and texture contrast. When all was said and done, this was one addicting salad!
1-12 ounce package prepared (but not dressed) broccoli slaw
5 ounces mixed or single greens like kale, Swiss chard, etc., finely chopped (I use a food processor for this task)
1 orange or red bell pepper, stemmed, seeded, and diced
1-15.5 ounce can dark red kidney beans, rinsed and well-drained
5 stalks celery hearts, diced
1/2 cup roughly chopped smoked almonds
Pinch sea salt
Pinch freshly ground black pepper
Lime Aioli Dressing (recipe follows)
In a large bowl, toss together all salad ingredients. Drizzle dressing over the top and toss well to combine. Check for seasoning and adjust if necessary. Refrigerate for at least a half hour to allow flavors to marry. Serve cold.
Lime Aoili Dressing:
Juice and zest of 1 small to medium lime
1 teaspoon stone ground mustard
1/2 cup olive oil
1 tablespoon nutritional yeast
1 tablespoon Liquid Aminos
1/2 teaspoon Sriracha (or your favorite hot sauce)
2 teaspoons ground cumin
1/2 teaspoon ground coriander
1/2 teaspoon garlic powder
1/2 teaspoon smoked paprika
1/2 teaspoon turmeric
Pinch turbinado sugar (or your favorite granualted sugar)
Pinch sea salt
Pinch freshly ground black pepper
1/4 cup vegan mayonnaise
Place lime juice and mustard in a medium bowl. Slowly whisk in olive oil. Add all remaining ingredients and whisk until smooth and completely combined. Check for seasoning and adjust if necessary.
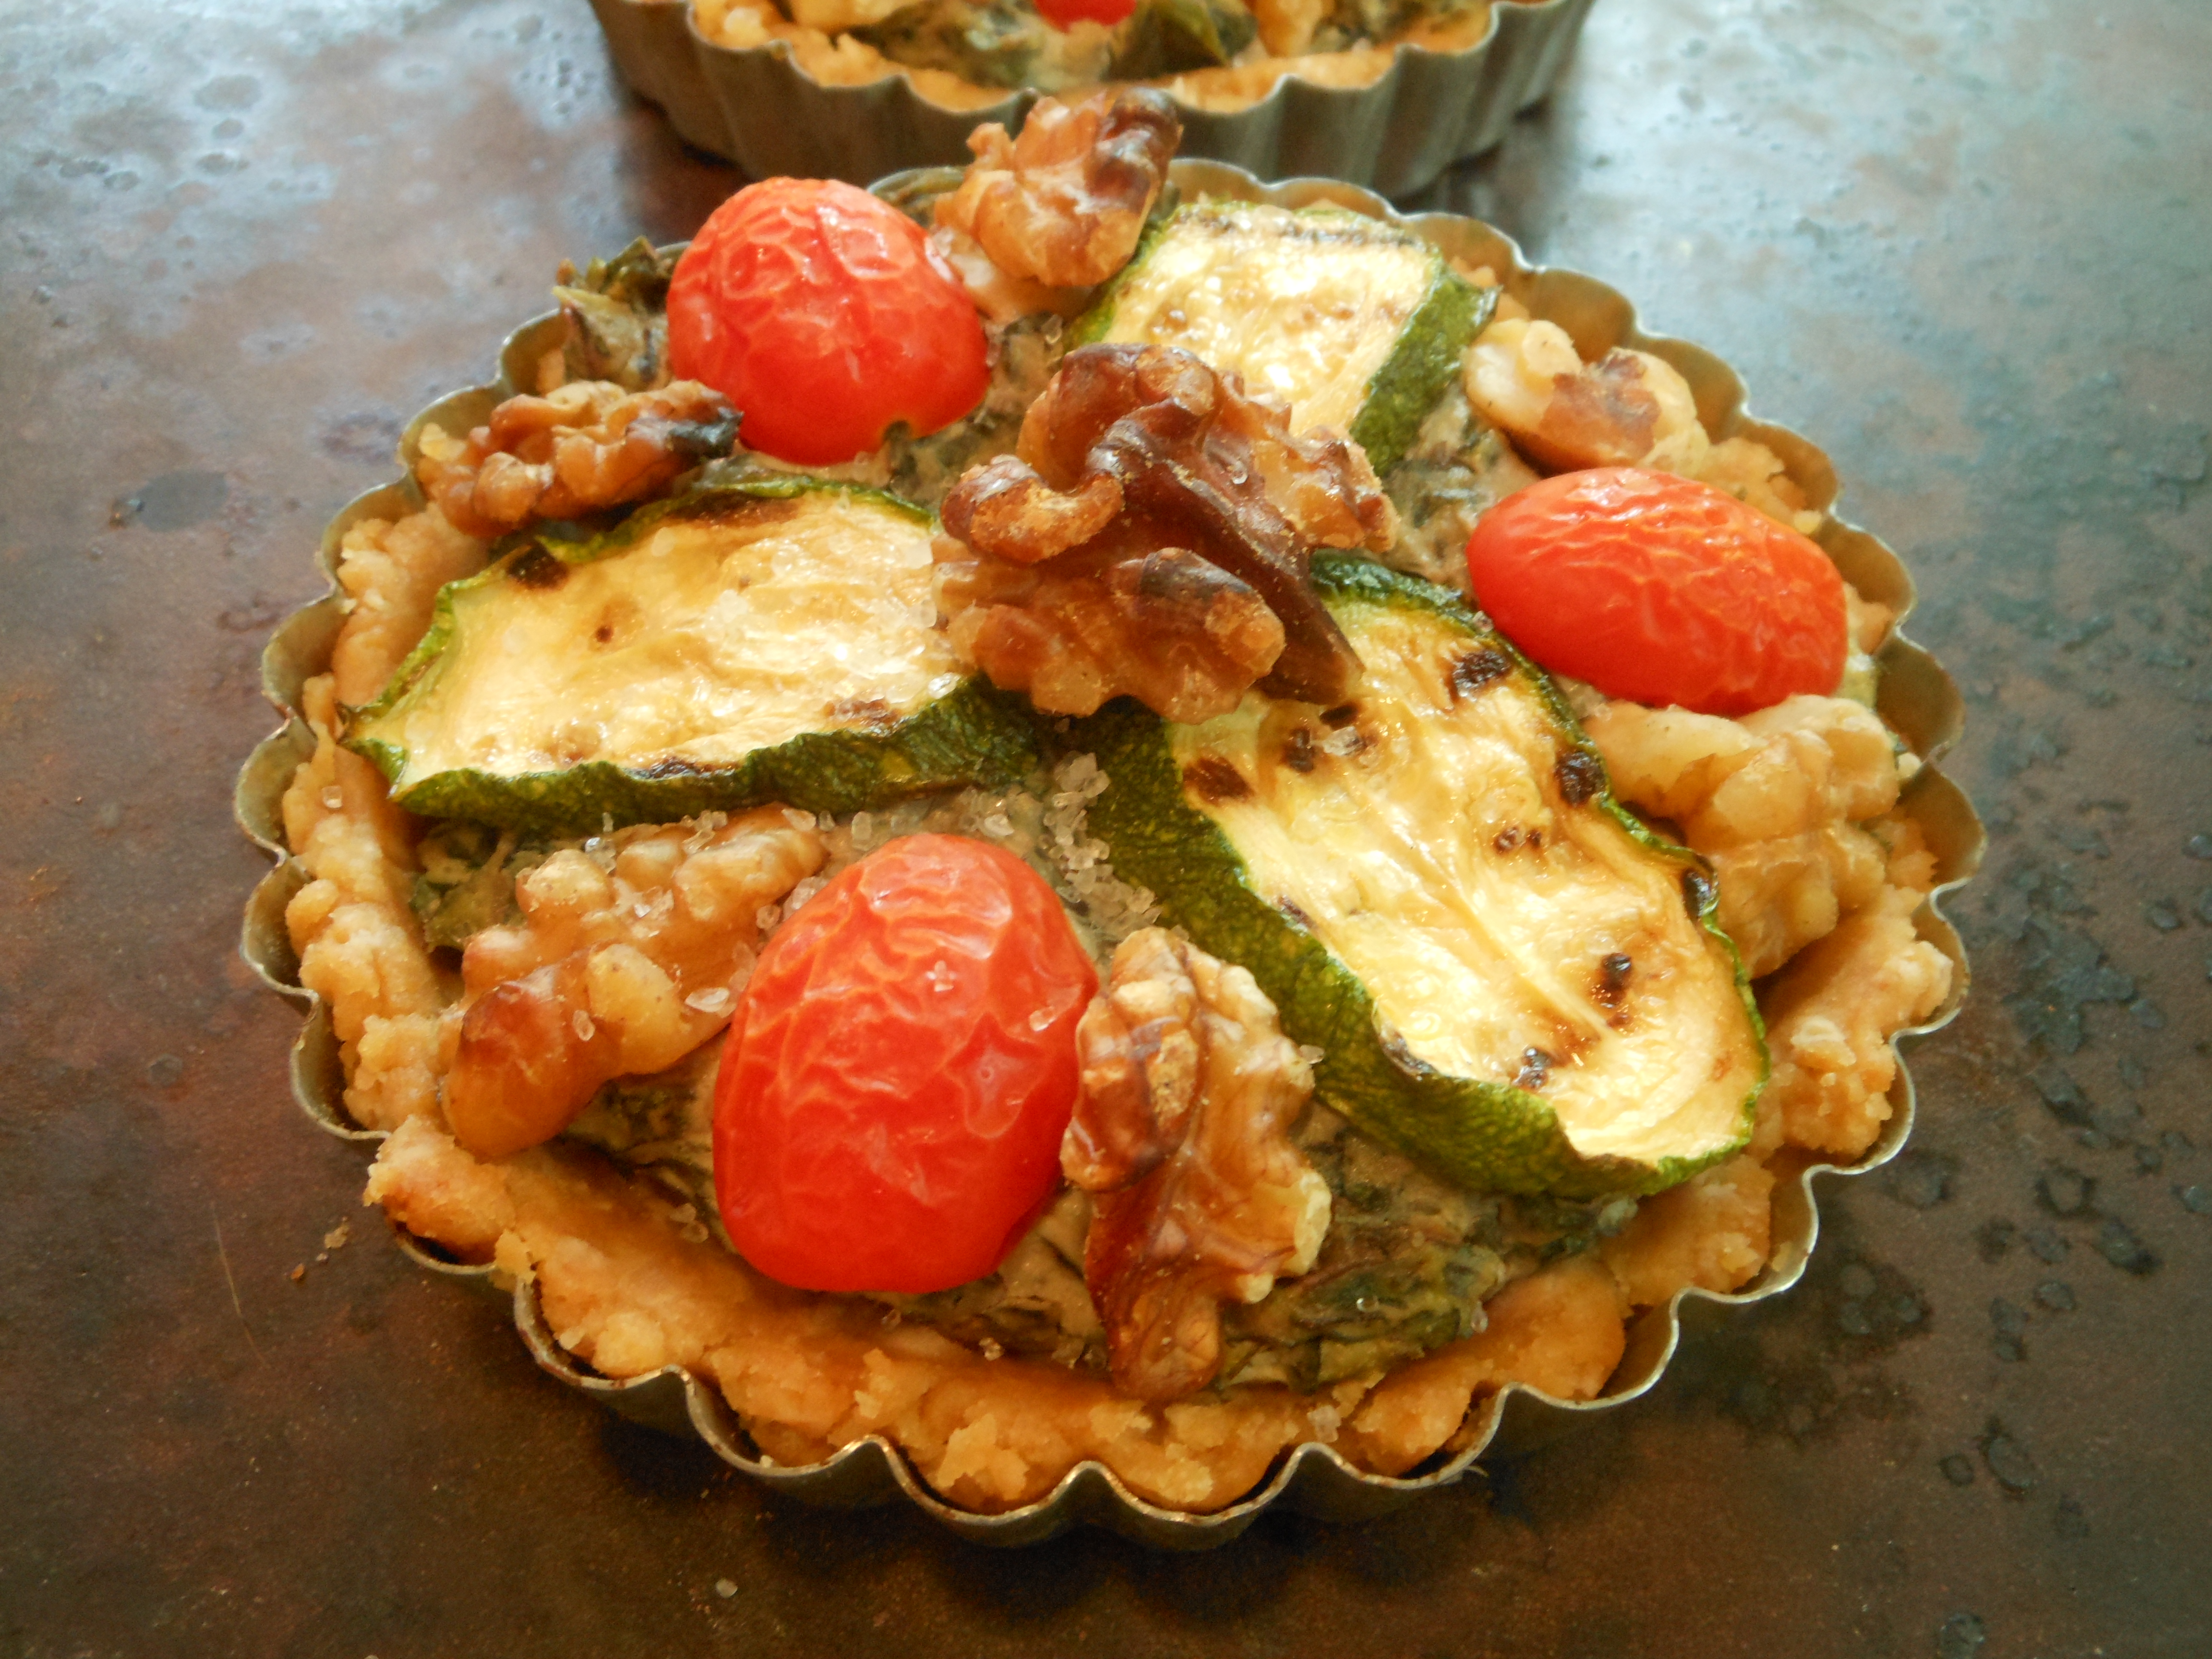
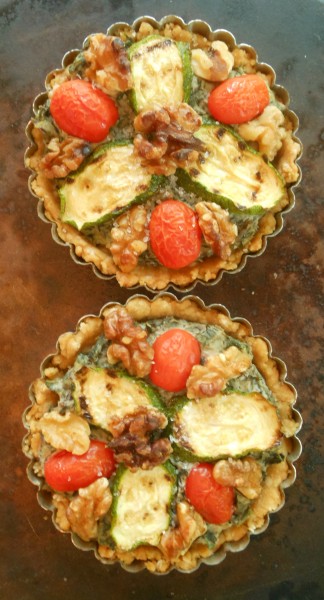
A recipe in a summer issue of one of my culinary magazines for a quiche featuring zucchini, tomatoes and walnuts inspired this dish. However, I had a bunch of local Swiss chard from our farmer’s market that needed used, so I finely chopped it and folded it into my vegan quiche batter. This is summer satisfaction at its best and brightest!
And it has been so popular, I thought it would be nice to contribute to the Virtual Vegan Linky Potluck 3, an ingenious idea by An Unrefined Vegan.
6-5 inch blind-baked tart shells (recipe for Press-In Pie Crust follows)
1 bunch Swiss chard, stemmed, and very finely chopped (I used a food processor for this task)
14 ounces extra-firm tofu (not Silken)
1/4 cup unsweetened soymilk or any unsweetened non-dairy milk
2 tablespoons nutritional yeast
1/2 teaspoon garlic powder
1/4 teaspoon onion powder
1 teaspoon sea salt
Freshly ground black pepper to taste
Zest of 1 small to medium lemon
1-2 tablespoons finely chopped basil or chiffonade (leaves stack, rolled, and thinly sliced)
18-1/4 inch thick zucchini slices, cooked (approximately 1 medium zucchini; I like to grill them in an indoor gill pan; but you can saute, broil or steam)
9 cherry tomatoes, halved lengthwise
6 walnut halves and approximately 36 walnut pieces (but you don’t have to be that exacting)
Approximately 1 tablespoon olive oil, 1 tablespoon balsamic vinegar, and 3/4 teaspoon coarse sea salt divided among the 6 tarts
Preheat oven to 400 degrees. Note: if you make your own crusts, which I highly recommend–my recipe is quick and easy–just leave the oven set to 400 degrees. Proceed with recipe while shells bake. Place Swiss chard in a large bowl. Rinse and dry food processor bowl and puree together until smooth tofu, soymilk, nutritional yeast, garlic powder, onion powder, teaspoon of salt, and black pepper to taste. Spoon mixture over Swiss chard, add lemon zest, and fold together until completely combined. Divide filling evenly among tart shells. On top of each, arrange 3 slices of zucchini, 3 cherry tomato halves, and 6 walnut pieces in a pinwheel design and place 1 walnut in the center. Bake for 15 minutes. Remove from oven, allow to cool just enough to remove tarts from pans, place tarts on serving plates, and drizzle each tart with 1/2 teaspoon olive oil, 1/2 teaspoon balsamic vinegar, and 1/8 teaspoon coarse see salt. Serve warm.
Press-In Pie Crust
2 1/4 cups unbleached all-purpose flour (I use white whole wheat, but you can also combine half all-purpose with half whole wheat)
2 teaspoons turbinado sugar (any granulated sugar is fine)
1 1/2 teaspoons sea salt
3/4 cup canola oil (or any neutral-tasting vegetable oil)
3 tablespoons unsweetened soymilk or anyunsweetened non-dairy milk
Preheat oven to 400 degrees. Place tart pans with removeable sides on a rimmed baking sheet. Combine dry ingredients in a medium bowl. Make a well in the center, pour in wet ingredients, and stir with a fork just until a nice, moist dough forms. Divide into sixths and pat evenly into tart pans. Prick a few times with a fork and bake for 10-12 minutes or until lightly golden brown. Remove from oven.

 Yield: 6 servings


 Yield: 3/4 cup
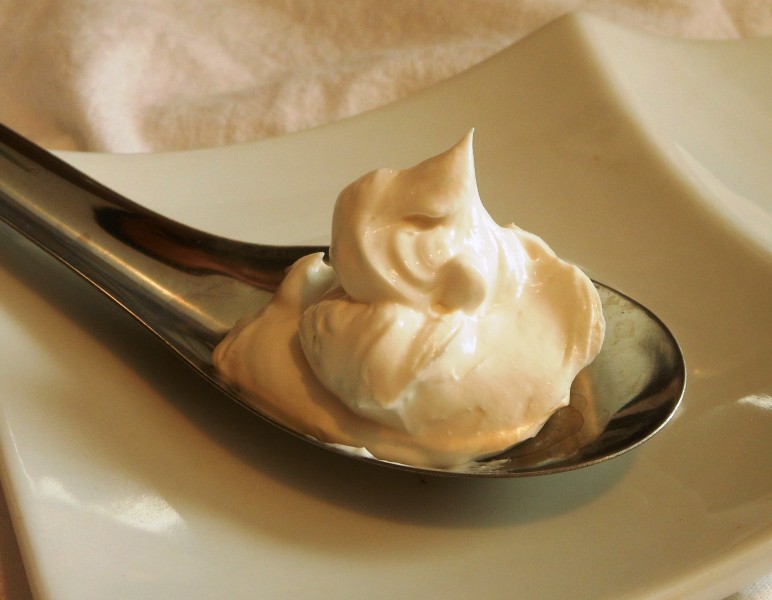


 Yield: 6-5 inch tarts