Vegan Thai Buddha Spring Roll Bowl

Thai Buddha Spring Roll BowlYield: 4 servings

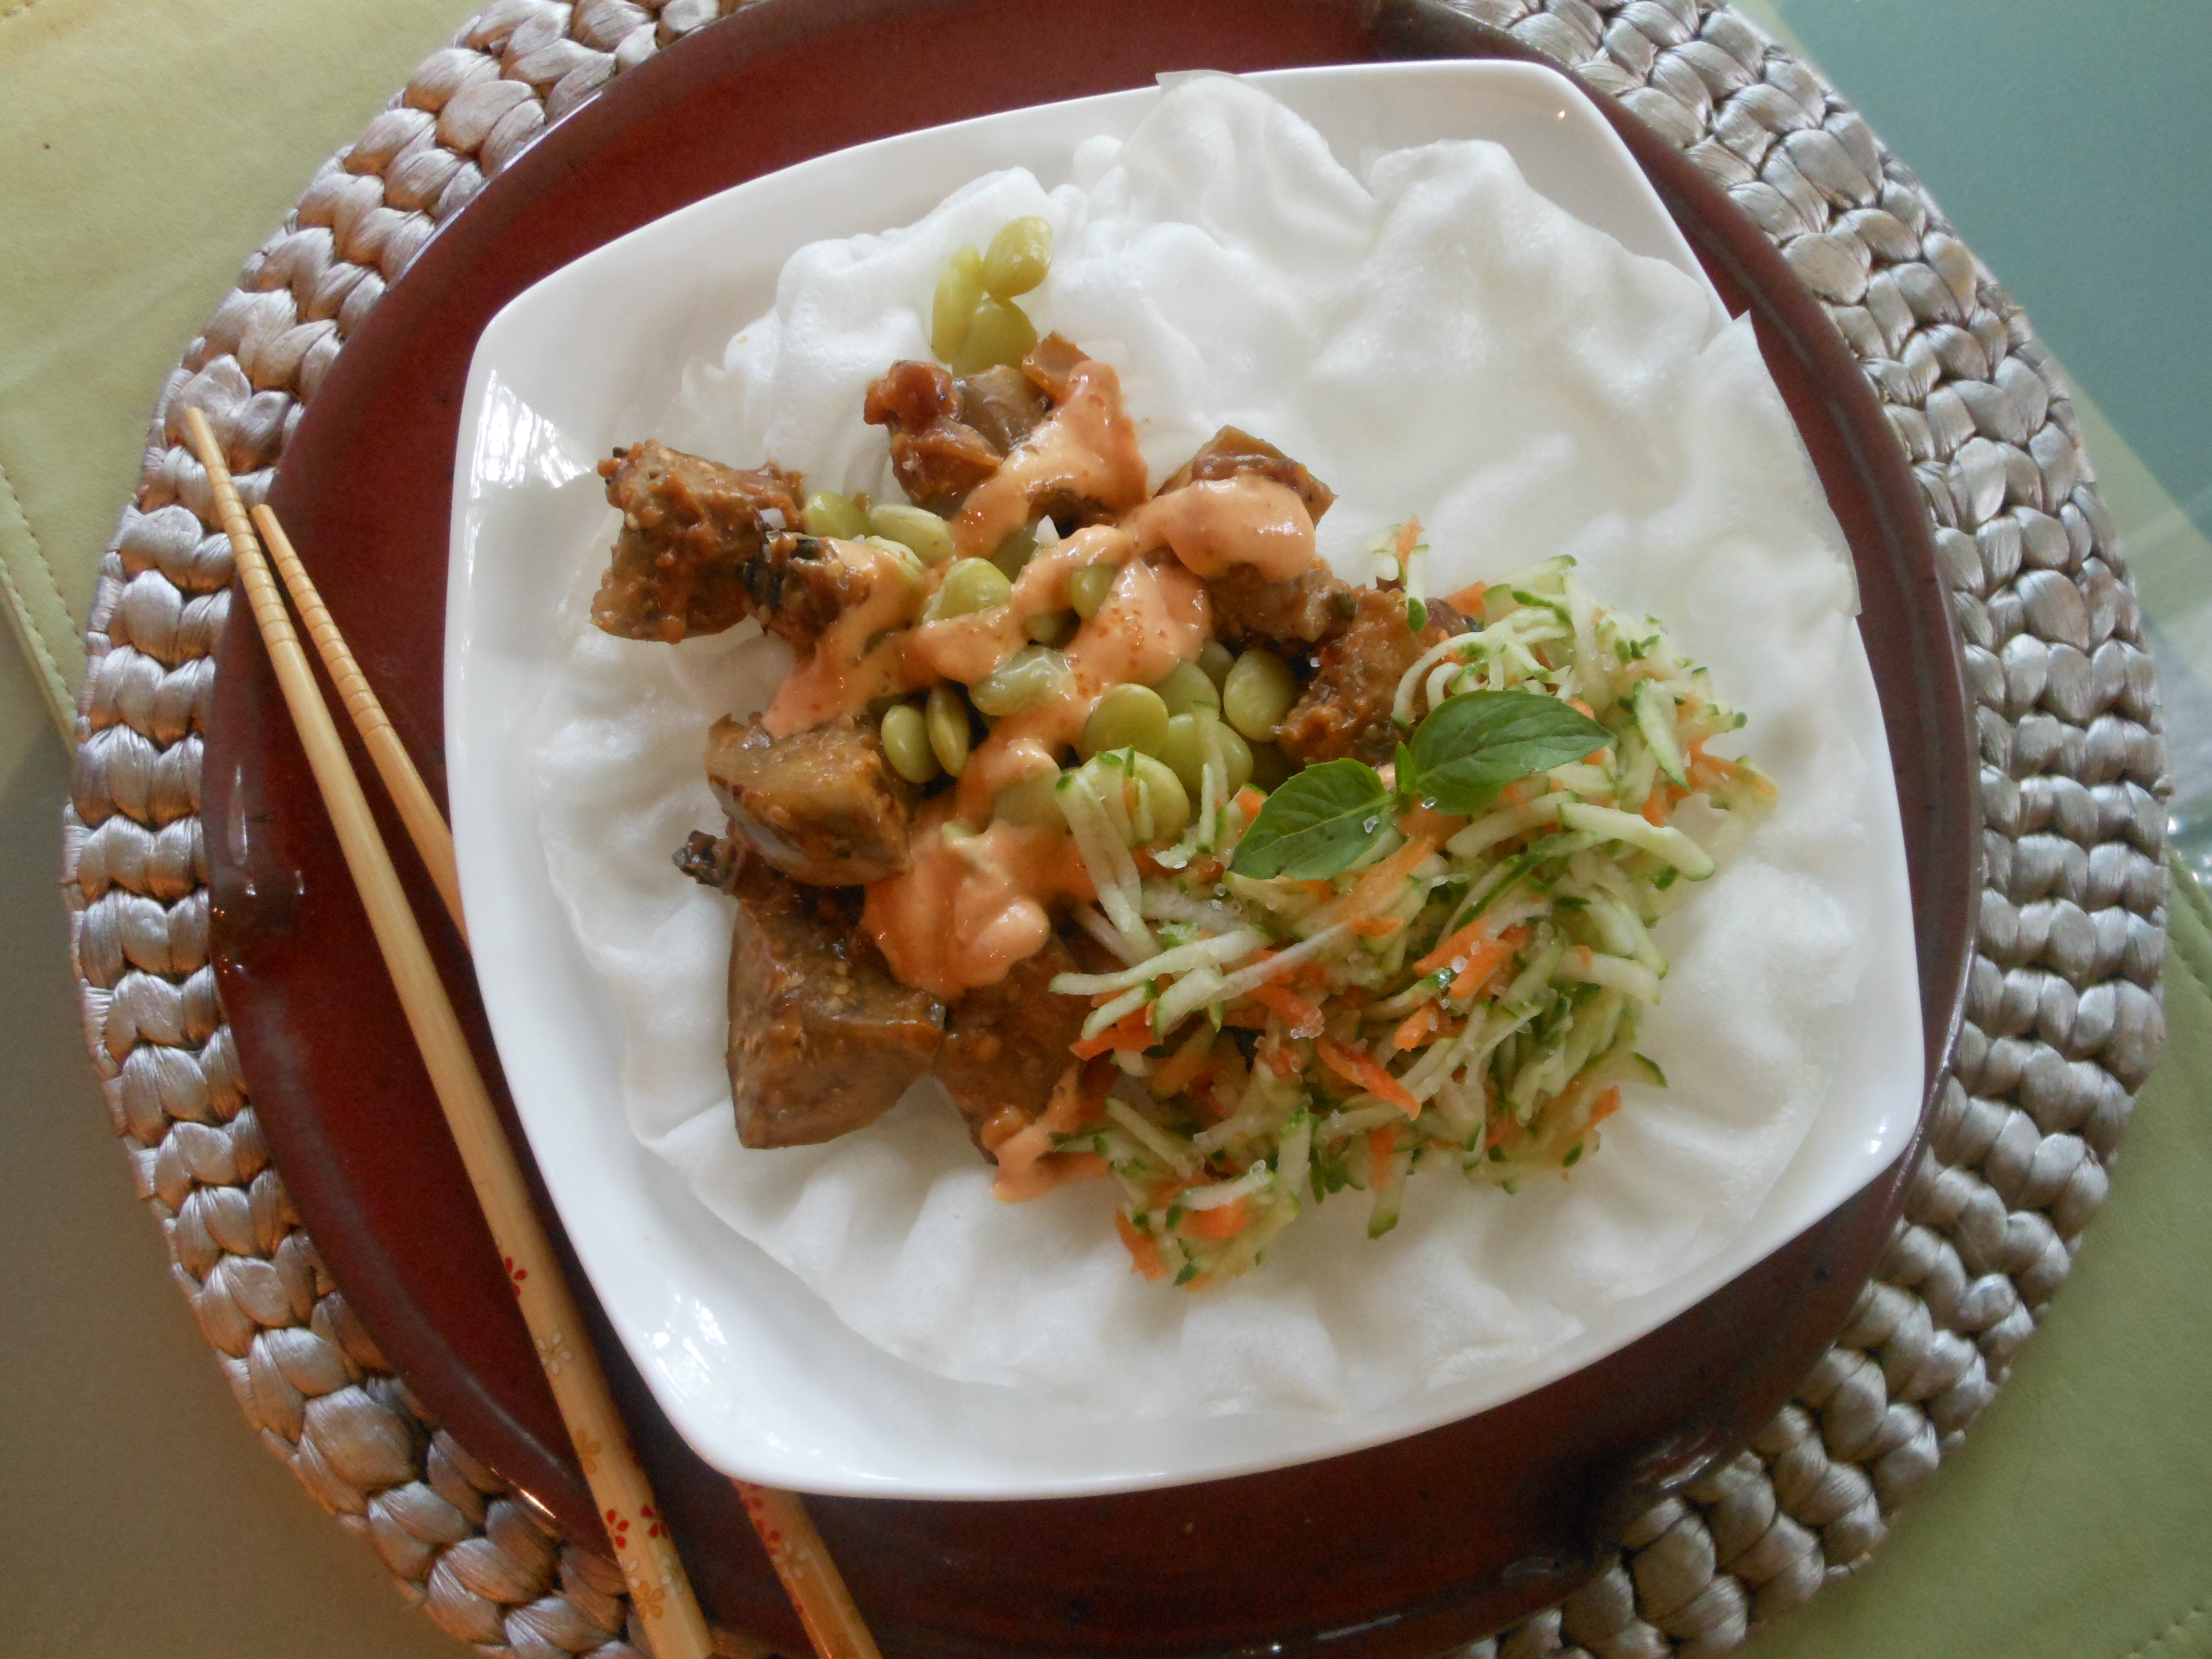
A spring roll wrapper crisped and perfectly puffed in the microwave forms the adorable edible bowl for this delectable Thai-influenced layering of fresh ingredients: limas cooked in coconut water; onion, eggplant, and garlic in a creamy peanut butter-red curry paste sauce with a hint of Thai basil; Cucumber-Carrot Slaw; and, if you’re feeling really decadent, Chili-Mayo, chopped cashews or peanuts, and a sprig of Thai Basil.  Buddha would certianly bless this bowl!


1 cup fresh lima beans cooked about 20 minutes or until tender in simmering coconut water to cover, cooled, and drained (reserve water for another use)

1 cup julienned or grated cucumber and carrot, combined in any proportion (I use one medium cucumber and one medium carrot and a food processor for this task)

Sea salt

3 tablespoons vegan “fish” sauce, divided into 2 and 1 tablespoons (sold as “vegetarian” in Asian markets)

1 tablespoon + 1/2 teaspoon rice wine vinegar

1 tablespoon olive oil or peanut oil

1 medium red onion, diced

3/4 pound eggplant, cut into 1-inch cubes

1 large clove garlic

1/2 cup water

2 tablespoons crunchy peanut butter (I use Kroger brand “natural”)

1 teaspoon Thai red curry paste (widely available in Asian markets and the international aisles of grocery stores)

1 tablespoon finely chopped Thai basil (also widely available at Asian markets; you can substitute regular basil, but it won’t have that distinctive anise-like flavor)

4 spring roll wrappers

Chili Mayo (optional; recipe follows)

Garnishes: 4 teaspoons chopped lightly salted and roasted cashews or peanuts and fresh Thai basil sprigs


While lima beans cook, make Asian Cucumber-Carrot Slaw:  in a small, non-reactive bowl, combine julienned or grated cucumber and carrot with a pinch of sea salt, 1 tablespoon fish sauce and 1/2 teaspon rice wine vinegar and set aside.  Make eggplant filling: heat olive oil in a large cast iron skillet over medium high.  Saute onion with a pinch of sea salt for about 3 minutes, stirring frequently, or until softened.  Add eggplant and garlic and saute, stirring frequently and lowering heat if necessary, for about 12 minutes or until lightly browned.  Stir in water, and allow to simmer while you whisk together in a small cup the peanut butter, the remaining 2 tablespoons of fish sauce, the remaining 1 tablespoon of rice wine vinegar, and the red curry paste.  Drizzle over eggplant mixture, stir to combine, and heat through.  Stir in Thai basil.  Lower heat and keep warm while you prepare spring roll bowls.  Microwave each spring roll wrapper for about 40 seconds on full power or until puffed with no slick, shiny areas.  Check after 20 to 30 seconds.  To serve: place each puffed spring roll wrapper on a plate or in a shallow bowl.  Spoon 1/4th of eggplant mixture in the center, followed by 1/4 of beans and 1/4th of slaw.  Drizzle with Chili Mayo if desired, and garnish each with 1 teaspoon chopped nuts and a sprig of fresh Thai basil.  Serve immediately.


Thai Chili Mayo:

6 tablespoonsvegan mayo

2 tablespoons vegan “fish” sauce (sold as “vegetarian” in Asian markets)

1 teaspoon rice wine vinegar

1 teaspoon Thai Red Curry Paste

In a small non-reactive bowl, whish together all ingredients until very smooth.  I like to transfer to a plastic squirt bottle from the dollar store for dispensing.


Vegan (and Parve) Pumpkin Cheesecake Ice Cream (with mousse option)–A Tofutti Exclusive!

Pumpkin Cheesecake Ice Cream 3Yield: 1 quart

This is the perfect summer-into-fall recipe!

I love the challenge of developing recipes exclusively for Tofutti Brands, Inc.  When they recently requested a parve recipe for pumpkin ice cream, I mentally created the recipe for a Pumpkin Cheesecake Ice Cream, as I wanted to use their Better than Cream Cheese; and then I set out on a hunt for certified parve products in our local Kroger.

Imagine my delight when every single ingredient I wanted to use, save graham crackers, qualified, provided I chose specific brands!  And I was able to substitute matzo meal for the graham crackers in the crumble topping with a wonderful outcome.

Parve or not, I trust you will rave about this beautifully colored, creamy textured ice cream like my guests have.  And you might be as excited as I was to learn that it is delicious served as a mousse before freezing!

Note: the specific brands of products listed are pareve.  If you adhere to a Pareve diet and choose other brands, be sure to look for the identifying symbol on the package.  Also, when selecting Tofutti Better than Cream Cheese–or Better than Sour Cream–please note that they company offers two kinds:  one contains transfat and one does not; I opt for the latter.


8 ounces Tofutti Better Than Cream Cheese

1/2 cup Sugar in the Raw natural turbinado sugar

1-15 ounce can Libby’s pumpkin puree

1-15 ounce can Coco Lopez Cream of Coconut

1 teaspoon vanilla extract

3/4 teaspoon ground cinnamon

1/2 teaspoon ground ginger

1/8 teaspoon ground cloves

“Graham Cracker” Crumble Topping (recipe follows)


Place Better than Cream Cheese, sugar, and pumpkin puree in the bowl of a food processor and process until smooth, scraping down sides of bowl as necessary. Add cream of coconut, vanilla extract, cinnamon, ginger, and cloves and process until completely combined, again scraping down sides of bowl as necessary. Chill mixture for several hours, freeze in an ice cream maker according to manufacturer’s directions, transfer to a covered carton, and chill for several hours to “ripen.”   Serve sprinkled with “Graham Cracker” Crumble Topping, if desired.

Chilled, but not frozen, this delectable ice cream base makes a beautiful, creamy mousse.


“Graham Cracker” Crumble Topping:

1 cup matzo meal

3 tablespoons Sugar in the Raw natural turbinado sugar

1/8 teaspoon sea salt

5 tablespoons melted Earth Balance Original Buttery Spread, melted

1 tablespoon pure maple syrup


Preheat oven to 350 degrees. Line a baking sheet with Silpat or parchment paper. In a small bowl, combine all ingredients with a fork.   Press into a 1/4-inch thick circle on prepared baking sheet and bake 25 minutes or until golden brown; check after 20 minutes. Allow to cool, and break into pieces or crumbs of the desired size. Store in a covered container at room temperature.

Note:  For parve maple syrup, sea salt, ground spices, and vanilla extract, look for brands like Camp, Dan-D’s Foods, Danon Foods, Gefen, Liebers, Now Foods, Pereg, Prima, Sobeys Foods, Sobeys West, Victorian Epicure, etc.

Southern Vegan Quinoa and Brown Rice Salad with Corn, Peanuts and Fresh Tomatoes

Wild Rice, Corn, Peanuts, Tomato, and Basil SaladYield: 4 to 6 servings

During the first full week of August, I was in MS visiting my family.  They live in Laurel, a small town in Jones County, 90 miles north of the coastal towns of Biloxi, Gulfport, Pascagoula, Ocean Springs, etc.  If you watched Hurricane Katrina coverage in 2005, these town names, in addition to New Orleans, may be familiar to you.

Despite being so far inland, then governor of the state, Haley Barbour, declared Jones County the hardest hit of any area outstide the immedate coastal strike zone due to the number of tornadoes spawned by the storm system.

Because of damage to their home, my parents and sister were displaced for nearly a year; but they were fortunate to find a lovely rental home near downtown on 6th Avenue, my favorite street in Laurel, where we spent Christmas that year.

Once you have lived through something like that, you never want to be without prepared foods in the house that don’t absolutely require refrigeration or cooking, at least not until opened.  So, there is a always still a plethora of canned goods about which I tease them good naturedly.  I love to cook for them–and they seem to enjoy it too–so I am frequently creating new dishes, like this one, from their “storm cellar.”

Feel free to cook your rice or other grain “to order,” and use fresh corn but, trust me, this salad is really delicious with the prepared rice and canned corn.  It was inspired by a salad I saw on an airport menu as I dashed through ATL on the way to see them.  All I saw was “Corn and Peanut Salad.”  I have no idea what else might have been in it or what it tasted like, but it doesn’t much matter, as this one is first class (get it?).

1-8.5 ounce package Uncle Ben’s Ready Rice: Whole Grain Medley:  Quinoa and Brown Rice with Garlic (or 2 cups cooked grain of your choice)

1-15.5 ounce cans corn, rinsed and drained (or 2 cups cooked corn, fresh or frozen)

1 cup dry roasted peanuts

1 large tomato, cored and diced

1-2 tablespoons fresh basil, finely slivered or chopped

Sea Salt to taste

Freshly ground black pepper to taste

1/4 cup olive oil

2 tablespoons white wine vinegar

Optional garnish: fresh basil sprigs

In a medium bowl, gently toss together all ingredients except olive oil and white wine vinegar.  In a small cup or bowl, whisk together olive oil and vinegar.  Drizzle over salad and toss again to combine.  Refrigerate, covered, for 2 or more hours to marry flavors.


Vegan Broccoli, Chickpea, Hominy and Fresh Tomato Salad

Broccoli, Chickpea, Hominy, and Tomato SaladI good naturedly tease my family in MS about their “storm cellar,” i.e. a plethora of canned goods, no doubt the “aftermath” of having lived through Hurricane Katrina, including displacement from their home for nearly t a year.

When I visit, as I did the first week of this month, I enjoy cooking for them and challenge myself to use what they have on  hand, as with this salad, which I prepared for a luncheon in honor of our dear family friend, Lisa Thames.  My mom made her famous Black Bean Soup, my sister her coveted Key Lime Pie, and my dad provided the wine–yep, wine at lunch for a special occasion such as this.

Even without the soup, pie, and wine, you’ll love this colorful salad.  And my sister, a hominy fan, will be glad I finally posted it!


Yield:   4 to 6 servings as a main course


1-10 ounce package frozen broccoli, completely thawed and drained

1-15.5 ounce can chickpeas, rinsed and drained

1-15 ounce can white hominy, rinsed and drained

1 larged tomato, cored and diced

Dressing (recipe follows)


Gently combine all ingredients in a large bowl.  Drizzle dressing over, and toss again gently to distribute.  Check for seasoning and adjust if necessary.  Cover and refrigerate for at least 2 hours to allow flavors to marry.


Dressing:

3 tablespoons olive oil

1 tablespoon lime juice

1 teaspoon maple syrup

1/2 teaspoon ground cumin

1/4 teaspoon garlic powder

Sea salt to taste

Black pepper to taste


Whisk together all ingredients in a small, non-reactive bowl or cup.

Kiss Me Organics Green Tea Matcha Powder–I’ll Drink to That!

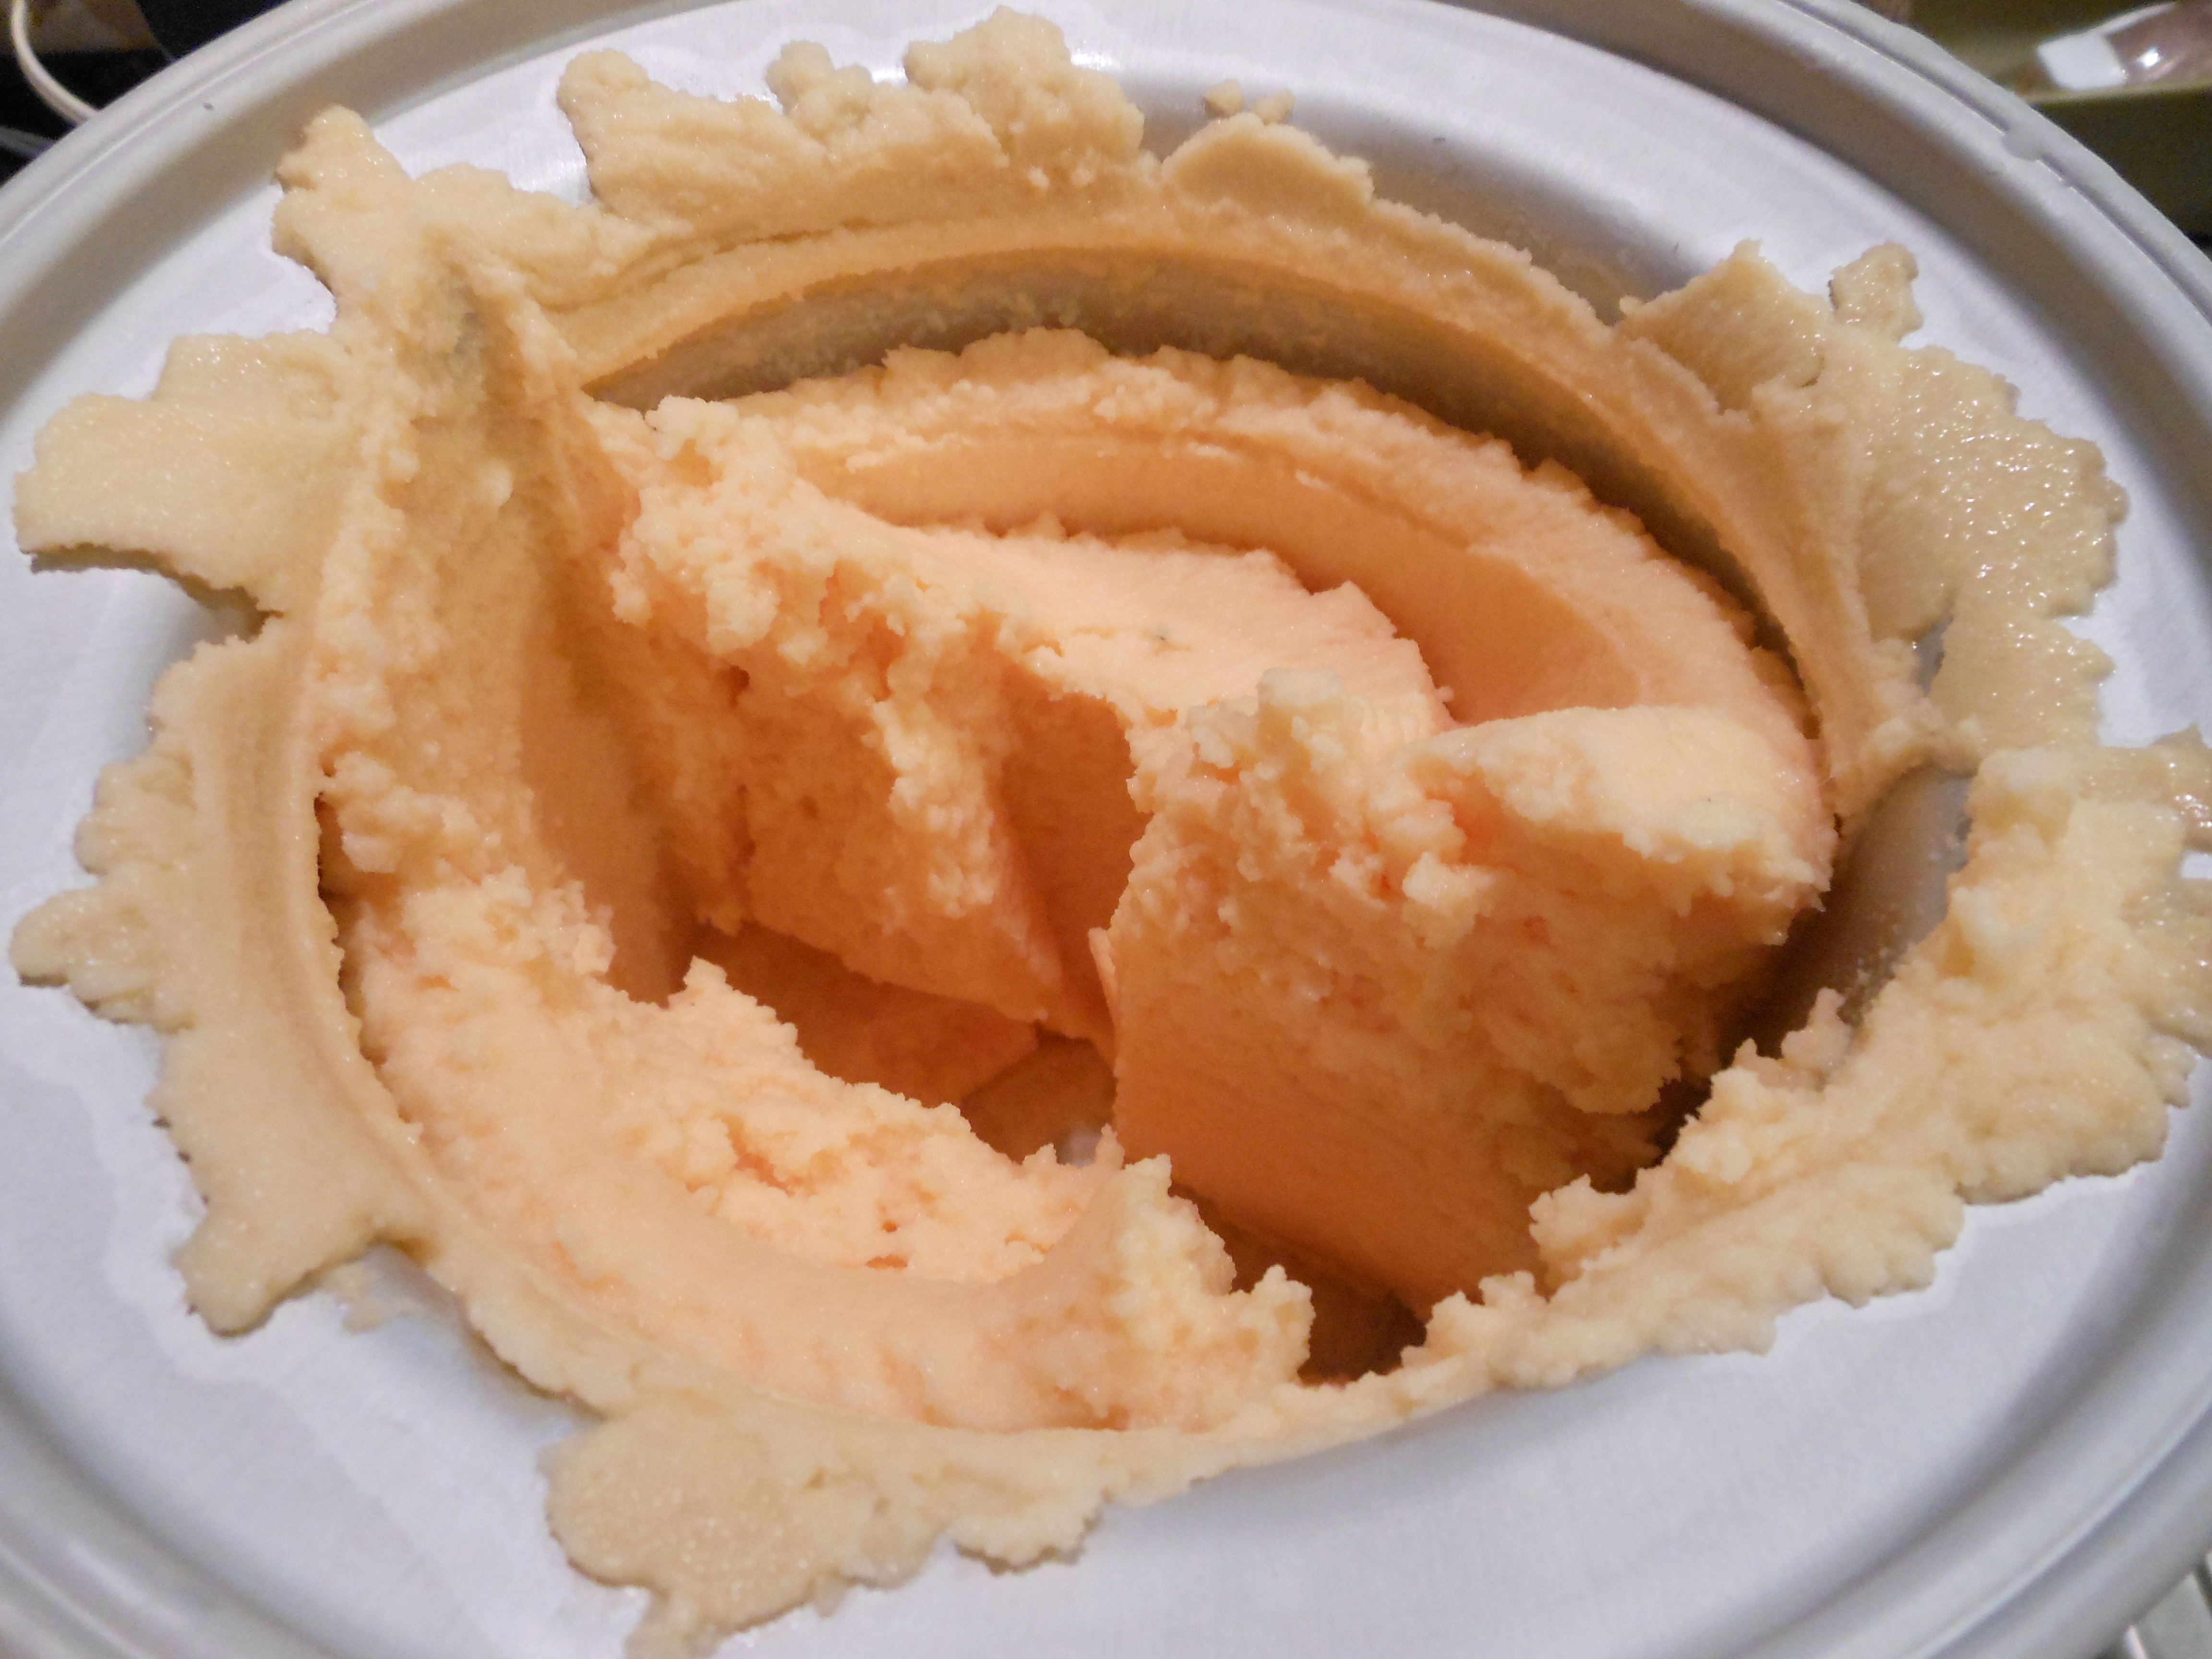
I am a Starbucks unsweetened green tea soy Frappuccino devotee (their soymilk is plenty sweet without the addition of syrup). Since those beverages are a bit pricey, I have always wanted to make them at home, but a grocery store matcha powder that I purchased a few years back was pretty much undrinkable, and I have not been able to recreate the taste and consistency I crave until now.

Recently, Kiss Me Organics offered me a free sample of their Green Tea Matcha Powder.  These offers always make me a little nervous as I want to love the product and review it positively, but what if I don’t love it?  In the case of this matcha tea, fortunately, I didn’t have to worry.

KMO Organic Matcha did the trick. It definitely has a robust flavor, but I like that and, in fact, in my Frappuccino of 1 cup ice + 1 cup unsweetened soy milk + 3 packets of Stevia + 1 teaspoon arrowroot starch (to prevent the frapp from being icy) whipped up in my Nutri Bullet, I used 1 whole tablespoon of this matcha powder and loved it. (The recommended serving on the package is ½ to 1 teaspoon.) Even so, each drink is still far less expensive than my beloved Starbucks versions. I am going to experiment with reducing the amount of matcha just to make it last longer. And I look forward to experimenting with it in baking, as well.

The color is beautiful and the flavor earthy and deep…some homemade vegan green tea cupcakes, frosting, and shortbread is in my future.  And I will share them here!

Creamy Vegan Cantaloupe-Coconut Cream Sorbet–as simple as it is sweet!

Cantaloupe SorbetYield: 1 quart

Tomorrow night is our much anticipated annual Julia Child Birthday Bash.  This sophisticated French potluck dinner brings out the best in our foodie friends each year and I can hardly wait for the parade of beautiful people and food to begin.

Among my contributions will be this sorbet inspired by a MS grown cantaloupe that a friend of my parents’  brought to them when I was visiting there last week.  I like cantaloupe fine, but “don’t wake up screamin’ for it,” as my father would say.  That one, however…wow!  It was so creamy and delicious that it tasted like ice cream with a mouthfeel to match.  I knew at that moment, that I would come home to try my hand at a vegan sorbet, as the “rules” of the party are that all food must be either made from a Julia Child recipe or French-inspired.  Sorbet fits the bill perfectly.

I am so glad that I made it for a party, as I might just polish off the whole carton if we weren’t expecting guests!

Note:  make this sorbet 1-2 days before you plan to serve it, as the base needs to chill and the ice cream is best of allowed to ripen.

1 medium-large cantaloupe, halved, seeded, and flesh scooped out with a spoon, divided

1/4 cup arrowroot starch

1–15 ounce can Cream of Coconut (Coco Lopez is a common brand sold where drink mixers are sold; not coconut milk or coconut creamer)

Juice of 1 large lime

Place flesh from one half of cantaloupe in food processor and process until smooth.  Strain into a medium bowl, return any large pieces to processor, and whisk 1/4 cup arrowroot starch into the puree.  Process remaining half of cantaloupe with Cream of Coconut until very smooth.  Strain  into a 4-quart saucepan and bring to a simmer over medium-high heat.  (Pop any large unprocessed pieces right into your mouth!)  Remove from heat and immediately whisk in cantaloupe-arrowroot mixture.  Allow to cool, whisk in lime juice, and then chill several hours or overnight, covered.  Freeze in an ice cream maker according to manufacturer’s directions; this took about 40 minutes in my Cuisinart.  Serve  immediately or scrape into a covered carton and freeze to allow to ripen until serving time.


Veganized!: Diane’s Dad’s Sandwich, a Winner in NPR’s “Taste of Summer” Contest (in Honor of August, National Sandwich Month)

Diane's Dad's Sandwich--stackedYield: 1 sandwich (easily mulitplies)

Visits to my family’s home in MS always involve food adventures.  Last week, one of them came in the form of a mere description of a sandwich by my good friend since childhood, Margaret Deavours, who had heard about it on, of all places, NPR.  This sandwich  has become her go-to and I now see why!

Called *Diane’s Dad’s Sandwich, it consists, in part, of summer garden favorites: thinly sliced vidalia or red onion, cucumbers, and tomatoes.  These fresh ingredients are “sandwiched” between a top layer of (vegan) cheese ( white cheddar is used in the original recipe) and, believe it or not, a bottom layer of crunchy peanut butter.  Stacked high between 2 slices of whole grain bread–untoasted for ease of eating–this sandwich is a winner in more ways than one!!  *Be sure to read all about the sandwich by following the link.  Recipes entered into the contest had to be accompanied by a story; it is NPR after all!

Margaret made the sandwich sound so intriguing that I created a special Vegan Sharp Cheddar Cheese just so I could partake because, apparently, the magic of this sandwich is attributed not only to it’s fresh and unusual combination of ingredients–unusual, at least, for a sandwich–but the precise order in which each and every one of them hits one’s palate.  That being the case, be sure not to flip the sandwich as you lift it from plate to face!

Margaret’s only addition is, to me, essential because I tried it with and without:  fresh basil or cilantro in keeping with the Thai flavor profile (not pictured below, as I added it later and LOVED it).   To stay even more true to that profile, I chose Thai basil with it’s hint of anise, and will never make it any other way–wowza!   Because fresh herbs are an add-on, I wasn’t sure where to place them in the all-important stacking order, but I chose the middle, between the cucumber and tomato.    Other than swapping out the cheese for my delicious vegan version and adding a sprinkling of sea salt and freshly ground black pepper, the only other change I made to the directions was to soak the red onion in unsweetened soymilk for a few hours to temper some of that peppery bite and strong aroma.

Don’t be put off by the peanut butter!  Besides the synergistic effect of all the ingredients, it is probably the peanut butter that makes this simple sandwich so extra-special!

2 slices whole grain bread, untoasted

1-2 tablespoons crunchy peanut butter

1 thin slice of vidalia or red onion (to rtemper strong flavor and aroma, soak in soymilk for a few hours, covered in refrigerator)

4 thin slices cucumber

Several fresh Thai basil leaves (you may substitute Italian basil or cilantro)

2 thin slices tomato

Sea salt to taste

Freshly ground black pepper to taste

1-2 tablespoons Vegan Sharp Cheddar Spread (recipe follows)

Spread 1 piece of bread with peanut butter and then layer on ingredients in the order given.  A note to you sandwich flippers: be sure to eat the sandwich with the peanut butter on the bottom!


Vegan Sharp Cheddar Cheese Spread

2 cups raw cashews, covered in 2 cups water and soaked overnight

1/2 cup white miso (which is actually golden; this amount is needed for that “sharpness” unique to cheddar)

2 tablespoons nutritional yeast

1 teaspoon garlic powder

1 teaspoon onion powder

1 teaspoon turmeric (for color; I decided to go for a yellow cheddar for more color)

1/2 teaspoon mustard powder

1/4 teaspoon sea salt or to taste

1/3 cup dry champagne, prosecco, white wine or beer (a non-alcoholic wine or beer may be substituted)

Place all ingredients in bowl of food processor and process several minutes or until smooth, scraping down sides of bowl as necessary.  Store leftovers covered in refrigerator.

Diane's Dad's Sandwich--open


Vegan Red Zinfandel Pasta with Golden Grape Tomatoes

Red Zinfandel Pasta with Golden Grape TomatoesYield: 4 modest servings (will need a substantial side dish or side salad to make a full meal)

This easy recipe yields pasta that looks like those made from doughs “dyed” with various vegetable dyes (or animal, like squid ink–ick!). But, instead, taking Giada de Laurentiis’s lead, prepared pasta is cooked in red wine and turns this beautiful color.  Clever, no?  Giada also adds a little bit of tomato paste to hers, which you can certainly do.  It will deepen the color for sure.  But I really wasn’t after that rich cooked tomato flavor, so I left it out and my husband and I both loved it.

She serves hers with herbs and goat cheese.  If I had had an of my Homemade Vegan Ricotta Cheese, I would have stirred little pieces of that into it, but we ate that right up!  So, I had some beautiful yellow-orange grape tomatoes from the farmer’s market that I thought looked striking in contrast with the pasta.  And it tasted delicious too.

Feel free to add whatever cooked vegetable you choose (though tomatoes are best added fresh).  You can hardly go wrong unless the color is too close to the pasta color and doesn’t show up.

8  ounces whole wheat pasta (I like a thin vermicelli–not the Asian rice variety–but spaghetti is nice too, just adjust cooking time)

Sea salt

2 tablespoon olive oil

1/4 cup finely diced red onion or shallot, red if available (about a medium shallot)

2 cloves garlic, minced

2 cups of dry red wine, like a Zinfandel or whatever you have on hand

16 golden grape tomatoes, halved

1/4 cup finely chopped basil

Garnish: sprigs of basil and optional nutritional yeast

Bring a large (4 quart) pot of well-salted water to boil over medium-high.  Add pasta and simmer pasta for about half it’s cooking time (about 4 minutes for whole wheat vermicelli); lower heat if necessary.   Meanwhile, in a large cast iron skillet over medium-high, heat olive oil.  Add onion and garlic and sauté, stirring continually, until softened and fragrant, about a minute or two.  Add red wine, and bring to a simmer; adjust heat if necessary.  Drain pasta and add to skillet with red wine mixture, or scoop pasta directly into mixture using a slotted spoon.  Cook pasta for its remaining time or a minute or so longer, stirring occasionally.  When almost all of wine has cooked off, add tomatoes and basil, and gently toss until all of the moisture has simmered away.  Serve immediately dusted with nutrition yeast if desired (but not enough to hid the beautiful color), and a sprig of basil.

Vegan Lasagna with Creamy Swiss Chard Filling, Walnut Pesto, and Fresh Roma Tomato Sauce

020Yield: 6 servings

In this lovely summer lasagna–a guest recipe I was asked to create for Tofutti Brands, Inc.–a fluffy and creamy Swiss Chard Filling finds its perfect counterpoints in rich Walnut Pesto; zippy, pleasantly acidic, lightly cooked Fresh Roma Tomato Sauce; and a crunchy topping.

Creamy Swiss Chard Filling (recipe follows)

sea salt

1/4 cup + 2 tablespoons olive oil

6 dried lasagna noodles

1/2 pound (about 3 large) fresh Roma tomatoes, unpeeled, stem end removed, and halved

3 tablespoons loosely packed fresh basil leaves

1 cup walnut pieces

1 large garlic clove, halved

1/2 cup panko bread crumbs

1 tablespoon nutritional yeast

Make Creamy Swiss Chard Filling in food processor, transfer mixture to a medium bowl, set aside, and rinse out bowl of  food processor.

Noodles:  Fill a large pot (4-quart)  3/4 full with water, add a tablespoon each of sea salt and olive oil, and bring to a gentle boil.  Add lasagna noodles, partially cover, and simmer 8 to 10 minutes or until al dente, lowering heat if necessary.  Drain and arrange noodles in a single layer on a baking sheet, covered with a kitchen towel to prevent drying out.

Fresh Roma Tomato Sauce:  Place Roma tomatoes in food processor with basil and a pinch of sea salt and process until smooth.  Transfer to a medium (2-quart) saucepan and cook over medium-high heat, stirring frequently, until sauce thickens and most of watery moisture has evaporated; lower heat if necessary to prevent scorching and sticking on the bottom.  Remove from heat.

Walnut Pesto:  Rinse and dry bowl of food processor and add the nuts, garlic clove, and about a 1/2 teaspoon sea salt.  Pulse until finely chopped and, then, with motor running, drizzle in 1/4 cup of olive oil to make a thick paste.  Set aside.

Topping:  Heat 1 tablespoon of olive oil in a large cast iron skillet, add bread crumbs and toast, stirring occasionally, until crumbs begin to turn golden brown, lowering heat if necessary.  Add nutritional yeast and continue toasting and stirring for another minute or until crumbs are golden and yeast is fragrant.  Remove from heat.

Assembly:  Preheat oven to 350 degrees.  Oil the bottom and sides of two 5 x 9″ metal or ceramic loaf pans.   Trim all of the lasagna noodles to fit the length of the pans and then cut the trimmings in half.  Line each of the pans with 2 overlapped lasagna noodles, spread each with 1/4 of the Creamy Swiss Chard Filling, and cover the surface of each with small dollops of 1/4 of the walnut pesto.  Top each with a single lasagna noodle and 1/2 of the noodle trimmings tucked along the sides if desired (or you may discard these).  Repeat layers, ending with a final single lasagna noodle.   Spoon half of the Fresh Roma Tomato Sauce over each, sprinkle with half of the bread crumbs, and bake, uncovered, for 30 minutes.  Allow to cool for 10-15 minutes, slice with a sharp serrated knife, and serve.

 Note: if you are watching your calories, this lasagna is equally as successful and delicious without the last lasagna noodle layer  Simply spoon the tomato sauce over the second and final Walnut Pesto layer, top with crumbs, and bake as directed.  In this case, you will need only 6 lasagna noodles.

Creamy Swiss Chard Filling:

1/2 pound stemmed Swiss chard leaves

14 ounces extra firm tofu, drained

8 ounces Tofutti Better than Cream Cheese

Juice and zest of 1/2 large lemon

2 large cloves garlic

2 tablespoons nutritional yeast

1 tablespoon fresh rosemary leaves

1/2 teaspoon Bragg Liquid Aminos

1/2 teaspoon sea salt

1/8 teaspoon turbinado sugar (or any granulated sugar)

1/8 teaspoon freshly ground black pepper to taste

Finely chop Swiss chard in the bowl of a food processor.  Transfer chard to a medium bowl, set aside, and rinse out bowl of food processor.  Place all remaining ingredients in the food processor bowl and process until smooth, scraping down sides as necessary.  Transfer to bowl with Swiss Chard and fold together until completely combined.

Vegan Crispy Mustard-Roasted New Potatoes

Crispy Mustard-Roasted New PotatoesYield: 4 servings as a side dish

This recipe is based on one of Ina Garten’s, the Barefoot Contessa, as seen on the Food Network. My main changes are the addition of fresh minced mild chili pepper, which is optional, and garlic.

I had seen the introduction to one of her shows recently, where she mentioned these potatoes, but I didn’t watch it. So, when our farmer’s market had beautiful new potatoes that they call “creamers” this week, I bagged some planning to make the recipe, as I knew I could find it online. And I did.

But I didn’t write it down; I just created it from memory, adding a couple of ingredients. They are just delicious and quite beautiful…something about those mustard seeds.

3/4 pound golf ball size new potatoes (quartered; halved if potatoes are smaller)
1 medium onion, halved, and sliced into 1/4-inch thick slices
1/4 cup olive oil
2-3 tablespoons stone ground mustard
1/2 teaspoon sea salt
1/4 teaspoon freshly ground black pepper
Optional: 2 teaspoons finely diced mild red chili pepper, seeds and membranes removed
1 large clove garlic, minced

Preheat oven to 425 degrees. Oil a large roasting pan and place potatoes and onions in a single layer in the pan. In a small cup, whisk together olive oil, stone ground mustard, sea salt, and pepper. Drizzle over potatoes and onions, and toss well to completely coat; I like to use my hands for this task. Roast for 30 minutes, stirring every 10 minutes. Sprinkle chili and garlic over potatoes, stir to distribute, and roast 20 more minutes, stirring after 10, or until potatoes are very crispy and brown and some of the onions are charred. Serve immediately.

Related Posts Plugin for WordPress, Blogger...