Vegan Baking for All Seasons: Vegan Italian Chocolate-Nut Thumbprint Cookies

I am a seasonal cooking devotee as you can see from The Blooming Platter Cookbook.  But I love perennial ingredients like chocolate year-round.

In this photo from the current issue of VEER Magazine, I’m holding one of my newest sweet treats: Vegan Italian Chocolate-Nut Thumbprint Cookies.  We wanted to include a photo showing that vegans don’t only eat vegetables, so we shot some of me with this cookie.

The inspiration for the recipe is bittersweet, as it came from a tray of cookies that was delivered to my sister-in-law’s house on the occasion of my mother-in-law, Terry’s, passing.  (People were so generous: you have never seen so much food in your life!)  I had to sample this particular non-vegan cookie for research.  It looked beautiful and I needed to know what it tasted like so that I could try to hit the mark….sorry!

The first batch went down the disposal, literally.  I hated to be wasteful, but they were a disaster.  My next riff wasa big hit at the Vegan Virginia Beach Bake Sale (as was everything that members brought, especially various cupcakes!).  So I made them again recently for our wonderful administrative assistants at Princess Anne High School.  I put 2 or 3 in tiny Chinese carry-out containers as gifts for all of them during “Administrative Assistants Week.”

One of the women, Susan Barnes, even asked for the recipe to share around.  She likes the cookies crumbled up in her yogurt(!).  But she made me promise that there was no tofu in them.  We have a running joke about tofu; it’s not her favorite.

I plan to make a batch of these cookies for the “Incredible Edibles” book-signing and launch party on Saturday night.  If you’re in the local area, come taste test!  If not, whip up a batch for yourself and be prepared to have a new favorite!

Yield: 36 Cookies

Cookies:

1 cup vegan butter (I like Earth Balance)

1/2 cup confectioner’s sugar

2 tablespoon natural sugar

2 tablespoons cocoa powder

Pinch sea salt

1 teaspoon vanilla

1/4-1/2  teaspoon almond extract

1 tablespoon water

2 cups white whole wheat flour

2 cups finely chopped pecans

Preheat oven to 325 degrees.  Line1 or 2 baking sheets with Silpat.  In the large bowl of an electric mixer, cream together butter and both sugars.  Beat in cocoa powder, salt, both extracts, and water.  Beat in flour, one-half cup of flour at a time, beating only enough to incorporate.  Avoid over- beating.  With the mixer on low speed, blend in nuts.  Scoop by 1 tablespoon of  dough onto prepared baking sheets.  Flatten into a disk with the bottom of a glass.  Press your thumb into the center of each cookie twice, side by side, slightly overlapping, to make a fairly large depression.  Bake about 16 minutes.  If using two baking sheets on two racks, switch after 8 minutes.  Remove from oven and cool completely on wire racks as soon as they are firm enough to handle.

Frosting:

1/2 cup vegan butter (I like Earth Balance

3 tablespoons cocoa powder

1 cup + 3 tablespoons confectioner’s sugar

1/4 teaspoon vanilla

1/8 teaspoon almond extract

In the bowl of an electric mixer, cream all ingredients together until well-combined and fluffy.  Using a small spoon, divide the frosting evenly among the cookies, filling the depression.  Store in the refrigerator in an airtight container.

Vegan Coconut Cream-Mango Sorbet

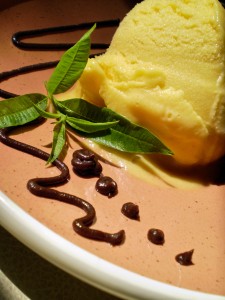
If you think the Chocolate Carrot Cupcakes below look scrumptious, you should try them with my Coconut Cream-Mango Sorbet: just a tiny scoop in a Chinese soup spoon!

The dessert display at the party mentioned in the cupcake post was beautiful, clean and modern with a sweep of white ceramic soup spoons filled with golden-orange globes of sorbet playing off the robin’s egg blue cupcake decoration–perfect complementary colors and flavors.

But with its subtle hint of fresh lime and tropical-sweet fruit flavor, this sorbet is luscious on its own or, if you don’t want to go so far as a cupcake,  with just a rich chocolate ganache squiggle as in the photograph.

This recipe and over 150 more, plus color photos, fill the pages of my new Blooming Platter Cookbook: A Harvest of Seasonal Vegan Recipes.  Your copy awaits at Amazon, Barnes & Noble, or Prince Books (both online and in their Norfolk, VA, store)!

Vegan Lemon Ginger Cookies

2.5 dozen regular-sized cookies or 1 dozen extra-large behemoths

Chewy, spicy, citrusy…I’m posting this recipe as back-to-school bliss, perfect for lunch boxes or after-school snacks…or even breakfast.  I am bringing them to my first block Advanced Art and AP Studio students for a sweet treat.

The original recipe was given to  me by my dear friend Allison Price in Nashville, with whom I shared many “study dinners” while we were in graduate school at Vanderbilt preparing for “comps.”   Her contributions were always wholesome and satisfying; homey but with a twist.

I originally veganized this recipe by substituting vegan butter for the dairy butter and Ener-G egg replacer for the egg.  But, I like to limit, whenever possible, my use of what my friend Jo Ann calls “ersatz” ingredients.  So, yesterday, I decided to use 1/4 cup lemon juice and 1/2 teaspoon baking powder for the egg, since 1 egg is equivalent to 1/4 cup liquid and has a little leavening power.  The results were virtually indistinguishable from the original, chock full of spicy, citrusy goodness.

3/4 cup vegan butter (I like Earth Balance), softened

1 cup natural sugar (I like demerera)

1/4 cup molasses

Zest and juice of 1 large lemon (approximately 1/4 cup juice; use just 2 tablespoons lemon juice + 2 tablespoons water if you want only a hint of lemon flavor)

2 teaspoons baking soda

1/2 teaspoon baking powder

3 teaspoons ground ginger

1 teaspoon ground cinnamon

2 1/2 cups unbleached flour

1/4 cup natural sugar

Line 1 or 2 cookie sheets with silpat or parchment paper.  Preheat oven to 350 degrees.  Cream together the butter and 1 cup of sugar in the large bowl of an electric mixer until light and fluffy.  (The mixture will have a little bit of a granular texture because of the coarseness of the natural sugar.)  Beat in molasses, lemon zest, and lemon juice until well combined, scraping down the sides of the bowl as necessary.   Beat in baking soda, powder, ginger and cinnamon, just until combined.  Then, with the  mixer on low or stirring by hand, incorporate flour, 1/2 cup at a time, until thoroughly combined.  Avoid over-mixing.

Using a small scoop to make regular sized cookies, or an ice cream scoop to make extra-large ones, shape dough into balls, and then roll in remaining 1/4 cup of natural sugar.  Place balls 2-inches apart on lined cookie sheets.  No need to flatten.

Bake regular-sized cookies for 10 minutes or extra-large ones for 20.  Cookies should be set, but slightly soft in the center.  Remove the sheets from the oven to a wire rack.  Now, if you prefer them flatter as I do, press each top gently with a spatula or, if cool enough, with you fingers. Store in airtight containers at room temperature.

Note: Lisa from Sweet as Sugar Cookies stopped by last week and invited me to her “Linky Party” to post a link to my Vegan Ginger-Spice Caramel Pecan Rolls.  So I did, but I also linked to this recipe, another favorite ginger-scented treat.  Though her website isn’t vegan, you will find loads of ideas for sweet things just waiting to be veganized.  I have my eye on a beet mousse!

Happy Vegan Valentine’s Day–Vegan Chocolate Truffles

Vegan Chocolate Truffle

Many recipes call for making a cashew cream of equal parts cashews and water which I find WAY too thin. These recipes also often call for melted chocolate which is luscious, but fairly high-fat. So, I make mine with cocoa powder and powdered sugar. Try them–you’ll LOVE them.

And, by the way, I hope this post isn’t too late to do you any good for Valentine’s Day tomorrow. This is the earliest I could get it done, so I apologize if you’ve no time left to make a batch. They are ultra quick to prepare and shape, though the mixture does need to chill for about 2-3 hours.

On the other hand, don’t feel you can only indulge on special occasions!

2 cups cashews halves or pieces (raw or roasted and lightly salted; if the latter, the truffles will have that “roasted” flavor and you will be able to taste the salt, but I love salt and sugar together)

1/2 cup cocoa powder

3/4 cup powdered sugar

1/2 cup water plus up to 1 tablespoon more

optional: 1/2 teaspoon flavoring of choice, e.g. vanilla, rum, hazelnut, etc.

Coating: cocoa powder, colored sugar, very finely chopped nuts, etc. (I used red sugar for the one in the photograph)

24 mini-paper liners in Valentine’s colors/patterns (I purchased mine at a craft store) Line a baking sheet with waxed paper.

Place all ingredients except paper liners, of course, in the bowl of a food processor. Process for a few seconds and then scrape the sides of the bowl. Process the mixture for several minutes or until very smooth, scraping the sides as necessary. Add the additional 1 tablespoon of water, 1 teaspoon at a time, if needed to prevent stressing the motor of your food processor, as this is a very thick mixture. Scrape it into an airtight container and chill for 2 to 3 hours or until it is firm enough to handle very easily. (Believe it or not, the motor of your food processor working will have caused the mixture to warm slightly.) Scoop the mixture into 1-inch balls (I use a small scoop for this task), rolling each one between your palms quickly to shape, and placing it on the prepared baking sheet. Return the sheet to the refrigerator if necessary before coating the candies. Pour the desired coating into a small bowl, quickly roll each truffle in it to cover completely, and place it in a mini-paper liner. Store the truffles in an airtight container in the refrigerator. Package as desired.

Yield: 2 dozen 1-inch truffles

Vegan Lemonade Ice Cream

Yield: approximately 1 quart

This is my mom’s favorite ice cream made my way.

When I was visiting my family a couple of weeks ago, Mama wanted me to veganize her Lemonade Ice Cream–doesn’t that just sound like summer?– to christen the Cuisinart electric ice cream maker I had given her and my dad (they gave me one just like it and I think it’s tops).

We didn’t get the ice cream made until the day before I was leaving early the next morning, so I wasn’t able to try any, but she reports that it met with ahhh-proval all the way around. I’ve been craving some ever since and finally made a batch this weekend. Oh, my, is it ever good: creamy and citrusy, kind of like a Dreamsicle only lemon flavored.

As always, I use Wheeler del Toro’s basic formula (if you didn’t purchase his Vegan Scoops cookbook last summer, treat yourself to it this summer). Since it makes about half as much ice cream base as my Mom’s recipe, which calls for one large can frozen lemonade, I simply used half a can.

Also, there was no arrowroot powder in my folks’ pantry, so I substituted an equal amount of cornstarch and it thickened beautifully. The only difference is that cornstarch doesn’t “break” when heated and, in fact, it needs to be cooked just a minute or so to thicken properly. Arrowroot reportedly prevents the formation of ice crystals and I’m not sure that cornstarch does. However, the batch I froze at my parents’ emerged from the ice cream maker silky smooth and didn’t last long enough for them to find out.

Enjoy this cool and refreshing sweet taste of summer as often as you like, as it’s a breeze to make.

1/4 cup unsweetened soy milk
2 tablespoons arrowroot powder
3/4 cup unsweetened soymilk (plain or vanilla would also be nice)
2 cups soy creamer
1/2 cup sugar
Optional garnish: twists of lemon rind or sprigs of fresh lemon verbena

In a small bowl, whisk together 1/4 cup soy milk with arrowroot powder until smooth. Set aside. Pour remaining soymilk, soy creamer and sugar into a small to medium saucepan and stir to combine. Place over medium heat and bring just to a boil. Remove from heat and quickly whisk in soy milk-arrowroot mixture until very smooth. Allow to cool to room temperature, whisk again if lumps remain and/or press through a sieve, and then cover and refrigerate several hours or overnight. When ready to freeze the ice cream, shake the lemonade container well, and whisk half a can into the soymilk mixture. Then freeze according to your manufacturer’s directions. Scrape the finished ice cream into an airtight container and store in freezer. Initially mine was frozen, but quite soft. But, after a night in the freezer, it was perfect. So you may want to freeze it a day before you plan to serve it.

Spiked Vegan Chocolate Mousse

Yield: 6 servings

1/2 cup chocolate soymilk
9-10 ounce bag semisweet vegan chocolate chips (not carob chips)
12 ounces Silken firm tofu
1/4 cup Amaretto, Kahlua or liqueur of your choice (or sweetened coffee in your favorite flavor)
pinch salt
2 tablespoons sugar
1/4 teaspoon pure almond extract
Optional garnish: sweetened cashew cream or a little sweetened vegan sour cream flavored with a tiny bit of vanilla extract plus a whole nut (I like cashews on anything!)

Heat milk in microwave for one minute. And chips and stir to melt and then whisk to combine. Place tofu and remaining ingredients in the bow of a food processor fitted with a metal blade and process until smooth. Taste and adjust flavoring, adding a bit more almond extract if needed and processing another couple of seconds. Chill in a large bowl; individual bowls, glasses or ramekins; or an 8-inch or individual tart crusts for approximately 1 1/2 hours to chill through. The mousse will set up almost immediately.

Vegan Lemon Verbena Ice Cream

Yield: approximately 1 quart

If you follow this blog, you know that I am a huge fan of Wheeler del Torro’s vegan ice cream. This founder and owner of Wheeler’s Frozen Dessert Company in Boston and author of The Vegan Scoop is a culinary genius. I’ve tried several vegan ice creams, with and without tofu, but wasn’t completely satisfied until I experimented with his formula.

The base for many, if not most, of Wheeler’s ice creams is a cup of soy or other vegan milk, 2 cups of soy creamer, 2 tablespoons of arrowroot (a natural starchy thickener) and 3/4 cup of sugar. You will scarcely believe how smooth and creamy the end results will be because the arrowroot thickens the base and, more importantly, reduces the formation of ice crystals.

Last summer I made lots of varieties and would hate to have to choose a favorite. This summer, with my first ever full-blown herb garden in full bloom, I decided to inaugurate ice cream season with Vegan Lemon Verbena. And, boy, am I glad I did. It was 97 here on Saturday. If you’re a frequent visitor, you know that lemon verbena is one of my favorite new herbs. The amount called for sounds like a lot, but it was really just about 3-4 nice-size stems.

If you don’t grow this plant, run, don’t walk, to your nearest garden center or farmer’s market and buy yourself a lemon verbena plant. It is unbelievably versatile for both savory and sweet dishes.

1/4 cup unsweetened soy milk
2 tablespoons arrow root powder
3/4 cup sugar
approximately 70 lemon verbena leaves, rinsed and completely dried (about 3-4 stems)
3/4 cup unsweetened soymilk (plain or vanilla would also be nice)
2 cups soy creamer
Optional garnish: sprigs of fresh lemon verbena

In a small bowl, whisk together 1/4 cup soy milk with arrowroot powder until smooth. Set aside. In a food processor fitted with a metal blade, place sugar and lemon verbena leaves until leaves are finely minced. Pour remaining soymilk, soy creamer and sugar mixture into a small to medium saucepan and stir to combine. Place over medium heat and bring just to a boil. Remove from heat and quickly whisk in soy milk-arrowroot mixture until very smooth. Allow to cool to room temperature, whisk again if lumps remain, and then cover and refrigerate several hours or overnight. At this point, you may simply freeze the mixture according to your manufacturer’s directions. Or, if you prefer not to have the actual leaves in your ice cream, simply strain the mixture through a fine sieve, pressing on the solids, and then freeze. Scrape the finished ice cream into an airtight container and store in freezer. Serve garnished with a sprig of fresh lemon verbena.

Vegan Chocolate, Raspberry and Cream Trifle

Yield: 6-8 servings (easily doubles)

My friend Susan Kaplan made a lovely Vegan Chocolate Bundt Cake for me as a holiday gift. I froze it to serve when she and her husband could come for dinner, which was this past Saturday. Joe and I each enjoyed another piece on Sunday, but there was still half of a cake left. So, because several days had passed and it was beginning to get dry, tonight I decided to transform it into a reasonably healthy trifle, eschewing peppermint for raspberries and Soy Whip for a not-too-sweet soy milk pudding. I think you’ll agree that my decision was a sound one.

1/2 recipe Vegan Chocolate Bundt Cake, cut into thirds (recipe follows)
*approximately 3 tablespoons raspberry liqueur (or one that would taste good with raspberries)
Vegan Vanilla Pudding (recipe follows), chilled
1 pint raspberries, rinsed and drained (about 36)

One day before serving, crumble 1/3 of cake into the bottom of a small clear glass trifle or other dish (I used a 5-inch square floral container but you may alternatively use individual wine or martini glasses). Sprinkle evenly with 1 tablespoon of liqueur, spread with 1/3 of pudding all the way to edges, and top with approximately 12 raspberries. Repeat layers two more times. Cover with plastic wrap and chill over night.

*Note: if you don’t have liqueur on hand or don’t consume alcohol, substitute room temperature strong coffee.

Vegan Chocolate Bundt Cake:
1 3/4 cups freshly brewed coffee
2/3 cup unsweetened Dutch-processed cocoa powder
1 1/2 cups granulates sugar
1/3 cup canola oil
1/3 cup applesauce
1/4 cup cornstarch
2 teaspoons vanilla extract
1 teaspoon almond extract
2 cups whole wheat pastry flour or all-purpose flour
1 teaspoon baking soda
1 1/2 teaspoons baking powder
1/2 teaspoon salt
2 teaspoons confectioners’ sugar

Preheat over to 325 degrees. Lightly grease an 8- or 10-inch bundt pan. Heat the coffee in a saucepan over medium heat until it comes to a simmer. Turn heat down and whisk in the cocoa powder until it has dissolved. Remove the saucepan from the heat and set aside to bring to room temperature. In a large mixing bowl, whisk together the granulated sugar, oil, applesauce, and cornstarch until the sugar and cornstarch dissolve, about 2 minutes. Mix in the extracts. Once the chocolate mixture has cooled a bit, stir that in as well. Sift in the flour, baking soda, baking powder, and salt. Beat until the batter is relatively smooth. Pour the batter into the prepared pan and bake for 45 to 55 minutes, or until a toothpick or butter knife inserted into the cake’s center comes out clean. Remove the pan from the oven and let the cake cool for about 20 minutes. Then invert the pan onto a serving plate to remove the cake, and cool completely. Once the cake is cool, sift the confectioners’ sugar over the top and serve.

Cake Source: Isa Chandra Moskowitz and Terry Hope Romero as published in Yoga Magazine via Susan Kaplan

Vegan Vanilla Pudding:
1/3 cup granulated sugar
3 tablespoons cornstarch
pinch salt
2 cups unsweetened or plain soy milk
1/2 teaspoon vanilla extract

In a small or medium saucepan, combine first three ingredients. Gradually whisk in soy milk. Turn heat to medium-high and cook, whisking constantly for 3-4 minutes or until mixture is quite thick. Remove from heat and cool to room temperature, whisking occasionally. Then chill in refrigerator for 2-3 hours.

Pudding Source: Jolinda Hackett at About.com who reprinted the recipe with permission from The Compassionate Cook Cookbook.

Vegan Thai Pumpkin-Coconut Milk Flan–A Thanksgiving Favorite Thai Style

Yield: 8 servings

For this Thai-inspired version of my go-to Pumpkin Flan, I simply substituted coconut milk for the soy milk. We had our Thanksgiving meal as a late lunch sans dessert at around 2:30 p.m. and then went to a 5 p.m. screening of “A Christmas Carol.” When we got home to have dessert, we were starving and it was dark outside, so I didn’t get a photograph of it. Therefore, I’m re-posting the photographed version of it made with soy milk, as it looks virtually identical. However, for our Thai meal, I combined vegan sour cream with a little maple syrup and spooned that over each serving, garnishing the tops with walnut pieces and a sprinkling of pumpkin pie spice. I should have made two flans, as virtually everyone wanted seconds.

1-12 ounce block of firm Silken Tofu (drained)
3/4-1 cup pureed pumpkin
1 cup coconut milk
2 ½ tablespoons cornstarch (you may alternatively use 1/3 cup all-purpose flour, but the result may be slightly more cakey than custardy)
1 tablespoon pumpkin pie spice
1/2 cup brown sugar (this is not a really sweet custard, so add another ¼ cup brown sugar if you prefer)
1 teaspoon vanilla extract

Custard: Preheat oven to 350 degrees. Oil an 8-9 inch round glass or ceramic pie dish. Place all filling ingredients in a food processor fitted with a metal blade and process until smooth and completely combined. Scrape into the pie dish, gently smooth top, and bake 45 minutes (but check every 5 minutes beginning at 30. When you touch the top, it should not leave a mark and, when jiggled, it should move slightly, but appear mostly set.) Let cool to room temperature on a wire rack and, if not serving right away, chill, covered. Serve chilled or at room temperature with topping and garnish.

Topping:
about 1/2 cup vegan sour cream
3-4 tablespoons maple syrup

Whisk together until well combined. Chill if not using immediately.

Garnish: a sprinkling of walnut pieces and pumpkin pie spice

Related Posts Plugin for WordPress, Blogger...