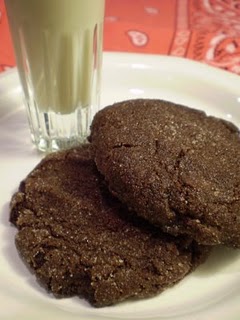
 Yield 16-18 Cookies
I call these my “$30 Cookies.” My mom, who lives in another state with my dad and sister, subscribes to Cook’s Illustrated magazine. We met in New Orleans last Christmas and, of course, we all brought along our favorite magazines for our hotel rooms. I found this recipe, cut it out, and promptly lost it, which is not like me, especially when it comes to food.
So, back home, I searched for it online. However, I could only access the Cook’s Illustrated site if I subscribed to their online publication for thirty bucks. I was so determined to obtain the recipe that I joined on the spot. I love the scientific method, but conversational tone, of Cook’s Illustrated. It’s like Alton Brown but without all the quirkiness (which I also like, albeit in limited doses). But I’ve not consulted the site for a single other recipe.
I made the cookies first by simply omitting the egg white, which is my typical approach to veganizing baked goods. The cookies are shaped into balls before baking and, in the magazine photo, they spread out to the perfect thickness in the oven. However, mine spread not at all. Hence, they were too thick in the center and required additional baking time, which dried them out. So, I decided that they needed about 1/4 cup more moisture, or slightly more than one egg white. But I didn’t want to use soy milk, as I definitely didn’t want them to turn out cakey. Then it occurred to me that maybe I should substitute ¼ cup of the butter with a fat that is liquid at room temperature—namely, canola oil—to encourage them to spread the ideal amount.
The consistency of the dough was definitely softer, even after chilling for the specified half hour, a very good sign. However, after about 4 minutes of baking, they still retained too much of their ball shape. Using my fingers (I have asbestos hands, but I recommend a spatula), I quickly opened the oven door and pressed gently on the top of each cookie to flatten them into about a ½-3/4” thick disk. After they had finished baking and cooling, I tried one and loved the results. I hope you will too. The sugar coating gives them a delightfully crunchy-crisp exterior, but they have a delectably soft interior.
8 tablespoons vegan butter, room temperature (I like Earth Balance)
4 tablespoons canola oil
1/3 cup natural sugar plus ½ cup for coating
1/3 cup packed brown sugar (you may substitute natural sugar for a total of 2/3 cup)
½ cup cane syrup, or dark corn syrup if you dare
1 teaspoon vanilla
1 1/2 cups unbleached all purpose flour (owr white whole wheat flour; one of my favorites)
3/4 cup Dutch processed cocoa powder
1/2 teaspoon baking soda
1/4 + 1/8 teaspoon salt (if using unsalted butter)
4-4 1/2 ounces vegan semi-sweet or dark chocolate chips or chocolate cut into 1/2” pieces
Line two cookie sheets with Silpats or parchment paper and set aside. In the bowl of an electric mixer, place butter, oil, 1/3 cup granulated sugar and 1/3 cup brown sugar. Reserve remaining ½ cup sugar. At medium to medium-high speed, cream mixture until well-combined and fluffy. Add corn syrup and vanilla and beat just a few more seconds to combine, scraping bowl, as needed. Mixture may look slightly curdled, but don’t worry. Add remaining ingredients, except chocolate chips, and beat on low speed, scraping bowl as needed, just until combined. Add chips and beat on low just a few seconds to distribute. Cover dough well and chill for half an hour, but no longer. Preheat oven to 375 degrees. Using a small scoop with a release lever, scoop out balls of dough about 1 ½” in diameter. Roll in reserved ½ cup of sugar and place a generous 2” apart on baking sheets. Place sheets in the oven on two racks as close to the center as possible. Bake for 4 minutes, open oven door and, using a spatula, flatten each cookie slightly to ½-3/4” thick. Close the oven door and continue baking for 2 more minutes. Reverse the positions of the baking sheets and cook for an additional 5 minutes. DO NOT OVERBAKE. Cookies should be ever-so-slightly cracked, look a little moist and soft in the center, and be more set around the edges. Cool on baking sheets set on wire racks for 5 minutes. Then, using a spatula, transfer cookies to the racks and cool to room temperature. Store in an airtight container.
Source: Inspired by a Cook’s Illustrated recipe, published January 1, 2009
Yield: approximately 36 cookies


