Vegan Cheesy Baked Buffalo Chickpea Dip
Betsy’s Best!

So sorry I’ve been away for so long…

The start of school–especially a year like this with great kids but a punishing schedule–always creates a bit of a hiatus from The Blooming Platter.  Add to that either food poisoning or a stomach virus the last two days of the first week of school, and food was of little interest to me for quite a while.

However, the first thing I wanted to eat after 2 days of being flat on my back in bed too weak to even feed the dogs–I had to call Bob home from work the first day when I couldn’t rouse myself by about 9 a.m.–was a vegan Buffalo “Chicken” pizza slice from Whole Foods.  It proved to be a bit too much of a good thing and I couldn’t finish it.  But, something about those hot-n-tangy Buffalo flavors still sounded good.  So, the next weekend when I made my regular Whole Foods stop after weekend yoga classes, I plopped some vegan Buffalo seitan bites atop some kale messaged with tahini dressing, and it was a revelation.

Then, yesterday, our generous administration and counseling office at school hosted a “social” during lunch–a lunch teachers can never take–and because they specifically told me they had vegan leftovers, I went down after my last class and enjoyed some veggies, fruit and crackers.  But there on the buffet table was a baked Buffalo dip and I knew I had to recreate it my way.  And soon.

So that’s what I did today after researching some recipes, making some mental changes, stopping at Whole Foods, and testing it out for lunch. Wow!  It is so delicious that I was afraid I might devour half a recipe.  But it is so rich and satisfying that, honestly, just a small serving is perfect. Even Bob had to admit that it was “not bad,” a glowing endorsement from his omnivorous self.

The main recipe I decided to veganize was quite  basic: cream cheese, ranch dressing, grated cheese, hot sauce, and canned chicken.  Another recipe I consulted also called for ranch dressing which I found puzzling since blue cheese dressing is the typical accompaniment to Buffalo wings.  So, I was elated when I found Daiya brand blue cheese dressing and decided to substitute it.

For my version, I also used vegan cream cheese, So Delicious shredded jack and cheddar blend, Pete’s hot sauce (I didn’t have Frank’s on-hand), and chickpeas in place of the chicken.  However, I feel sure that the original protein must add a depth of flavor, so I used 1 vegan no-chicken bouillon cube. It does up the salt level, so if you are hyper-sensitive to salt, you might want to omit.

The rich and creamy mixture was plenty tangy without additional vinegar, but I felt it did need a hint of butter used in standard Buffalo sauce recipes, so I added 1 tablespoon of Earth Balance.

Also, I think everything savory is better with garlic and onion–an opinion Bob and I share–so I added minced garlic and, because he doesn’t care for cooked onion, I used finely sliced green onion both in the dip and over the top when its lusciousness emerged from the oven the first time I prepared it, and immediately after spooning it into the crockpot the second time.

Again, I pronounce the end result perfection scooped up with celery sticks; Bob a “not bad” scooped up with Fritos; and that, friends, means that it is a winner for you and your carnivorous pals.

Vegan Cheesy Baked Buffalo Chickpea Dip

2-8 ounce cartons vegan cream cheese

3/4 cup Frank’s hot sauce

1 cup vegan Blue “Cheese” or Ranch Dressing (I used Daiya brand, but you might try Just brand Ranch if you can’t find Daiya Blue “Cheese”)

1 cup shredded vegan cheddar, jack cheese or a combination (I used the So Delicious brand combo)

1 vegan no-chicken bouillon cube

2 large cloves garlic minced

2-15 ounce cans chickpeas, rinsed and drained

1 cup + 1/4 cup green onions, thinly sliced

Accompaniment: fresh celery sticks and/or chips

Preheat oven to 350 degrees.  Oil or spray a small baking or au gratin dish with non-stick cooking spray. (If using crockpot, don’t preheat, but do sray removable dish compartment eith nobstick spray.)  Place all ingredients except chickpeas and green onions in a large saucepan over low heat.  Stir frequently until cheeses melt and the mixture is thick and creamy.  Stir in chickpeas and 1 cup of the green onion.  If baking, spoon into prepared dish and bake for 20 minutes.  Remove from oven, sprinkle with reserved green onion, and serve immediately with fresh celery sticks and/or chips.

If using crockpot, spoon mixture into dish compartment of unit, set to medium, sprinkle with reserved green onion, cover, heat until bubbly, and then reduce setting to low.

Easy, Fast, Intoxicating Vegan Dan Dan Noodles
with 0 Calorie Noodles(!)

Yield: 2 servings (easily multiplies)

Vegan friends, prepare to have your pasta-loving lives changed.

Recently, I fell in love with vegan Dan Dan Noodles, both at V Street in Philadelphia and at Forbidden Bistro, our favorite Chinese restaurant here in Virginia Beach.

The problem for me and the reason I had probably never ordered Dan-Dan before is not finding vegan noodles, but all of the calories in any kind of noodle. The dish at V Street was the perfect “gateway” though, as it was a dimuntive tapas portion.  So when I noticed them on  the Forbidden Bistro menu,  I talked myself into ordering them, but I made more than one meal out of their dinner entree.

As for solving the problem of noodles and all of their calories, enter the amazing No-oodles, a thin, slightly curly, tofu-free shirataki. They have O CALORIES. That’s right. None. Nada. Zip.  Feel free to use any brand of shirataki in this recipe, including the type made with tofu, which has a few calories.  But I prefer the No-oodles, as their size and shape seems more Dan Dan-like than fetuccine-like.

Locally, I found No-oodles last weekend at a small, niche natural market called Organic Depot. After you read the list of what No-oodles don’t include–dairy, gluten, carbs, calories, etc.–you will wonder what they do include. And that is simple: water, yam flour, and lime.  Somehow, they are delicious and don’t break down when simmered.  But they lack nutrition of any kind, so you obviously have to be sure to enjoy them with accompaniments that are full of vitamins, minerals, and protein.

Dan Dan is traditionally served with julienne cucumbers, scallions, and lime.  But I subbed other ingredients that I had on had for the cuke: tricolor pear tomatoes and a delicious naturally fermented curry-flavored sauerkraut from Whole Foods that included cabbage, carrots, and cauliflower.  A vegan Kimchi would be really nice too.

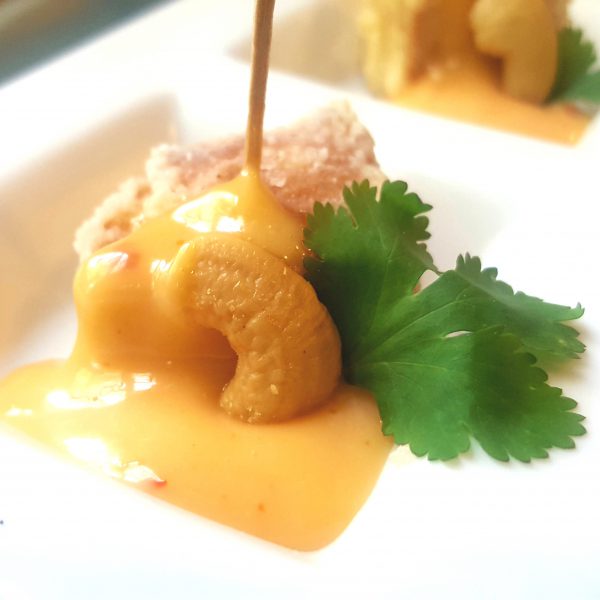
I researched recipes and ultimately decided to tweak one I found online from Food and Wine.  It, and the others, called for frying the peanuts for the sauce, which sounds delicious  ut messy.  So I simply chose already roasted peanuts, the same amount of oil, and skipped the frying step because oil isn’t a problem for me when the noodles have no calories.  Though I put peanuts in the sauce, as called for by tradition, I garnished tge dish with a few cashews because I love them so.

Honestly, I could eat this dish every day.  And it’s so easy, quick, and healthful that there’s no reason not to.  Hmm…

Note: if you want to make Dan Dan Noodles with Tofu, cut 14 ounces of firm or extra firm tofu into cubes and marinate in sauce for an hour or so before removing with a slotted spoon, sauteing in an oiled skillet–or baking/broiling–and spooning over the completed dish.

low

Dan Dan No-oodles

1/4 cup peanut oil (vegetable oil will work in a pinch)
1/2 cup roasted and lightly salted peanuts (or cashews)
1 small jalapeño, stem, ribs, and seeds removed (wash hands after) or 1 teaspoon Asian fire oil (hot, spicy oil)
1 large garlic clove, halved
1/2 teaspoon minced ginger
2 1/2 tablespoons soy sauce
2 tablespoons water
1 1/2 tablespoons rice vinegar

1 tablespoon fresh cilantro leaves or 1 teaspoon dried (optional)
1 tablespoon Sriracha chili sauce
1 tablespoon sugar (I like coconut sugar in this dish)
1 teaspoon Asian sesame oil
Sea salt to taste if needed (I don’t feel the dish needs extra salt, but it depends on your peanuts)
2-8 ounce packages No-oodles or Shirataki (if the latter is made with tofu, some calories will be involved), drained
Garnish (choose any or all): Julienne cucumber, Asian-compatible sauerkraut (I use a curry variety with cabbage, carrot, and cauliflower from Whole Foods) or Kimchi, sliced scallions, lime wedges, sesame seeds, lightly roasted and salted cashews, sprigs of mint or cilantro

Simply place all ingredients except pasta and garnishes in a food processor–I used my small processor for one recipe–and process until smooth.  Scrape into skillet and warm over low or medium heat.  Add No-oodles, stir gently, and simmer until noodles are heated through.  Serve in bowls topped with the garnishes of your choice; go for contrasts in color and texture.  Enjoy with chopsticks.

Vegan GLUTEN-FREE Chocolate Cookies
with White Chocolate Chips

Yield: 1 dozen cookies (recipe easily multiplies)

I am not sensitive to gluten–at least not in any noticeable way–so I created these cookies for two reasons: 1) for folks who are, and 2) because I have a summer crush that is quickly turning into a long-term affair with brown rice flour.  It lends to these cookies and, presumably, other baked goods, an ever-so-slight “sandy” texture that reminds me of the commercial Pecan Sandy cookies of my childhood.

To create this recipe, I started with my late mother, Sallie Gough’s, recipe for Chocolate Crinkle Cookies.  I adored both my mother and her cookies.  The recipe scribed in her distinctive hand-writing on a badly stained file card is a testament to the central role Chocolate Crinkles played in my young culinary life.  When my cousin, Dan, would make his annual summer visit from Texas to our home in Mississippi, baking these cookies–dark, almost black, balls rolled in powdered sugar that baked up into flat-ish white cookies with dark rivulets through them–was always on the itinerary along with box sliding on Sewer Hill and epic neighborhood games of Kick the Can.

Note that, since I am not gluten-sensitive, the “trace” of gluten that “may” have been present in my vegan white chocolate chips did not pose a problem for me.  If you are baking for gluten-free cookie lovers, make sure a possible trace is not an issue or look for a brand “without a trace.”

1 cup brown rice flour

1 cup granulated sugar

1/4 cup cocoa powder

2 teaspoons baking powder

1/2 teaspoon sea salt

1/2 cup apple sauce (this flavor is not detectable)

1/4 cup vegetable oil (canola or sunflower is fine)

1 teaspoon vanilla

1/2 cup vegan, gluten-free white chocolate chips (may subsitute vegan, gluten-free chocolate chips)

12 pecan halves.

Preheat oven to 350 degrees.  Line cookie sheet with parchment paper or Silpat.  In a large bowl, whisk together all dry ingredients except white chocolate chips and pecan halves.  Make a well in the center and pour in applesauce, vegetable oil, and vanilla.  Whisk together wet and dry ingredients until completely combined and the consistency of any other cookie dough.  Stir in chips.  With a small scoop or tablespoon, scoop up rounded tablespoons of dough and place about 3 inches apart on prepared cookie sheet.  Top each with a pecan half, pressing down gently to ever-so-slightly flatten the cookie.  Bake 12 minutes or until completely set.  Remove from oven and allow to cool completely on cookie sheet placed on wire rack. Store in airtight container.


Best Vegan “Tuna” Salad
that Actually Tastes of the Sea

Yield: 4 to 6 servings

Let’s be honest: chickpeas do not taste like tuna. They simply don’t.

Maybe it’s been so long since we all tasted tuna that something vaguely the same color and texture mashed up in mayo will do the trick for some.

Not for this gal.

I have made chickpea tuna on several occasions before and been unimpressed with my efforts. But I had made an (exquisite!) aquafaba chocolate mousse on Saturday for a party that evening and had two cans of chickpeas left over.  I also had a craving. So I got to work. Though, in truth, this mock tuna salad is really no work.

In the process, I discovered 5 “secrets”:

Nori powder and soy sauce are critical for that briney hint of the sea. Dulce flakes simply don’t pack enough ocean punch.

Tartar sauce in place of mayo tricks the brain into thinking “sea.”  (I prefer tartar–with fresh dill, tarragon, sweet pickle relish and juice, and rice wine vinegar–made from my low calorie/ high flavor Blooming Platter Mayo, but a commercial brand of tartar, like Vegenaise–or commercial mayo made into tartar–would also be great in flavor)

Pickle relish lends that tuna sandwich-of-my-youth flavor.

Green onion provides a toned down reference to the diced white onion I loved in tuna salad as a kid.  And it also somehow hints at the ocean.

Well-mashed chickpeas are a must for a close texture approximation.

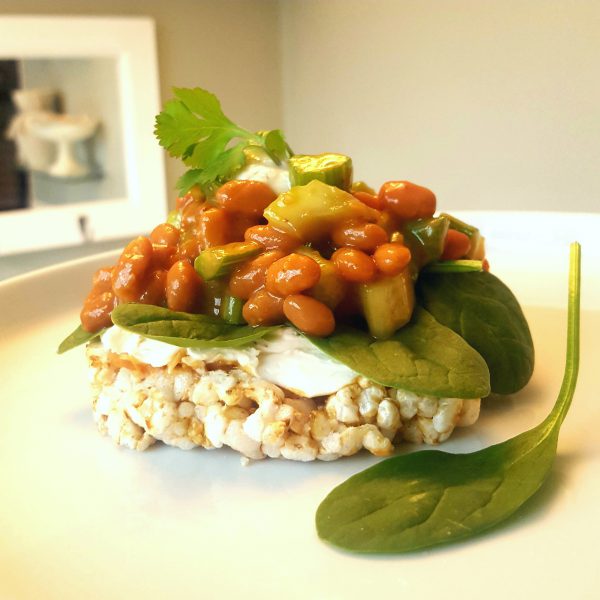
And there you have it.  As for serving, I haven’t eaten much bread in years, but if nothing other than a sandwich will do, go for it. I love the salad, instead, piled on a rice cake even though I am not gluten sensitive. I crave that low-calorie texture.

And, though I certainly didn’t eat tuna salad with fresh baby spinach as a child, I really love the color that the spinach leaves add to the whole presentation, as well as the flavor, texture, and nutrition.

For garnish, dill is a favorite flavor regardless, but it is especially delightful with tuna, so a little dab of additional mayo and a sprig of dill crowns this jewel. I just happened to have the baby tricolor pear tomatoes, so I popped a couple of those on the side for the most satisfying dinner on every level.

2-15.5 ounce cans chickpeas, very well drained but unrinsed, and coarsely mased with a fork

4 to 5 tablespoons vegan tartar sauce (you can use mayo, but tartar tricks the brain)

2 tablespoons sweet pickle relish (dill relish is fine if you don’t care for sweet)

2 large green onions, thinly sliced, both white and green parts

1 teaspoon soy sauce or Tamari

I teaspoon Nori powder (purchased or place 1 broken sheet Nori in spice or coffee grinder and pulverize)

Sea salt to taste

1/4 teaspoon freshly ground black pepper

Best Vegan Watermelon-Tomato-Bell Pepper Gazpacho

Yield: 6 to 8 servings

For a long time, I thought I didn’t care for gazpacho. And I don’t like the rich, tomato-y kind that tastes like a Bloody Mary.

But this ain’t that!  I adore my quick, light version that combines watermelon, tomato, bell pepper, cucumber, onion, and garlic with some delicious spices and a bit of lime juice for that needed little zip.

If you grew up in the South, you might be familiar with salting the flesh of a watermelon before eating it. Somehow it makes the fruit taste even sweeter. So, avoid skimping on the salt. But at the same time, don’t over-salt. Finding that sweet spot, no pun intended, is essential to a soup with lively flavors.

Food scarcely gets more beautiful, more nutritious, or more easy to put together than this one-processor meal. It is low-calorie, includes no added fat, and is filling without being heavy. It is low in protein, however, so you might pair it with chickpea salad or marinated and grilled tofu or tempeh.

And it is great stand-up cocktail party food because, served in glasses, guests can sip as they mingle.

1.5 pounds seeded watermelon cubes

1 large cored tomato, cut into chunks (I like a gnarly heirloom variety)

1 large seeded orange or yellow bell pepper (red would be fine too)

1-8 inch cucumber, cut into chunks (I leave peel on and seeds in for nutrition)

1 medium yellow onion, peeled and cut into chunks

3 to 4 large cloves garlic, peeled and halved

Juice of one large lime

Optional: 1/2 cup loosely packed cilantro leaves and tender stems

2 teaspoons ground cumin

1/2 teaspoon dried oregano

1/2 teaspoon smoked paprika

1 teaspoon sea salt or to taste

1/4 teaspoon freshly ground black pepper

Optional garnishes:  roasted or grilled corn kernels; diced tomato, bell pepper, or cucumber; minced jalapeno; pine nuts, toasted or not; vegan sour cream; sprigs of cilantro; a sprinkling of smoked paprika; and/or slices of lime, cut from edge to center, and hung on rim of martini glass, if using.

Place half of fruit and vegetable chunks and all of lime juice, spices, and optional cilantro in the bowl of a large food processor and process until as smooth as you want. Pour into a large bowl. Process remaining fruit and vegetables to the same consistency, pour into bowl, and stir well to completely combine. Chill for at least a couple of hours and serve in cups, bowls, or glasses for spooning or sipping, garnished as desired.


Blooming Platter Vegan Mayo
2 Delicious Low-Cal and Low Fat Versions

Ah, vegan mayo.  I love it so.  But, alas, at 100 calories per tablespoon–sadly, no different than egg- and oil-based mayo–I don’t allow myself to indulge nearly as much as I would like.  Or I end up having to log extra miles just to burn it up.  Enter Blooming Platter Mayo which I created in 2010 for The Blooming Platter Cookbook: A Harvest of Seasonal Vegan Recipes.

My Mayo, made with regular tofu, contains only 10 calories per tablespoon so you can slather it on to your heart’s desire.

My dear omni friend, Allison Price, attests to keeping a container in her fridge at all times and I suggest you do the same.  I love “Just” brand mayo, Vegenaise, and all the rest.  But both the calories and the price tag are a bit too high for me.

This mayo blends up in a few seconds with either 12 very basic ingredients or just 6 .  A dozen may sound like a lot, but I tested and tasted, carefully balancing all of the flavors to create what I considered to be the perfect balance.

BUT, everyone’s palate is different–and mine has changed–so have created a second version that usrs half as many ingredients and I think I prefer.

My cherished partner, Bob eats like a 10 year old midwestern boy–and will only eat Duke’s “real” mayonnaise.  So, with a jar in our fridge, I tasted miniscule amounts of it for comparison as I was tweaking the recioe from my cookbook.  I ended up using 2 tablespoons of apple cider vinegar, as opposed to the original recipe’s 2 teaspoons, as a result.

I also added another pinch (1/8th teaspoon) of sweet paprika for a total of 1/4 teaspoon.  And, since the cookbook was published, I have discovered black salt (which is really grayish pink) with its distinctive sulphery and eggy taste.  So I used that in place of the original 3/4 teaspoon of salt, but I added some additional sea salt necessitated, I thought, by the greater amount of vinegar.  Find black salt online or in Indian markets.

However, wondering just how few ingredients I could get away with and still absolutely love the taste as much, if not better, I made another batch. For now, this will be my go-to recipe and it follows my tweaked original.

Here’s to a long-lasting love affair with mayo whixhever version you choose!

Blooming Platter Vegan Mayo

12 ounces extra-firm Silken tofu OR 14 ounces firm regular tofu + 2 tablespoons water

2 tablespoons apple cider vinegar

1 tablespoon fresh lemon juice

1 teaspoon granulated sugar

1 teaspoon nutritional yeast

3/4 teaspoon black salt or sea salt

1/2 teaspoon garlic powder

1/4 teaspoon onion powder

1/4 teaspoon sea salt

1/4 teaspoon freshly ground black pepper

1/8-1/4 teaspoon sweet paprika

1/8 teaspoon turmeric

Process all ingredients together in food processor until thick and very creamy, scraping down sides of bowl as necessary and adjusting seasoning if necessary.  Store in an artight containter in the refrigerator.


Blooming Platter 6-Ingredient Vegan Mayo (not counting salt)

12 ounces firm or extra-firm Silken tofu

1 tablespoon white vinegar

Juice of 1/2 a large lemon

1/2 teaspoon garlic powder

1/2 teaspoon mustard powder

1/2 teaspoon smoked paprika

1/2 teaspoon sea salt or to taste (delicious with about half black salt, if you have on hand, for a sulphery “eggy” flavor)

Process all ingredients together in food processor until thick and very creamy, scraping down sides of bowl as necessary and adjusting seasoning as desired.  Store in an airtight container in the refrigerator.

Vegan Flax & Chia Seed Pancakes
Oil-Free and Oh-So-Quick & Easy

Yield: 1 serving of 4 silver dollar-sized vegan pancakes (recipe easily multiplies)


With more ground chia seeds and flax seed meal than I knew what to do with–courtesy of a friend’s church pantry where the higher end donations from grocery stores apaprently aren’t what the needy need–I wondered what would happen if I used equal parts flour and flax/chia seeds in a vegan pancake recipe, as opposed to the typical 2 to 3 tablespoons per cup or so of flour.

Nutritious deliciousnes is what happens!

Enjoy these low calorie, oil-free wonders for a quick, easy, and satisfying breakfast that refuses to weigh you down.

1/4 cup whole wheat flour or whole wheat pastry flour

2 tablesoons ground chia seeds

2 tablespoons flax seed meal

2 teaspoons Truvia (stevia sweetener) or the sweetener of your choice to taste

1/4 teaspoon baking powder

1/4 teaspoon baking soda

6 tablespoons unsweetened soymilk or other non-dairy milk

1/8 teaspoon almond extract

1/8 teaspoon vanilla extract

Optional Toppings:  maple syrup, vegan sour cream or nut butter, chopped nuts, fruit, etc.

Preheat skillet lightly sprayed with non-stick spray over medium heat. In a small bowl, whisk together all ingredients except toppings. Divide batter into four silver dollar-sized pancakes in skillet, gently smoothing the tops.  Cook a couple of minutes or until set around the edges and starting to turn golden brown on the under side (you can peek carefully). Carefully flip each pancake with a spatula and continue cooking on the opposite side until puffed, golden, and completely cooked through.  Adjust heat as necessary. Serve with your choice of toppings.

325 calories per serving of 4 silver dollar pancakes (if made with stevia sweetener and unsweetened soymilk; does not include syrup and walnuts)

Vegan Parmesan Crisps
Yes!

Yield: 4 crisps (recipe easily multiplies, but they are rich)

Yesterday, I purchased a new carton of Follow Your Heart brand vegan parmesan for a dinner party last night. But about 3 tablespoons remained in the previous carton. Wanting to save room in the fridge, I was about to combine them when the Parmesan Crisp idea struck.

I was afraid of a failed gooey or frizzled up failure, but 3 tablespoons wasn’t a huge gamble.  Wow!  I needn’t have been concerned. The results were company-worthy.

I squirted a little Just brand vegan Ceasar dressing on top and garnished with a sliver of marinated red pepper and a sprig of rosemary, as these are perfectly firm enough to pick up, sturdy enough for a topping, and both crispy and chewy.

They are delightful and deeply satisfying.

Vegan Parmesan Crisps

3/4 cup Follow Your Heart brand Non-Dairy Parmesan Cheese (it is sold shredded)

Toppings and garnishes of choice

Lightly spray a skillet with nonstick spray and place over medium heat. Using 3 tablespoons each of the parmesan cheese, make 4 mounds and then carefully  press them out with your fingers or a fork into a fairly flat pancake shape. Cook a couple of minutes or until cheese melts, holds together in a disk, becomes crispy around edges, and is lightly browned on underside. Flip with a spatula and cook just another 20 or 30 seconds. They should flip very easily. *Adjust temperature as necessary.  You may want to make one test crisp to determine correct time and temo on your range before making a batch.  Top as desired or offer options and let guests top their own.

*Note: I have a very powerful new range and what used to require medium-high heat, now takes medium or even low heat.


Best Vegan Plain New York Style Cheesecake
Adapt a Million Ways!

Yield: 8 to 12 servings

I have loved baking–and now vegan baking–for as long as I can remember:  both the art and the science of it.  Experimentation and solving culinary puzzles have kept the excitement in the relationship.

This New York Style cheesecake represents a veganization triumph.  I think my mother–who considered her dairy-based recipe the iconic version, the one to which all others were compared–would be proud.  Or maybe, like the omnivorous Bob, she would say, “Not bad.”  Though I don’t think so.

Please note two things: 1) while I love demerera, coconut and other less-processed sugars as much as the next gal, this recipe needs white granulated sugar for it’s pure color and clean taste; and 2) I use coconut cream in this recipe and can’t detect a pronounced coconut flavor, but feel free to substitute a non-dairy creamer of your choice.

Crust:

4 cups whole vegan gingersnap cookies (the crispy/crunchy kind), shortbread cookies, or graham crackers broken into cookie-sized pieces

1/2 cup nuts (pecans, almonds, etc.) or another 1/2 cup cookies; graham crackers

Optional: 1/4 cup granulated sugar

1/2 cup vegan butter, melted

Pulse cookies or graham crackers in a food processor until coarse crumbs are formed.  Add optional nuts and sugar and continue pulsing until finer crumbs are formed.  Drizzle in butter and pulse just until moist crumbs are formed.  Distribute mixture into the bottom of an 8- or 9-inch springform pan and press evenly onto the bottom and 2 inches up the sides of the pan.  Freeze while you prepare filling.

Filling:

14 ounces firm tofu, drained

16 ounces vegan cream cheese (I use Tofutti brand)

1 cup granulated organic white sugar

3 tablespoons cornstarch

1 cup thick coconut milk (I use So Delicious Culinary Coconut Cream purchased at Whole Foods)

Juice of 1/2 to 1 whole large lemon (taste after adding 1/2)

1 teaspoon vanilla extract

1 teaspoon almond extract

Topping:

16 ounces or 2 cups vegan sour cream

1/4 cup organic white sugar

1/2 teaspoon vanilla extract

1/2 teaspoon almond extract


Garnish:

Fresh chopped fruit or berries, macerated in sugar and liqueur (like Bailey’s Almande) or not; the dessert sauce of your choice (e.g. chocolate, salted caramel, etc.); and fresh mint sprigs

Preheat oven to 325 degrees.  Rinse and wipe out bowl of food processor.  Process tofu and cream cheese until smooth.  Add all remaining filling ingredients and continue processing until creamy and silky smooth.  Pour into frozen crust and gently smooth top.  Place cheesecake on a baking sheet and bake for 1 hour and 20 to 30 minutes or until set, very lightly browned around edges, and slightly jiggly only in the very center.  During last five minutes of baking, whisk together topping ingredients in a medium bowl until completely combined.  Turn off oven, slide out oven rack, gently spoon topping over cheesecake and seal to edges, and slide rack back in.  Open oven door halfway, and allow cheesecake to cool completely in the oven to avoid cracking and sinking, which will take about 3 hours.  Chill for an hour, uncovered, and then chill for at least another hour, covered.  (This will prevent condensation from dripping on surface of cheesecake.)  When ready to serve, run a knife around the edge of the cheesecake, remove it from the pan and place it on a serving platter.  Serve in slices garnished as desired.

Related Posts Plugin for WordPress, Blogger...